An Afternoon in Chicago

I love Chicago and this past weekend I visited it for some fun with friends who live in the city. I wanted to share my Saturday afternoon activities with you in a post because I highly recommend recreating it yourself! It was the perfect amount of fun, food and relaxation.

I headed into the city from Lansing on the Amtrak. If you’ve never traveled by train and this is an option in your area, I highly recommend it. Mainly because I love having the entire 3.5 to 4 hours to read, watch Netflix, listen to music etc. I love it because you arrive right downtown. It would take me about the same amount of time to drive it but Michigan winters are too unpredictable for me to trust that the roads will be safe and clean to drive on. Plus I hate having to deal with a car in the city. While I arrive Friday, I want to highlight Saturday afternoon because my good friend Nick killed it when it came to planning a run day.

IMG_7788.JPG

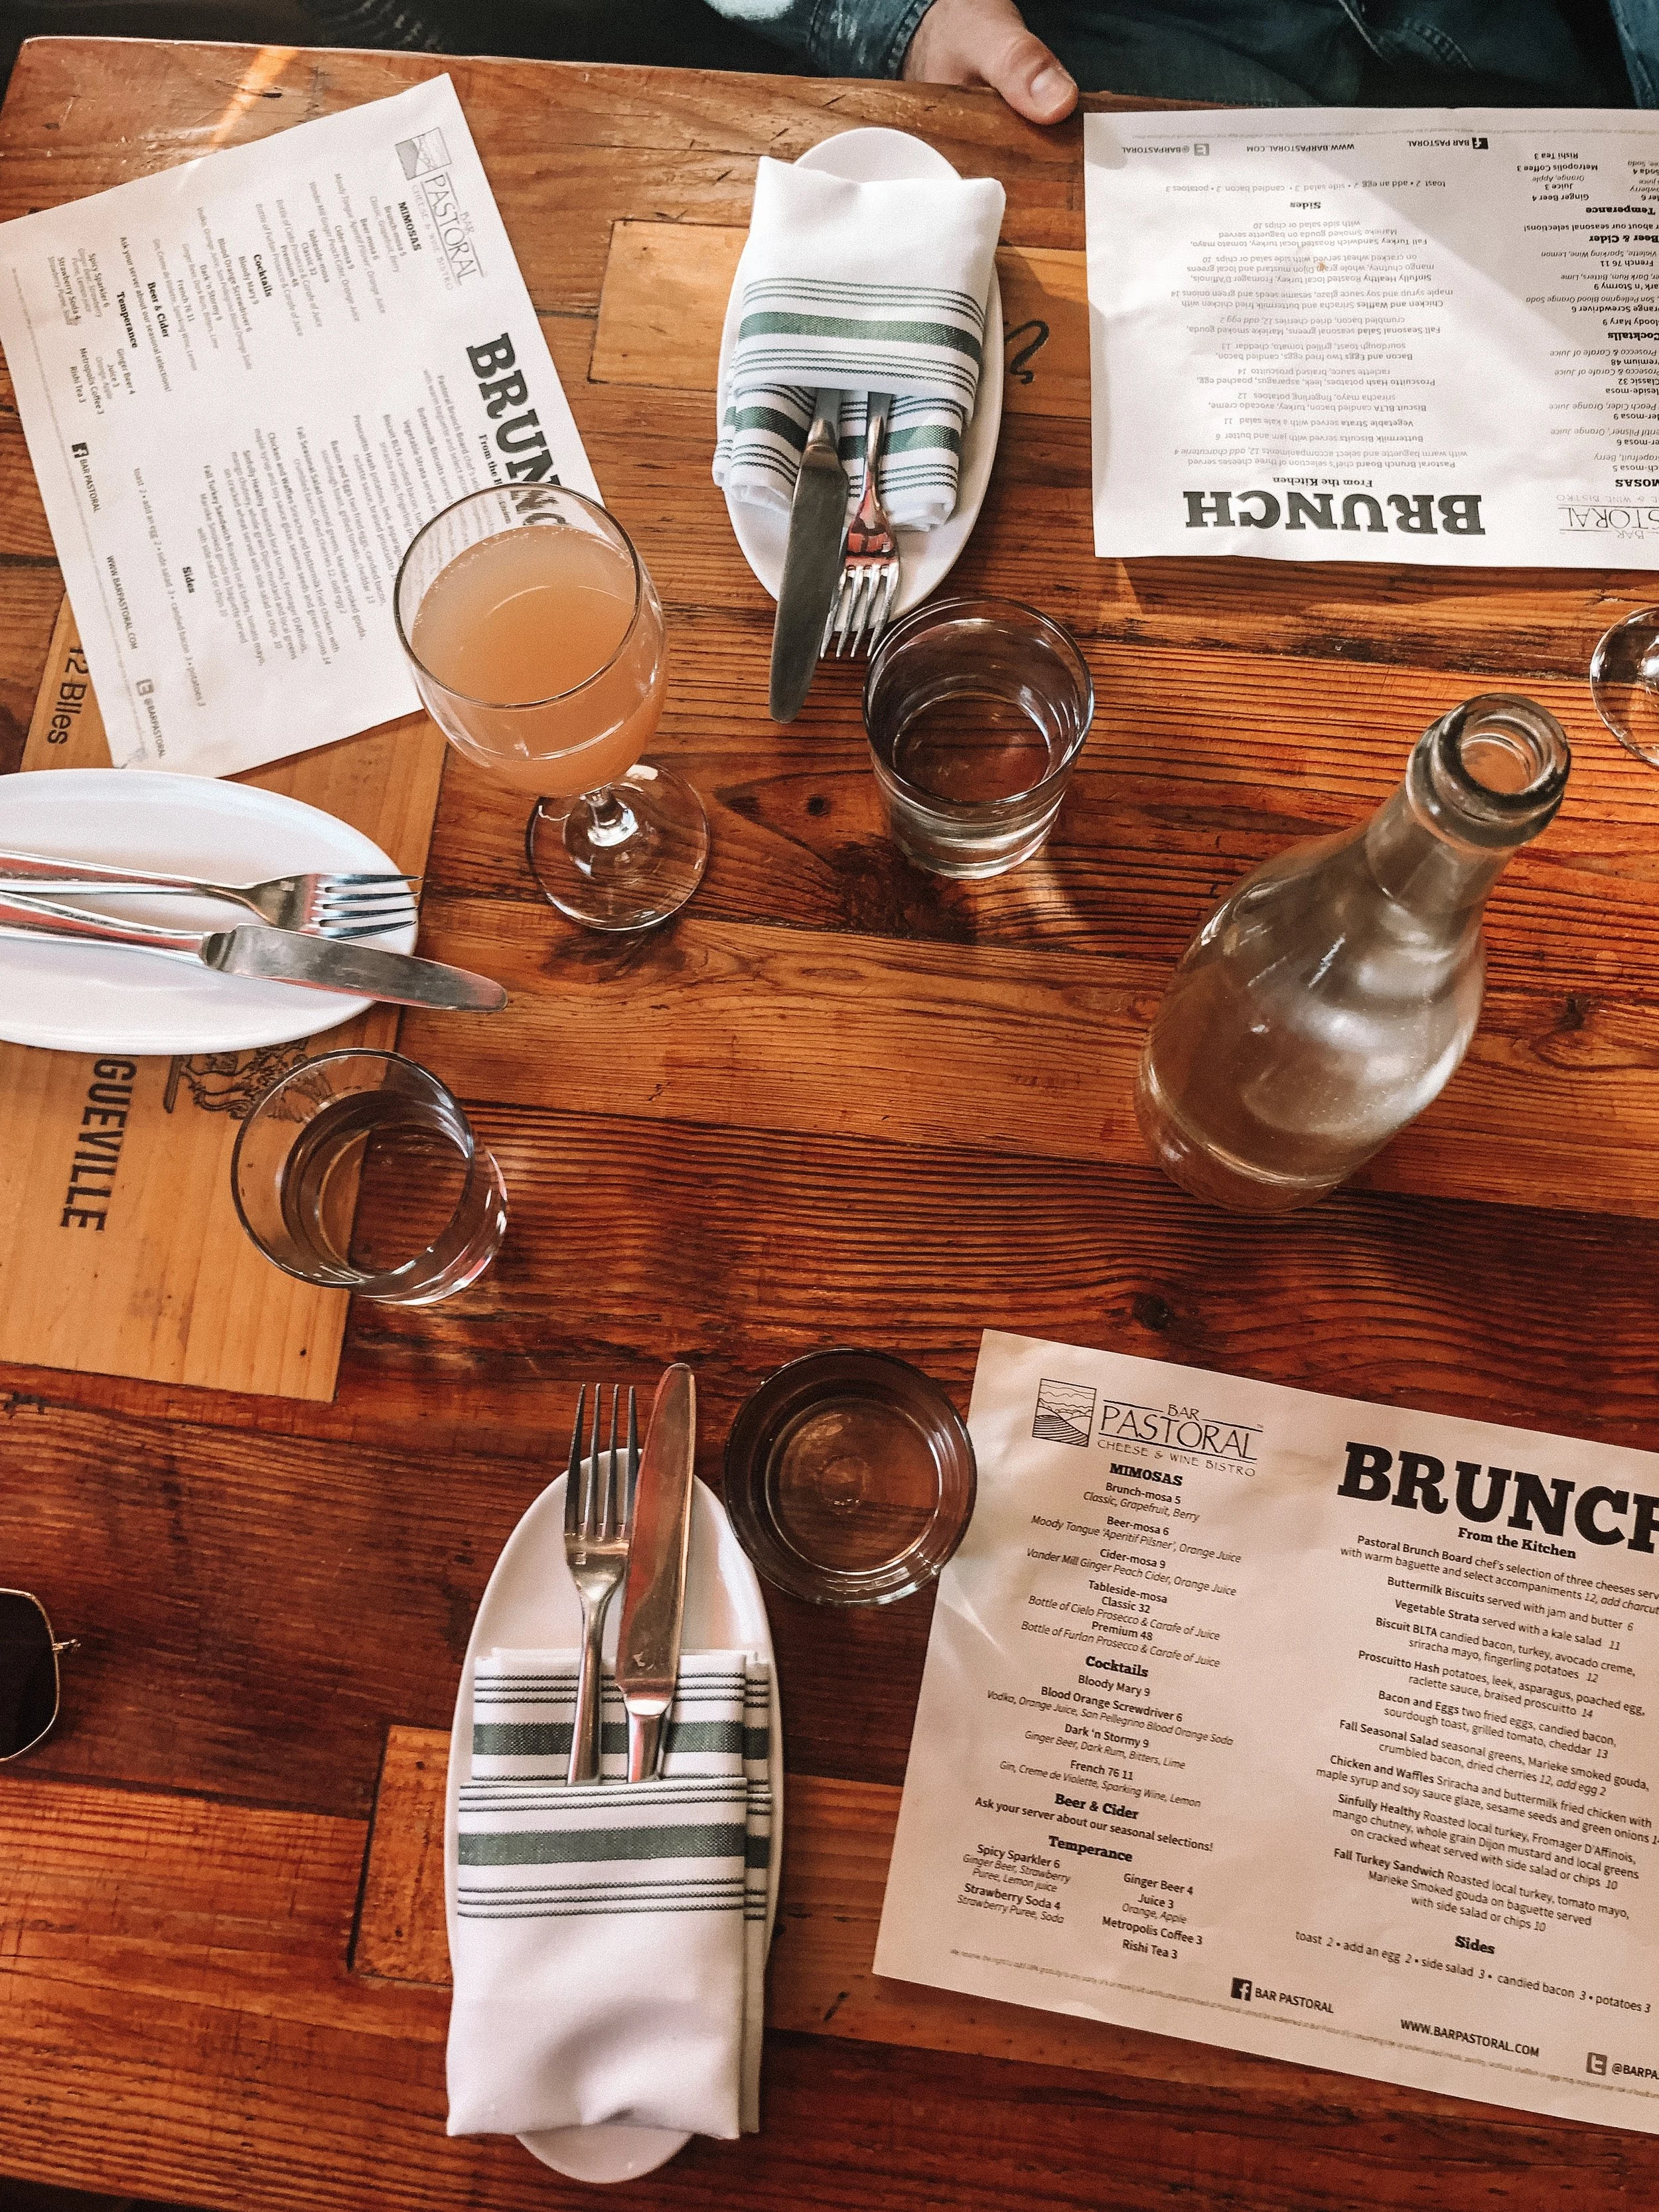
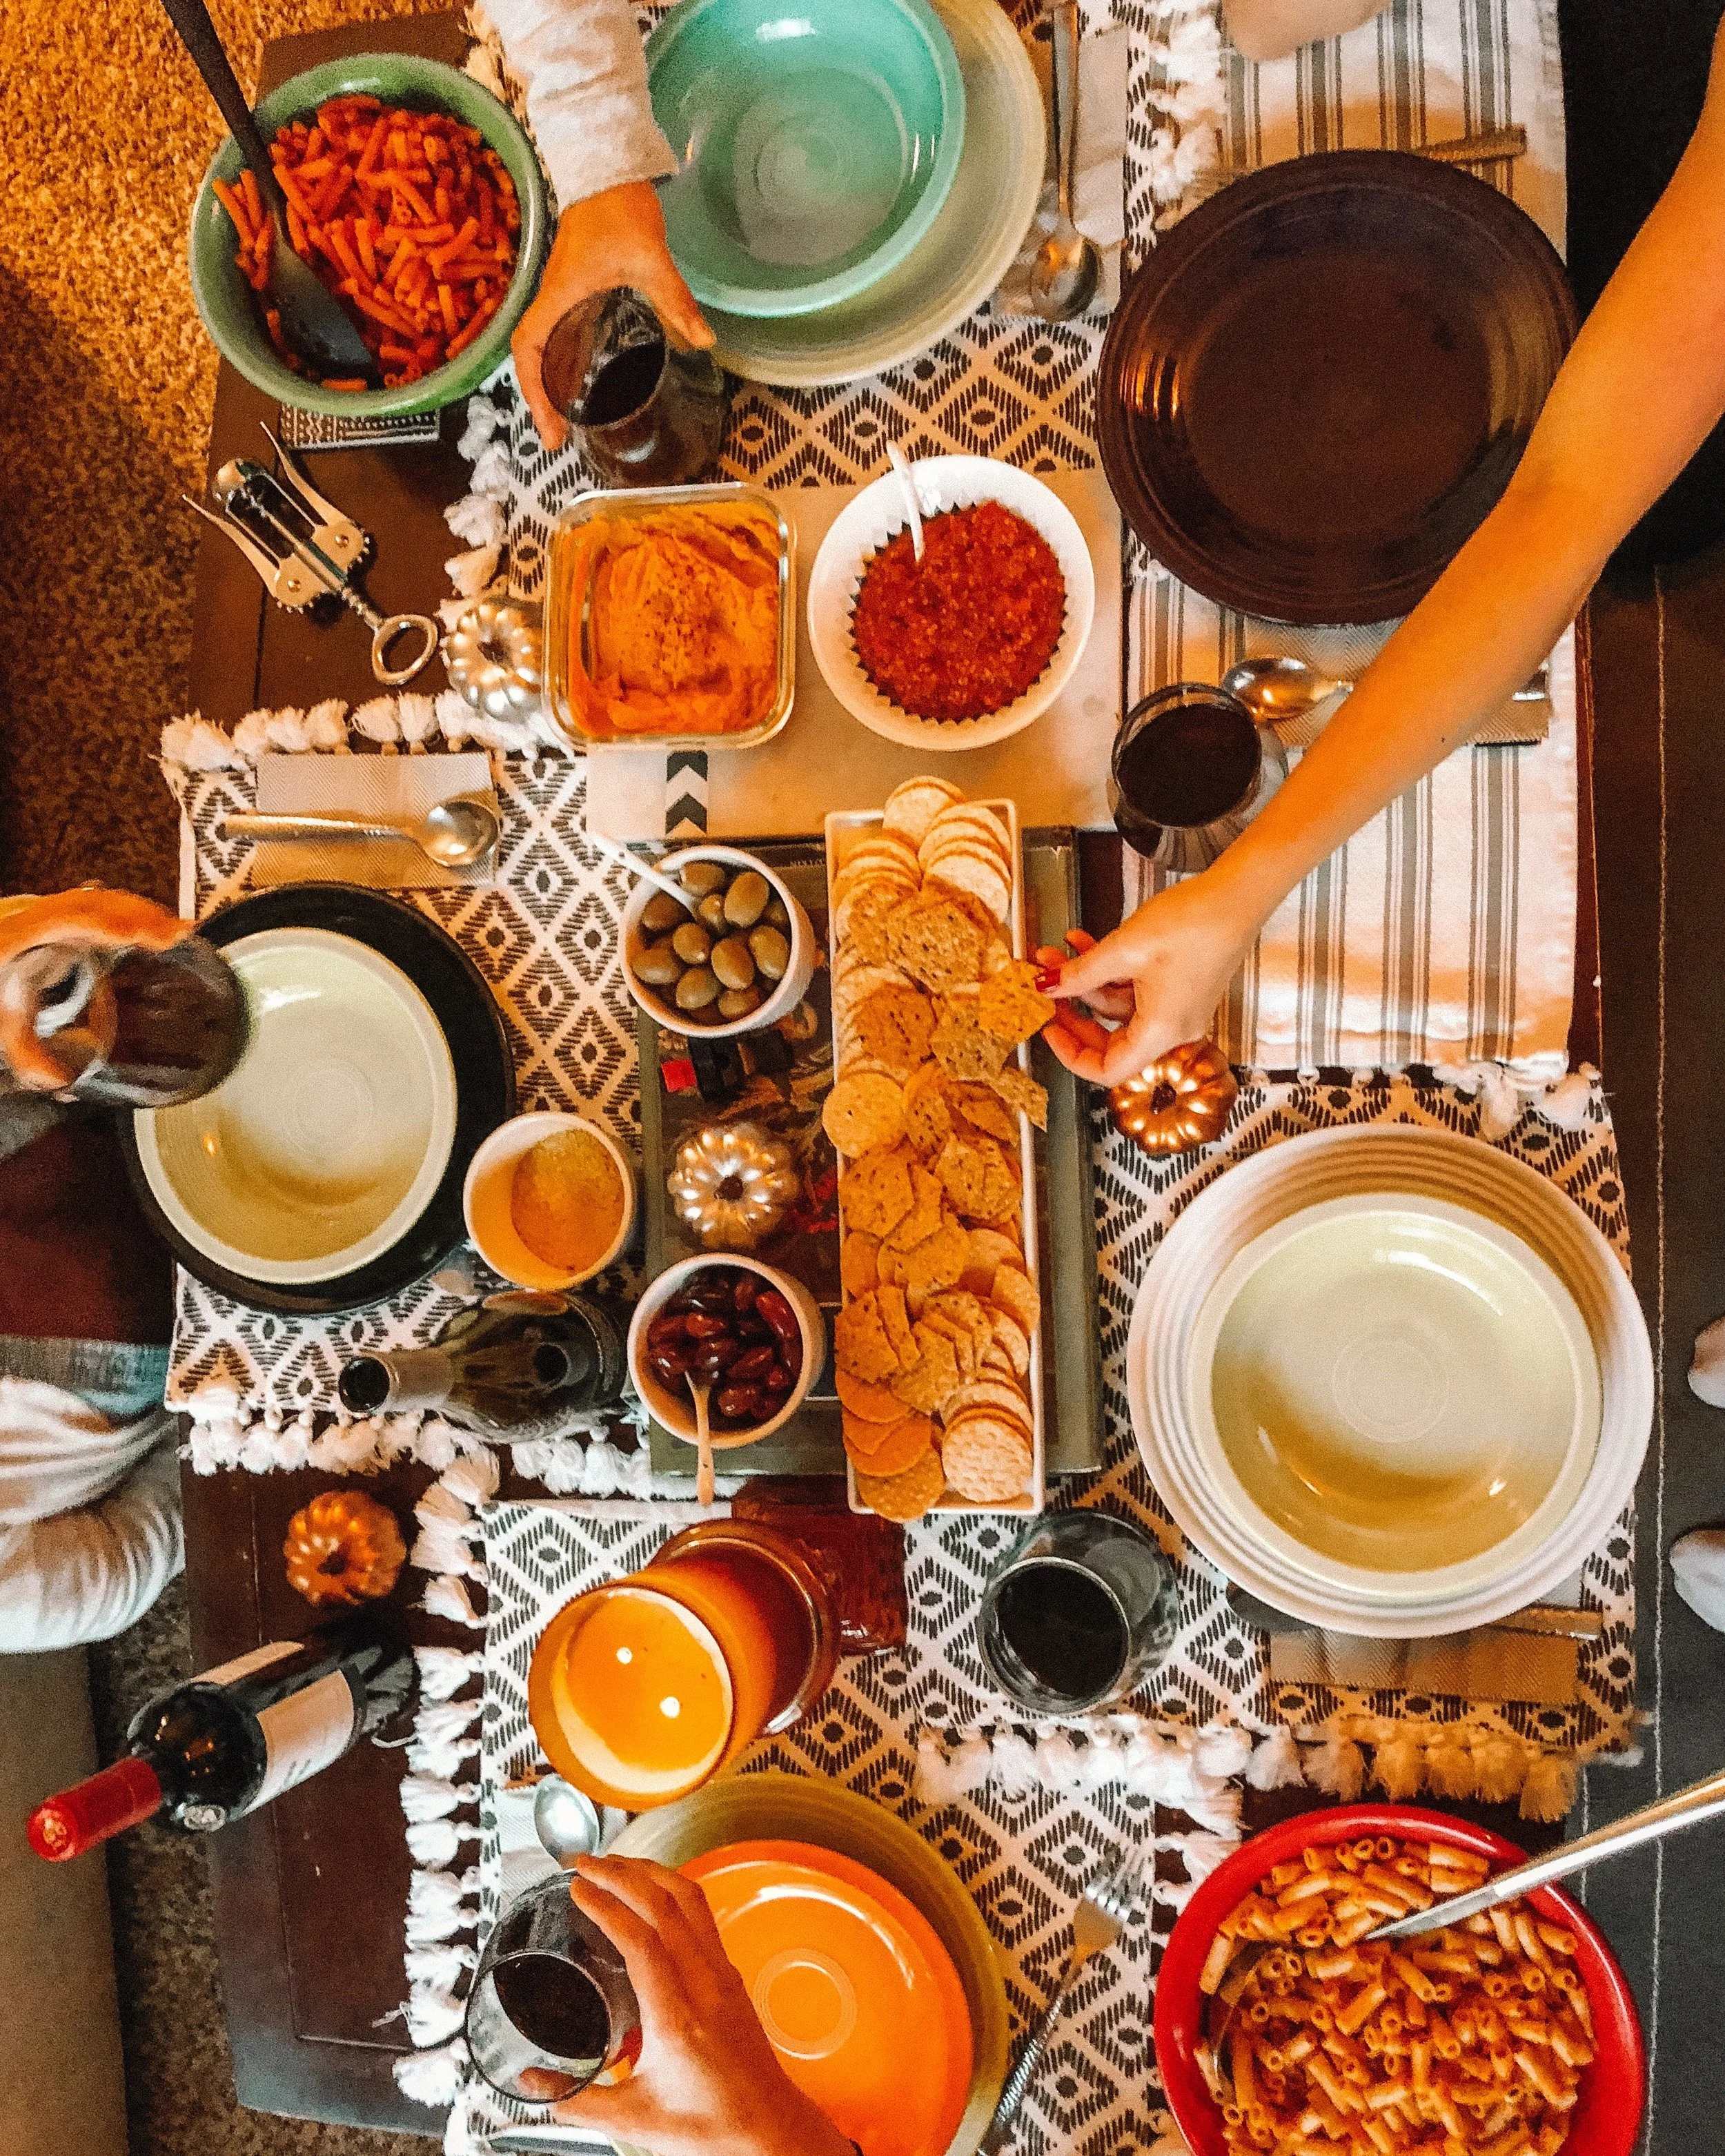
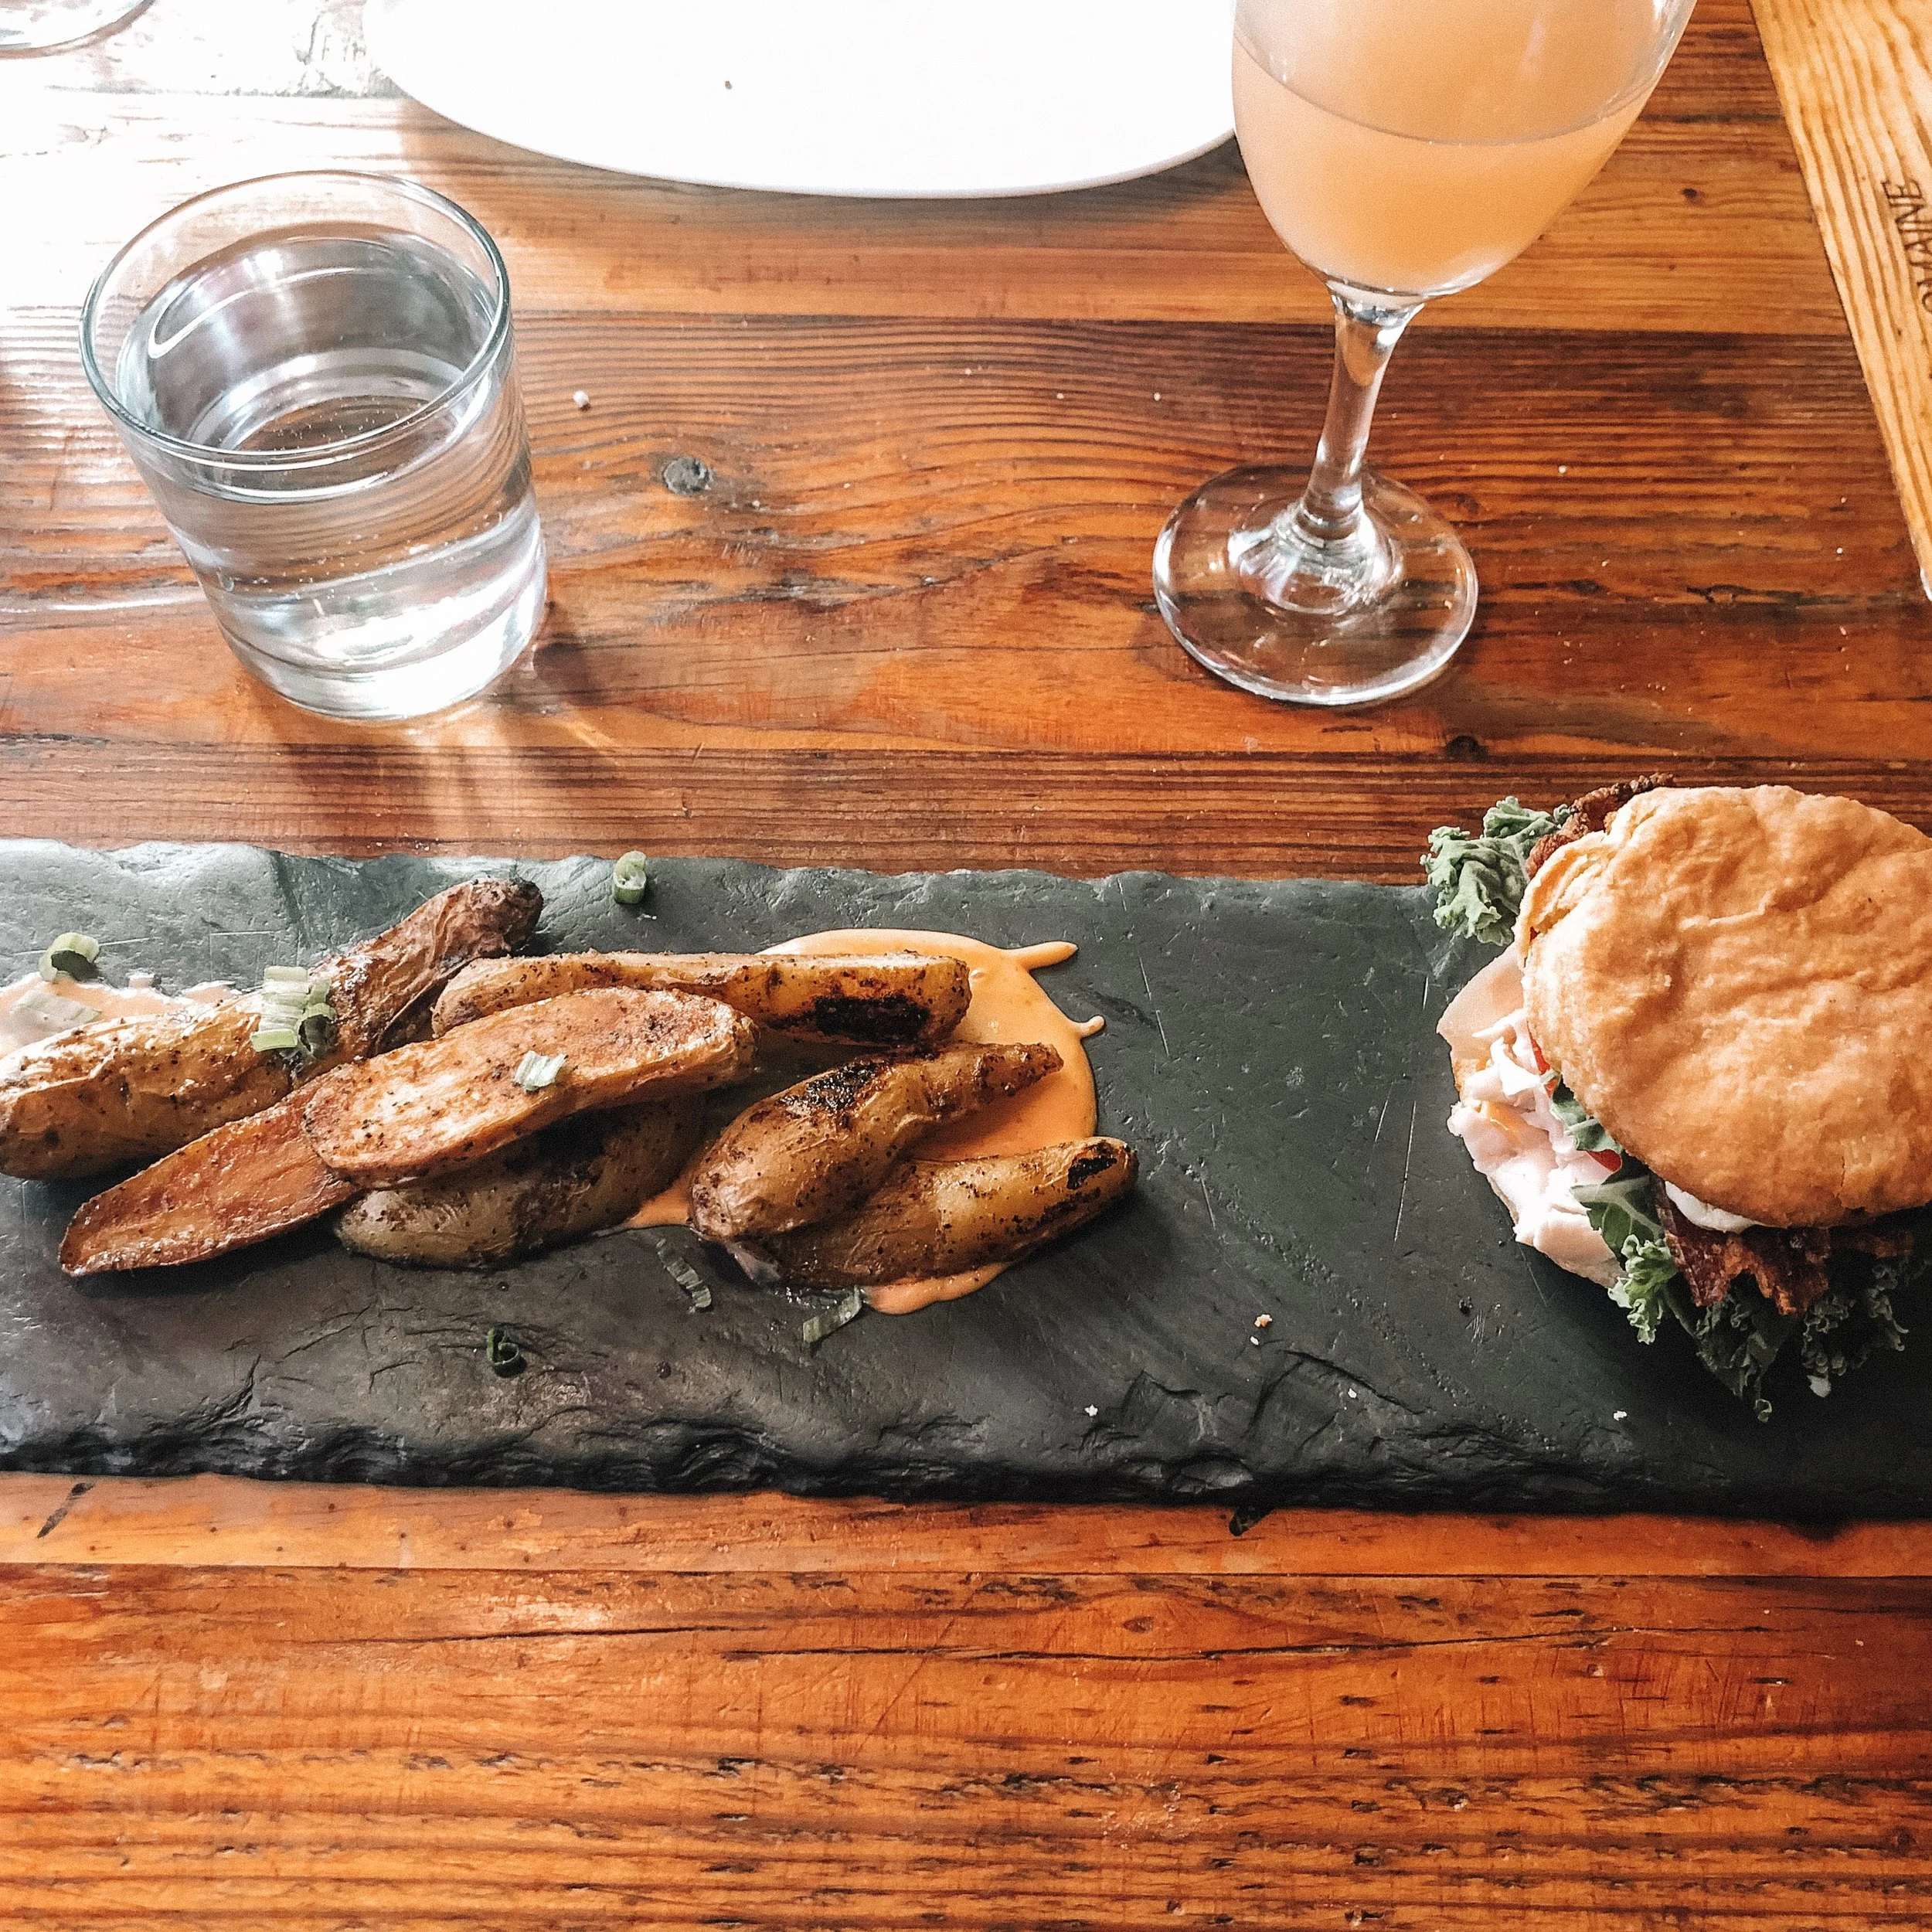
First off, we headed to Bar Pastoral in Lakeview for brunch. It was a cozy space decorated for Christmas and we got to sit in a little bench nook in one of the front windows which is my absolute favorite. When the grapefruit mimosas arrived, I knew we were off to a great start to our day.

We split this beautiful charcuterie board of meats, cheese, spreads, and bread and boy was it delicious! Next door to the restaurant is Pastoral, where you can buy wine, meats, cheeses, spreads and more which was fun to visit after our meal. For my meal I chose the Biscuit BLTA which was divine! It was a turkey, bacon, avocado crema, & tomato sandwich on a biscuit with amazing potatoes on the side. The sriracha mayo that the potatoes came in was unreal too. I was in heaven. (In case you’re wondering “Wait a minute Andrea. I thought you couldn’t eat Gluten…?”, you are not wrong! Haha! I have medicine I can take to be able to tolerate gluten and not get sick, but I only use it in situations like this when I’m not at home and want to enjoy a meal out). Highly suggest having brunch at Bar Pastoral, and I’d even gamble and say their dinners are amazing too! Everything that came to our table was so delicious!

IMG_7790.jpg
IMG_7824.JPG

After brunch, we walked down to the grocery store Mariano’s where I got an espresso shot to negate my after-brunch coma I was starting to sink into. The espresso was awesome and my friend Nick mentioned that he prefers their coffee to Starbucks. Once I was refueled we headed over to the wine bar for a glass of wine. They offer a wine of the month and you can get a glass of the special for $3! It was a really delicious Pinot Noir. I wish I had remembered to get the name of the wine, but I completely forgot. Blame the brunch.

Next, we hopped in an Uber and went to a location I had been DREAMING of. Nick just knows me so well and planned for us to head into the amazing Restoration Hardware location in the Gold Coast neighborhood. I cannot even tell you how long I have wanted to go here, so I basically screamed when I found out that’s what we were doing. Walking through the beautifully renovated old building with a glass of wine in hand is a complete experience. There are 5 floors of stunning rooms and it doesn’t feel like a store. I can’t wait to go back in the summer and go out on the rooftop too! I especially loved the atrium in the center that has extremely high ceilings, a beautiful fountain and so much greenery. Next, I think I’l definitely eat a meal at the cafe.

IMG_7776.JPG

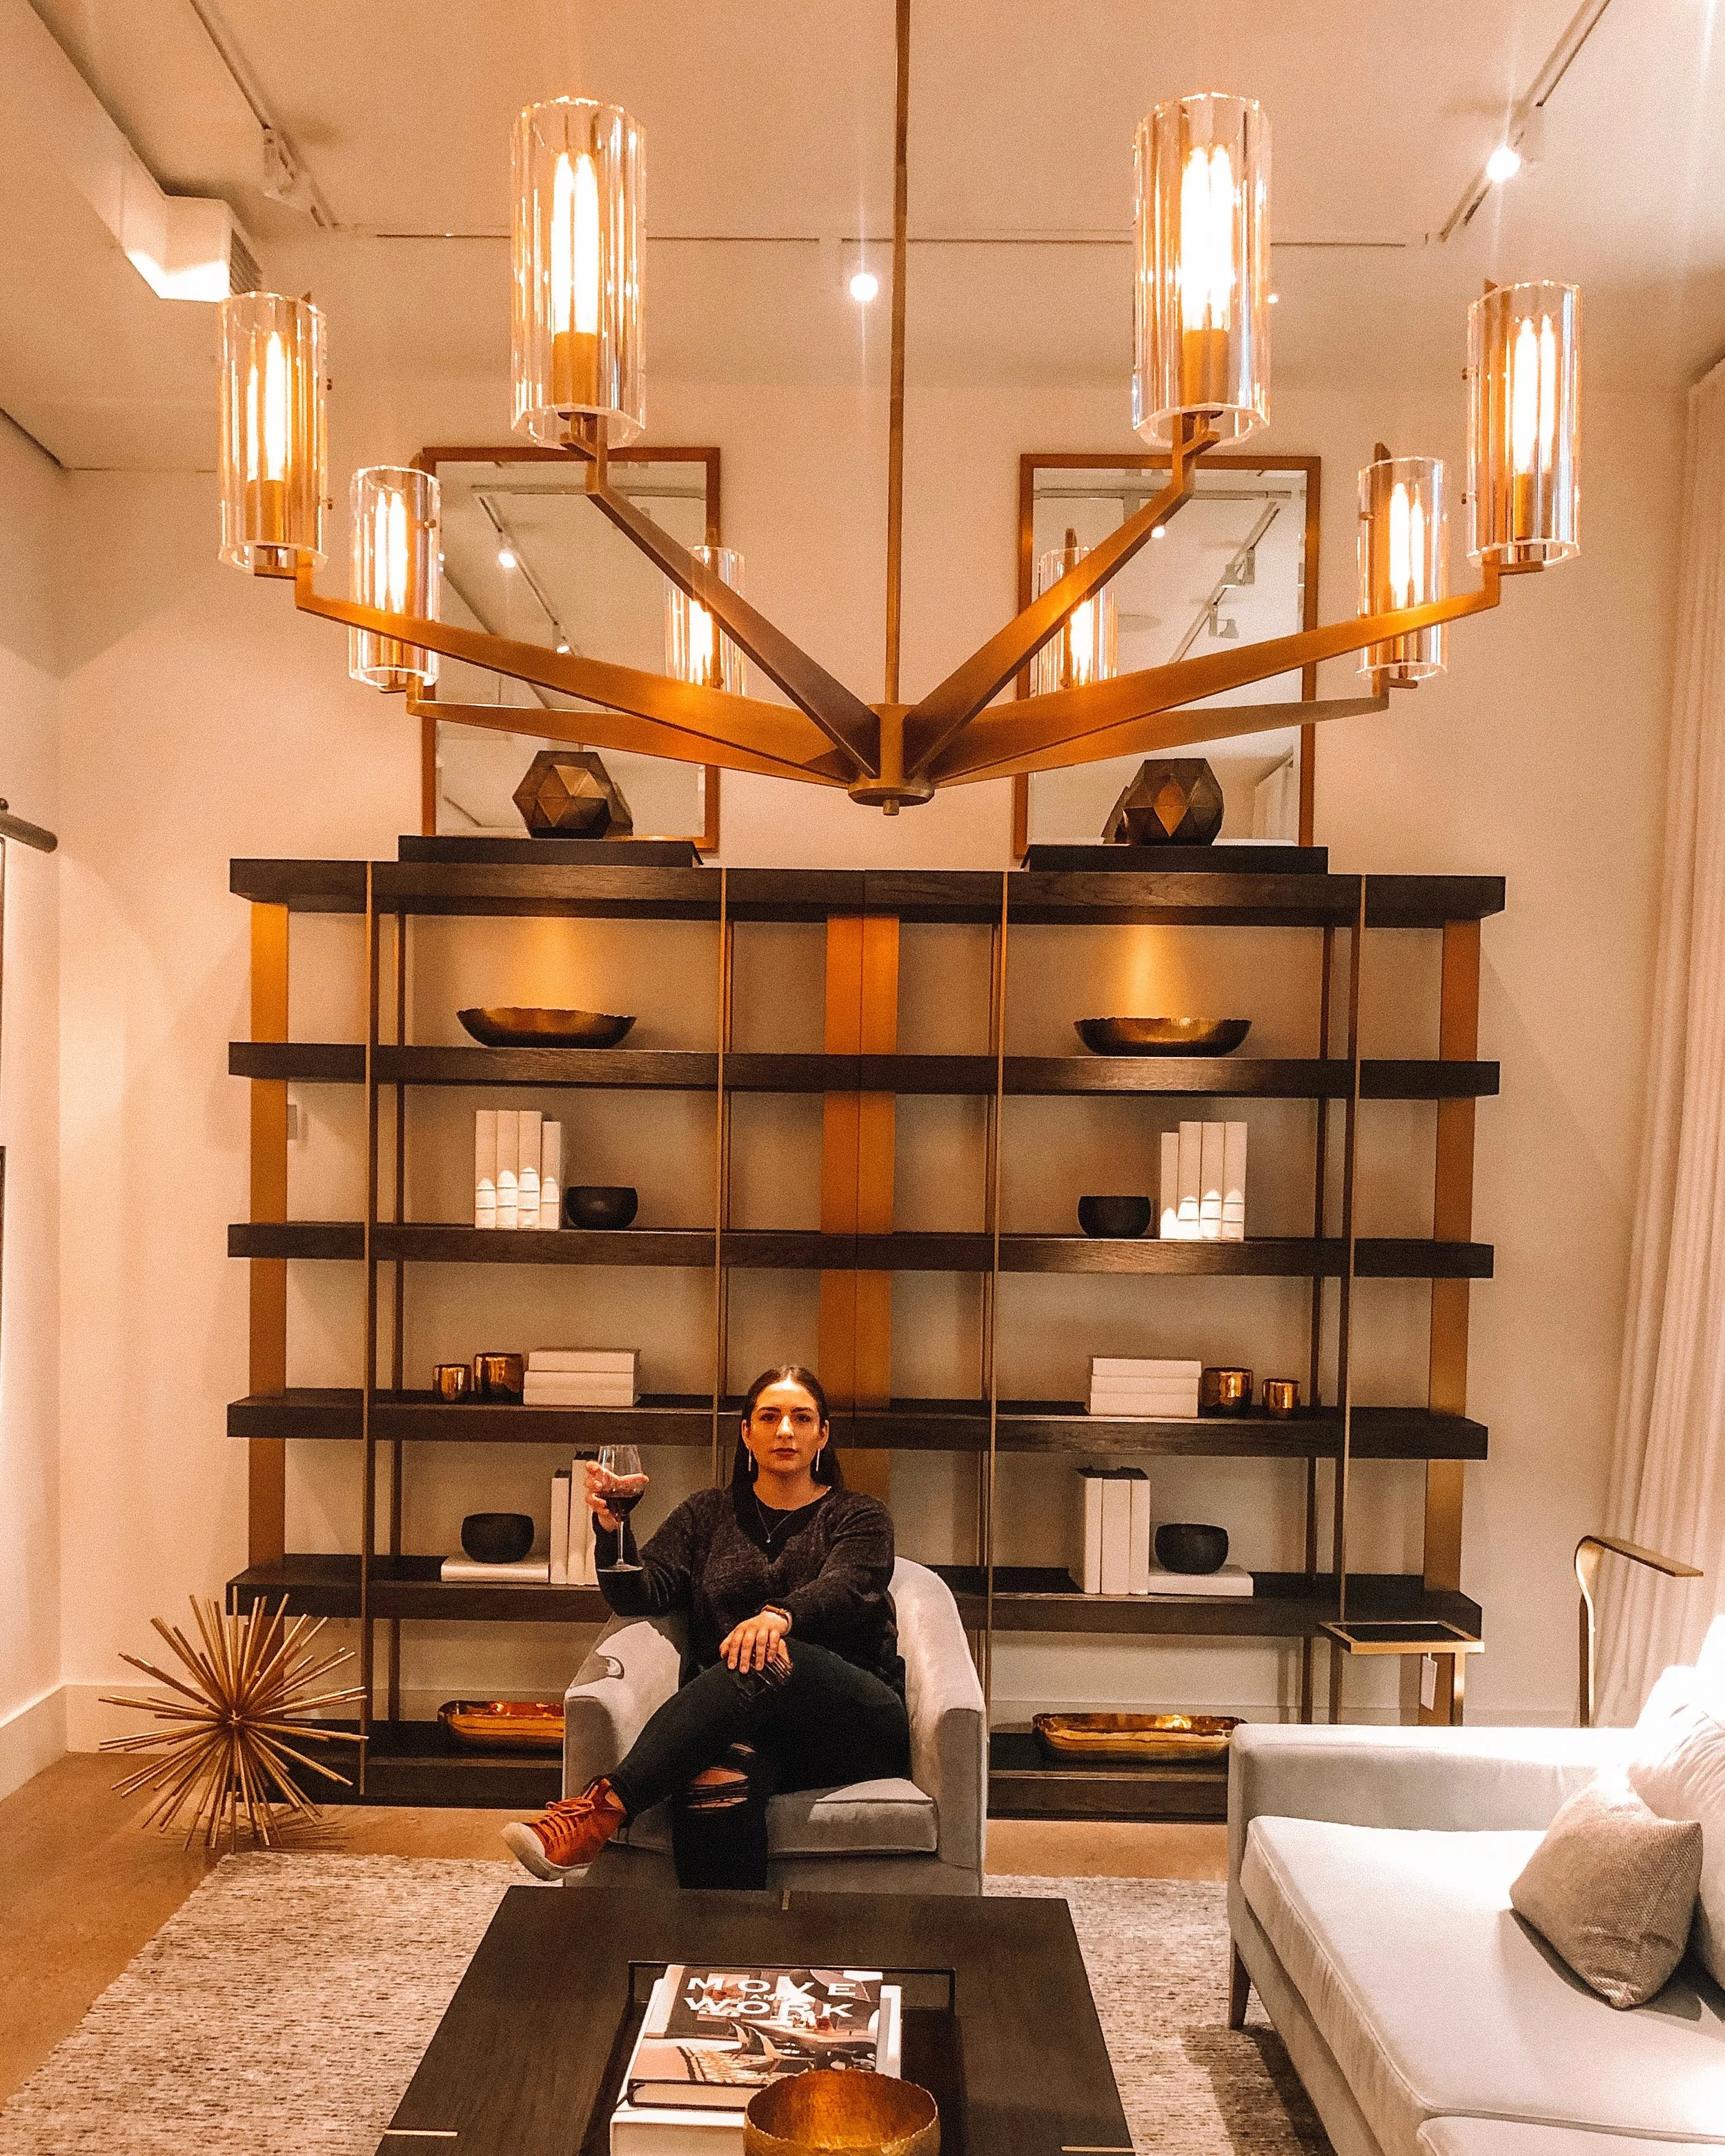
I left Restoration Hardware feeling an immense sense of motivation and inspiration. While I currently can’t afford anything from the showroom, you can’t but help to dream of what the future could look like with hard work and perseverance. I cannot wait to buy something from there some day. I highly recommend visiting a place of inspiration like this because I think it’s important to see goals right before your eyes. It makes anything feel possible and I’m so grateful we went.

IMG_7813.JPG
IMG_7812.JPG

Lastly, we walked over to The Goddess and the Grocer where I had a yummy little Italian Sandwich that was super tasty. If you need a quick bite, this is a great little stop on State St.

While this was only a slice of the fun I had in Chicago, I highly recommend checking these places out! The best part was that I honestly didn’t really spend that much money either. What are some of your favorite spots in Chicago? I am always adding to my list for future visits. Comment below and let me know!

Have a wonderful day,

Andrea

Under $20 Gift Guide

It’s the fourth and final day of Gift Guide Week and tonight I’m bring you a gift guide of gifts under $20! It’s a combination of all kinds of random gifts and hopefully it can bring you some ideas if you need a budget-friendly last minute gift. In case you missed the previous three gift guides from earlier in the week you can click below to visit each one!

  1. 5 Lbs of Gummy Bears:

    Hear me out. These are the BEST gummy bears I’ve ever had and I can never stop eating these. If you need a funny gift for White Elephant that someone would laugh at but actually enjoy, this would be great! Or if someone you know just loves candy…like me…

  2. Scratch Off Bucket Lists:

    You may have seen these with world maps, but they also have ones for Top Movies, Books, etc. If someone you know is a really into something specific like books, this is a great gift that they will be able to use for a long time, and even display if they want!

  3. Handheld Milk Frother:

    If the person you are gifting to loves coffee, matcha lattes, chai lattes, etc, a handheld milk frother to allow them to make yummy coffeehouse drinks at home is a great option. I love mine and use it all the time.

  4. Expensive Coffee/Tea:

    It’s really nice as coffee and tea drinkers to receive quality coffee or tea that you might not always have the budget for. I’ve linked my friend’s coffee company because it’s the coffee I drink every morning and it’s so delicious! I highly recommend it. My favorite tea (besides organic green) is the Tazo Wild Sweet Orange Tea.

  5. Christmas Ornaments:

    I think it’s fun to get really funny ornaments for people. Paper Source has some really great ones this year, like this avocado one. World Market also has a lot of great inexpensive ones in store!

  6. Card Wallet:

    Card wallets are a gift that are always nice to get because it’s nice to have a small wallet to carry to the gym, running errands, or when you simply can’t carry a normal sized wallet. Target has many great options including the one I’ve linked above.

  7. Camping Hammock:

    I think this gift would be great for someone who likes to spend time outside, even if it’s just in their backyard! This hammock can support a lot of weight and hold two people which is nice! I already know who I’m gifting this to this year!

  8. Papermate Inkjoy Gel Pens:

    These are my favorite pens and if the person you are gifting to loves stationary, planners, or just having a great pen to write with in many colors, this gift set is great!

  9. Subscription Service:

    Subscription services are nothing new, but I love gifting them because it allows people to see if they like it and continue on if they so choose. My personal favorite is the Book of the Month, subscription which is great for readers! It’s just $14.99 and you get a beautiful hardcover book every month and can choose between a few different options!

  10. Plants:

    Plants make a great gift for the holidays, especially if you live in a colder climate. It’s nice to receive a little bit of greenery for inside your house when outside it’s looking a little dull and gray. I haven’t personally ordered from Costa Farms before (the plants I linked above), but I’ve heard great things about them!

  11. Silk Eyemask:

    Having a nice silk eyemask is something that would be a great gift, but not everyone would necessarily buy for themselves. I love sleeping with an eyemask because it really feels good to have slight pressure over my eyes and the darkness helps me fall asleep faster. Silk is great and won’t tug on your skin, so this is a classic black mask that anyone would love.

  12. High Quality Candle:

    Everyone loves getting a nice, high quality candle, especially women. There’s just something about always having a candle burning that is so cozy. I’ve linked my favorite scent from my favorite candle company (from my home town of Kalamazoo!) above, Kalamazoo Candle Company! I love their scents and supporting small companies!

  13. Amazon Gift Card:

    When in doubt, get the gift card to Amazon. I promise no one will ever be sad that they have free money to Amazon.

What did you think of the above gifts?! Do you have any recommendations that are under $20? Comment below if you have some.

I hope you enjoyed Gift Guide Week on Andrea Fontana Beauty! If you liked it be sure to let me know so I can do something similar next year!!

Have a wonderful time picking out the perfect gifts for your loved ones,

Andrea

Disclosure: Amazon links are Amazon Affiliate links meaning that I make a commission off the purchase of the product through my link. I would never recommend a product that I didn't love and all opinions are my own. I am thankful for you choosing to purchase through my links, as it helps me create more content for Andrea Fontana Beauty.

A Cookbook Gift Guide

Welcome back to gift guide week here at Andrea Fontana Beauty! Just in case you missed my two previous posts here are the links for them; The Skincare Nerd’s Gift Guide & The Makeup Lover’s Gift Guide.

Today we are talking…COOKBOOKS! One of my favorite kinds of books.

If you’ve been following me for awhile you probably know how obsessed I am with them. My collection is past 50 at this point so I thought I’d offer a few suggestions and describe who I think they would be best for.

The Traditional or Brand New Cook

If you have someone on your list who is new to cooking I highly recommend either ‘The Joy of Cooking’ cookbook or ‘The Fannie Farmer Cookbook’. I have both and refer to them often for classics. They would be a great staple for any college student, newlywed or even someone who has found a new love for cooking, because they are filled with basic recipes that everyone needs.

If your gift is for a cook who is unfamiliar in the kitchen, I highly recommend ‘Salt, Fat, Acid, Heat: Mastering the Elements of Good Cooking’ because it teaches you so much about what it takes to make a great meal. The Netflix series is also AMAZING and not to go off on a tangent but you should watch it ASAP.

The Gluten Free Cook

I’ve talked a lot about ‘True Roots: A Mindful Kitchen’ a lot, especially on my Instagram. I have made so many of the recipes and they are so amazing. If someone has dietary restrictions like gluten, dairy, or refined sugars, this would make a great gift.

The Fit Cook

I received ‘Bobby Flay Fit’ for Christmas last year and I’ve used it so much, there’s a burn mark on the cover from the coils of my stove. If the person you’re shopping for is into fitness and healthy eating, but doesn’t like sacrificing flavor, this is a great option! The recipes are easy and rely on using a lot of great spices to create clean and delicious meals.

The Pasta-Obsessed Cook

If the person you are shopping for likes pasta or noodles (I mean who doesn’t though…) these are two of my favorite cookbooks that I have actually used quite a bit in the last few years. ‘The Ultimate Pasta and Noodle Cookbook’ has recipes from all types of cuisines, not just Italian. It’s again a great reference book. My other recommendation would be for someone who LOVES Italian pasta and I’ve talked about it before on here. ‘250 True Italian Pasta Dishes’ is great for those who want to learn which types of pastas go with which sauces and how to choose veggies to add in. It has many great combinations and even a section with fast weeknight recipes.

The Beauty Loving Cook

I know I just mentioned this cookbook in my Skincare Gift Guide, but I have to mention it again in case you missed that post. If you are gifting to a lover of makeup, skincare or nutrition, ‘Eat Beautiful’ is an amazing collection of in season recipes to promote healthy skin and beauty.

The Italian Food Cook

Did you really think I wouldn’t include an Italian section. My pick for this year goes to a cookbook my boyfriend got me for my birthday one year because he wanted me to cook from it. ‘The Sopranos Family Cookbook’ is not only full of delicious traditional recipes, but it’s also really fun to look through.

The Cook Who Loves to Give Back

If you have a friend to gift this season that loves to give back, this would be a great option for them. The ‘America The Great Cookbook’ is a collection of signature dishes and family recipes from chefs all over the country. So not only is it a great collection of different types of cuisines, but the proceeds go towards helping ‘No Kid Hungry’ fight childhood hunger.

Now if you have a cookbook addiction like me or you’re shopping on a budget this holiday season, don’t forget that thrifted/used books are a great way to reuse and recycle books! I don’t know what I was doing before I started using Thriftbooks.com to order all of my books from. I have been buying from them from almost a year and have always had great luck with them. The customer service is also great if you have a question. I have found some of my favorite cookbooks for under $5 before! If you click this link, you can save 15% off your first purchase on Thriftbooks.com!

Do you have any favorite cookbooks? Be sure to comment below and let me know which ones you are obsessed with that I need to add to my collection.

Don’t forget to come back here tomorrow for Day 4 and my last day of Gift Guides on Andrea Fontana Beauty,

Have a great day,

Andrea

3 Delicious Veggie Sides For Your Back Pocket

Can you believe Thanksgiving is next week? Even thought I put my Christmas Tree up yesterday, it doesn’t feel like the holidays are as close as they really are. Just in case the holidays sneak up on you like I know they will for me, I decided to share three recipes that you can whip up in no time and bring to your holiday dinners in a pinch.

This first one is one that I bring to every holiday dinner in my family. My nieces always ask my sister if I’m going to bring “my really good potatoes”. While they do take a little bit to bake in the oven, they are super easy. If you are in a pinch, slice your potatoes thinner so they cook quicker!

Tyler Florence’s Scalloped Potato Au Gratin

Next up we have a mushroom side that is great if you’re bringing a dish to make at someone’s house, but don’t want anything that has to go in the oven. We all know how vital that oven space is. These are super quick as well which is nice when you are in a pinch!

Laura Vitale’s Parmesan Sauteed Mushrooms

Lastly, I want to share how I make my yummy sweet potato fries/wedges because what’s thanksgiving without a little sweet potato! I guarantee these will be a hit. You can mix up the seasonings and do whatever herbs you want, but I personally love basil. Rosemary is great too!

Sweet Potato Wedges

  • 3 Sweet Potatoes

  • 2 TB of minced garlic, to taste

  • 3 TB Avocado Oil, or oil of your choice

  • 1 TB Dried Basil

  • Kosher or Sea Salt & Freshly Ground Black Pepper

Preheat oven to 450 degrees. Peel your sweet potatoes and cut each potato lengthwise into wedges. Toss wedges in a bowl with Avocado Oil, basil, garlic, salt & pepper. Line baking sheets with parchment paper and spread wedges onto parchment, making sure they are not touching. Bake for 25 minutes, making sure they are starting to brown and crisp. Flip over and bake for another 20 minutes or until crispy and brown all over. Exact time varies per oven.

I hope you try these recipes out! If you do, let me know what you think and be sure to comment below any of your favorite holiday recipes!

Remember to take a moment every day and practice gratitude,

Andrea

My 15 Trader Joe's Must-Haves

I freaking love Trader Joe’s. I unfortunately do not live close enough to one to shop on a regular basis there. There are three stores that are about an hour away from me and if I’m ever nearby one of them I always stop by and grab some goodies. I asked on Instagram (Click here to follow me) if you wanted to see the items I always stock up on when I’m near a Trader Joe’s and 100% of you said yes so here we are. I always get other items too depending on what I’m planning on making that week or if something looks really interesting to try. These are simply the items I always make sure to get!

My first tip for Trader Joe’s or just shopping at a grocery store that’s a little farther away from you, is to buy a reusable thermal bag to keep in your car so that you can safely take chilled items home without them spoiling. I bought mine at Trader Joe’s for under $9 and I love it because it zips and holds so much!

IMG_6816.jpg

1. Red Lentil Pasta ($2.99):

I am gluten-free now so I love this red lentil pasta and always grab at least two bags. As an Italian I love my pasta al dente and my number one complaint about other gluten-free pastas is that they are too squishy and always fall apart. I think this pasta is the closest texture I’ve seen to regular gluten pasta and I love it. Plus it has more protein and fiber than normal pasta so that’s amazing.

2.Everything But the Bagel’ seasoning ($1.99):

If you haven’t heard of this one you have to have been living under a rock because it has to be one of the most popular products Trader Joe’s sells. I use mine mostly for topping avocado toast and eggs, but it can be used in so many other ways! I am convinced there is nothing this isn’t good on.

3. Nutritional Yeast ($2.99):

I don’t always buy this one every time I am stocking up, because you actually get a lot of nutritional yeast for the $3. If you don’t already know, nutritional yeast is a common cheese replacement. I use it in place of parmesan or pecorino cheeses when I’m cutting back on dairy and have even used it to make a dairy-free ‘cacio e pepe’ that was delish!

4. Coconut Sugar ($3.99):

I LOVE this coconut sugar. The price is great and I use coconut sugar so much. I try to use it in place of brown sugar whenever I can, and even use it on my oatmeal every morning. I purposefully look for baking recipes that call for it instead of granulated or brown sugar because I love it so much and it’s so much better for you. Click here to visit a post I did about swapping it for brown or granulated sugar in your kitchen and why it’s beneficial.

5. Gluten Free Rolled Oats ($3.99):

I go back and forth between buying this bag of oats and the Bob’s Red Mill Quick Steel Cut Oats from Costco, but I love that these are gluten free and you get a HUGE bag for $4. It’s nuts! If you don’t follow me on IG you can go there and see my love affair with oatmeal that has been continuously blossoming for years.

6. Fruit Bars ($0.99 each):

I always keep bars in my backpack purse in case I am with a client, doing a wedding, or just out and needing a snack. My biggest thing with bars is making sure they are clean and not loaded with fillers. These have just two ingredients; the two kinds of fruit! Nothing else. They are super yummy and I don’t care that they have 20 g of sugar because it’s coming straight from fruit.

7. Green Tea ($2.49):

I always keep massive amounts of Green Tea on hand because I drink at least one cup a day, and sometimes more in the winter. You can’t beat this price for a tasty & classic big box of green tea bags.

8. Salsa Verde ($1.99):

My sister convinced me I needed this one time when I was shopping with her and I am so grateful she got me addicted to it. I love it for regular chips and salsa, but it’s especially great for pouring over a chicken breast in the slow cooker. When it’s dinner time, you shred the chicken and you have easy chicken tacos with lots of great flavor.

9. San Marzano Tomatoes ($3.99):

San Marzano tomatoes are simply the best. They make the most flavorful tomato sauce so I always make sure to have a can or two on hand for when I need to make a sauce for a special night.

10. Green Chiles ($0.89):

This is another can I keep on hand, but it’s for whenever I want to whip together a quick chili. I pretty much always have the ingredients on hand, which is extremely helpful for easy dinners in the winters and fall.

11. Proscuitto ($4.99):

This is the second time in a row I’ve not paid attention to the proscuitto and accidentally bought the German smoked version which I don’t like as much as regular proscuitto. I like to keep it on hand because I’m Italian and I really have no better reason than that. I’m addicted and it’s genetic.

12. Gluten-Free All Purpose Flour ($3.99):

You can pretty much use more GF All Purpose Flours interchangeably with a few recipe exceptions so I like to always have it on hand. The price of this one is pretty good compared to some of the ones out there.

13. Ginger Paste (~$2):

I already had a bunch of these tubes on hand so I didn’t actually see how much this one costs in the store. I always have this on hand because I LOVE cooking with fresh ginger. I absolutely hate buying a knob of it at the store however, and not using it up in time. I hate wasting food, so I love that it’s already in paste form and keeps well in my fridge. I flavor so many things with ginger.

14. Polenta Roll ($1.99):

I adore polenta and while it’s really cheap to keep the dry polenta flakes on hand, sometimes it’s really convenient to keep a log of polenta in your pantry so you can fry it up really quickly and serve it as your carb with chicken, mushrooms, veggies, etc.

15. Marinated Artichokes ($2.69):

I love having a jar of these in my pantry to quickly jazz up pastas, pizzas, salads, and more! The price is also really great compared to my usual grocery store. Extra tip: I like to use the marinated oil that the artichokes are packaged in, in place of regular olive or avocado oil for extra flavor.

There you have it! Those are my top 15 must haves from Trader Joe’s. Do you shop at TJ’s? Comment below with your favorite items to stock up on and let me know if any of these are your staples too!

Have a great start to your week,

Andrea

Tips for Hosting an Easy Dinner Party

It is no secret that I love to cook. Feeding people is my love language and my house will always be open to transform empty bellies into full and happy ones. I hosted a dinner party the other night and when I shared a few snippets of it on Instagram, a few of you reached out and asked me to share my tips on how to make hosting a dinner party easier. I am proud to say that it was amazing and I was able to create a dinner party magic in less than 2 hours. You read that right. I started cooking/setting up around 4:45 and my guests walked through the front door at 6:30. So how did I do it? I will show you how.

Planning:

In order to whip something like this up so quickly, you have to plan. I did a few major things that made this night super easy for me:

  1. I planned my menu out at least a week in advance and checked with all of my guests that they were fans of foods that not everyone loves, i.e., mushrooms in this case. I chose dishes that were not super detailed and needy, so that I could be cooking multiple things at once (I’ll get more into this in a little bit).

  2. I grocery shopped the night before and left everything out on my counter that wasn’t perishable, and put everything together in the fridge that I’d need. This allows you to pull everything out and not go searching through your cupboards/fridge trying to find each ingredient. You’d be surprised how much time you can save when you don’t have to keep walking to the pantry.

  3. I made a rough timeline of what I wanted to cook when. For example, my appetizer was something that needed to sit and stew a little, so I started this first. This allowed me to not have to think about what I needed to do next because it was all written down for me. I just check things off my list.

Decor:

When it comes to decor, I love to have things like books, place mats, candles and such all around. Instead of getting extra decor out to decorate my table, I just used what was already sitting out around me. I walked around my living room and grabbed things like pumpkins and candle sticks, and brought them to my table. I have a little storage cupboard by my front door, who’s top houses my keys and such, but inside I actually hide away all of my entertaining dishes, so that when it’s time to bring them out, they are all in one spot.

Personally, I find a rustic and cozy atmosphere to be the most appealing at a dinner party, so don’t get to stressed about things matching. In case you didn’t notice in the pictures above, I only had four of the gray and white tassel place mats, so I just grabbed a gray and white striped tea towel from my kitchen and added it for my 5th place setting. I’m not big on patterns matching perfectly but I generally always buy my entertaining dishes in neutral colors so that they always go together well enough.

Also, don’t be afraid to get out of the box and get creative with items that might not normally be used on the table. I like playing with height, so I stacked some big and really old coffee table books about Italian food right in the center of the table and placed my bowls for olives on them.

Cooking:

Now for the main portion of the planning and why this dinner party was so easy, did I mention everything was Gluten and Dairy Free? Here are the things I did to make my life easy:

  1. I chose recipes that didn’t need to be babysat, but would still wow my guests.

  2. I baked my pumpkin spice cake the morning of the dinner party at 6:30 am and did yoga while it was in the oven. BAM Kill two birds with one stone people. Also, you will automatically fill your house with the aroma of dessert all day which is a great way to start off prepping for a dinner party!

  3. My appetizer was a slow cooked tomato and garlic spread for crackers (recipe to come in a special announcement). I also set out two kinds of olives and would normally do cheese as well if the crowd wasn’t dairy-free.

  4. I also made a super easy and light mushroom soup because once the onions and mushrooms are sauteed and seasoned, it literally sits on the corner burner and stews for a little while, which means you can do other stuff! (Recipe also coming in that super exciting announcement…haha)!

  5. My entree was a homemade vodka sauce (I swear by this recipe from Rachael Ray) over brown rice and red lentil pastas. Can you guess why I picked it? You’re right, it’s super quick and easy and only stews on the stove for like 20 minutes! But you’re actually making a homemade sauce so it tastes like heaven.

If there is one piece of advice I can give you for hosting a dinner party it’s this….CLEAN YOUR DISHES AS YOU GO! There is nothing worse than having the world’s best dinner party full of laughter and happy tummies and then everyone walks out the door and you have a WHOLE kitchen to clean and you get depressed and want to ignore it and walk straight to your bedroom to sleep instead. So I always do this… While I’m cooking I wash every dish I can at every chance I get. I’ll even start placing food in their serving plates so that I can wash the pots they were cooked in. I even go as far as to wipe up my counters and stove before anyone arrives. This way the only things left to clean afterwards are the dishes you eat on and the serving plates. You can quickly rinse all the food off so they are mostly clean, load them in the dishwasher or leave them in the sink for the next morning and get to sleep instead.

I love dinner parties because of how relaxed and enjoyable they are. If you plan ahead and do certain tricks, you can make it enjoyable to host as well. If you have any tips or recipes you love for hosting dinner parties, be sure to comment below! I hope you enjoyed this post and remember; the details aren’t necessarily the most important part of the dinner. The food is a vehicle and excuse to experience the laughs, the stories, and the love among your amazing guests.

Happy hosting!

Andrea

My 'Party's Over' Detox Skin Tips

Welcome back! If you don't follow me on Instagram (...but like why aren't you?) then you wouldn't know that I spent 5 days last week in Chicago working a wedding and then frolicking with friends in the city. This meant more gluten than I normally eat, little sleep, wine instead of water, and all sorts of anti-clear skin habits. Am I paying for it? You betcha. Was it worth it? HELL YES! Because spending quality time with my best friends is priceless and I have the tricks to get my skin back to where I want it once the party's over. 

Today I'm sharing what I've been doing to get my skin back to where I want it & my body feeling normal again. These are my "Party's Over" Detox Skin Tips. Whether you're back from vacation or just celebrated your birthday week (...or month haha) I hope you find these tips helpful to getting back on track with your skin & body.

1. Get rid of all the guilt. Do not spend one second stressed about the fact that you had 2 donuts instead of 1. We've all been there. We've all done it. But that's the point. It's done and all you can do is accept that you cannot change it and get back on track now.

2. Cut out your trigger foods for a week. The first thing I had to do when I got back was get back to eating gluten-free every meal. I usually had one or two meals with gluten when I was in Chicago and since it affects my skin so much, I have cut them out for a week to boost my clear skin and feel better. Whatever your trigger food may be, skip it for a few days or a week and it'll help you to start feeling like yourself again.

3. Do an At Home Detox Facial: Chances are you were a little more lax with your skincare routine when on vacation so it's time to get your skin back into shape. This is especially important for me because my diet caused some serious texture issues and breakouts. I cannot recommend this enough. Here's how I do it.

  1. Start by cleansing your face & toning. I'm currently using this Juice Beauty Green Apple Brightening Gel Cleanser, but if you don't have it try to go for one with a gentle chemical exfoliation to help get rid of any congestion. This cleanser was in my July Favorites; click here to read why I liked it. 
  2. 1st Mask: Chemical exfoliation; I like the Herbivore Botanicals Blue Tansy Mask because it's great for blemishes. Leave on for 15-20 min until dry and wash off & tone again.
  3. 2nd Mask: Detox and clarifying; I prefer the Aztec Healing Bentonite Clay because it boosts circulation and detoxifies so well! Click here to read my post on this mask. The clay comes as powder and I like to mix it with apple cider vinegar or water and add a few drops of tea tree oil until it forms a thin paste. I apply it and leave it on for 30-45 min depending on how long it takes to dry/how long I can handle it. It tingles! Rinse and tone again.
  4. 3rd Mask: Hydrate & Nourish; I love the Farmacy Honey Potion Renewing Anti-Oxidant Hydration Mask to hydrate and heal my skin after I've neglected it. It warms on contact and is such a comforting and nourishing experience. Leave this one on for about 15 minutes and have a cup of tea. Rinse off, tone, and apply your normal spot treatments & serums. 
  5. Lastly it's time to re-hydrate your skin due to your preference of wine over water. I like to throw on my Laneige Water Sleeping Mask in place of my moisturizer so I can really benefit from all the hyaluronic acid and feel hydrated when I wake up.

4. Try reducing your caffeine intake. I know what you're probably thinking. Wait, I need MORE coffee to recover from a great time than less, but trust me. Your skin and your body will adapt better with less caffeine. Try sleeping more instead! Crazy I know...

Go ahead bookmark this post for easy access next time you have a girls night out, staycation, or simply need weekend recovery. If you're like me, you're not 21 anymore and can use the tips to getting back on track. Maybe you'll feel a little less stressed about skipping your routine when it's time to simply have fun!

Have a great week,

Andrea

July Favorites

I'm back with favorites and I'm excited to share the ones I have this month. I polled you guys over on Instagram and while a lot of you like the video format from last month, most of you prefer the written format, so I'll probably return to this format and film a YouTube favorites video every so often. 

This month is short but sweet, but I hope you enjoy it.

The only skincare product that is new to me recently is this Green Apple Brightening Gel Cleanser by Juice Beauty.  When I went through my skincare product detoxification, my cleanser rated so high on Think Dirty. This one is a ZERO and I love it. I feel like I've hit the jackpot. It's loaded with antioxidants which is really important in protecting your skin. The brightening is due to the citric (lemon) and malic (apple) acids! I love how this has left my skin feeling cleansed well (coconut oils) and brightened. I highly recommend it if you are someone who struggles with an uneven skin tone.

Every spring/summer I seem to revisit my lipstick collection and pick out lipsticks that I forgot about. This one from Maybelline (Shade 945: "Stormy Sahara" is one I realized that I've never talked about but is a classic shade from them. If you're a light/medium skin tone and looking for a good rosy/nude check this one out. 

This next favorite is also a lip product but on the higher end. Back in the spring when I did a Sephora and Ulta haul I mentioned this NARS Power Matte Lip Pigment in 'Walk This Way'. I am so amazed by the formula of these. They feel like water going on, but are packed with pigment and go on so easily. They dry down to being virtually undetectable and wear so nicely on the lips. I love this shade too, because it's just enough of a pop of color to be noticeable but isn't obnoxious and bright. 

My last beauty favorite is a nail polish that has been the only thing on my toes for the past year. The color looks especially great in the summer. I'm not sure if you can still get it anywhere besides this website I found, but the Essie Metallics Collections in 'Nothing Else Metals" is the best shade. It's a silver/lavender shade that looks so great on toes. It matches everything and really looks great with a tan in the summer. 

A food favorite for the month is one that I tried a long time ago. I can't remember where I tried this brand for the first time, but when I went on Amazon to buy them I ended up getting this variety pack that was AMAZING! These bars are free of the top allergies; peanut, dairy, gluten, tree nut, soy, egg, fish, shellfish, & sesame. While I try to stay away from processed snacks, these are relatively clean and I like them every once in a while especially now that I'm gluten free. The Chocolate Chip crispy squares and Strawberry granola minis were definitely my two favorites, but I really enjoyed all the flavors. 

So those are my favorites from the month of July! I told you they were going to be short and sweet! What have you been loving? Leave a comment below and let me know.

Have a great August,

Andrea

Disclosure: Amazon links are Amazon Affiliate links meaning that I make a commission off the purchase of the product through my link. I would never recommend a product that I didn't love and all opinions are my own. I am thankful for you choosing to purchase through my links, as it helps me create more content for Andrea Fontana Beauty.

How to Pickle Onions

This recipe was highly requested over on my Instagram because it seems I'm always showing or mentioning pickled red onions in my food posts. I'm just obsessed with them. They make many dishes look prettier and taste better! If I don't know what I'm making for dinner at night, you can often find me standing with the fridge open, pickled onion jar in my hand, snacking as I scan the fridge for ingredients and ideas for that night. If you don't follow my Instagram yet, go check it out! It's where I talk about food the most and share tons of tips

IMG_4848.JPG

To make pickled onions you will need the following:

1 large red onion  (I like to use red, but you can use others)
1 cup of white vinegar
minced garlic
black peppercorns
3 TB white sugar
1.5 TB salt
Storage jar like a mason jar

1. First add your vinegar, salt, sugar and peppercorns to a small saucepan and mix to dissolve the sugar and salt. Put the lid on the pan and bring to a boil over just slightly higher than medium heat.

2. While waiting for mixture to boil, slice your onion into really thin rings. I like to put them in a big bowl and mix a few teaspoons of minced garlic into them. 

3. When mixture comes to a boil, pour it evenly over the onion & garlic mixture and mix it well. I like to put the lid from my pan over the onions in the bowl to trap the heat in there so they don't cool as quickly. If your liquid doesn't quite cover all of your onions (this can depend on what size of bowl you use), mix the onions in the liquid mixture every 15ish minutes. 

4. Let the onions cool and place in the mason jar making sure to pour the pickling liquid in with the onions to cover them. You can really squeeze them in there, I promise! Store in the fridge for up to 4 weeks. (Mine never last this long...haha)

5. ENJOY! These are great on tacos, burrito bowls, sushi bowls, scrambled eggs, and more! The possibilities are endless. 

Leave a comment below letting me know what your favorite thing to pickle is!!

Have a great day,

Andrea

How I make Almond Milk/Flour:

This post has been so highly requested and I'm happy to finally write it for you. After doing my elimination diet a few months ago and feeling what it felt like to be eating 100% unprocessed, I was hooked. I've always had the belief that life is about balance in many aspects. I would never want to deprive myself of the foods I love but also think there is an alternative to eating heavily processed treats. I have kind of always operated on the idea that if I can make it myself I'm allowed to eat it.

IMG_4222.JPG

Almond milk isn't necessarily bad for you, but when you buy it in the stores it unfortunately has to have stabilizers and other ingredients that keep it fresh for you to enjoy at home. Making almond milk eliminates all of this processing and tastes SO MUCH BETTER. Plus, since going gluten free I like to have almond meal (aka flour) on hand and it's expensive! Making your own almond milk yields the milk, but also about 1 cup of almond pulp that you can easily turn into meal! This means it's a zero waste process and will save you money, especially if you use almond meal on a regular basis! Today I'm going to take you through how I make my almond milk and turn the pulp into meal!

First let's go over what you will need for this process:
- 1 cup of almonds (I buy mine in a big bag at Costco)
- 7 cups of water
- Vanilla or salt if wanted
- High speed blender or food processor (I use a ninja) --> Here's the one I have and LOVE (Side note: I took FOREVER to decide on a blender and this is the one I went with. I've had it for over a year and use it constantly. I can't recommend it enough if you're looking for a high quality blender but don't want to shell out the money for a Vitamix)
- Glass container to store milk up to 3 or 4 days --> I purchased this one from Amazon
- Nut Milk Bag --> I purchased this Nylon 2-pack from Amazon.

1. You'll need to soak the almonds for at least 4 hours (I usually just do it overnight) in order to soften them and make them easy to blend.

2. Empty the water that the almonds have been soaking in and add the cup of softened almonds, 7 cups of water and a splash of vanilla and sprinkle of salt to the blender. I have made it with no salt and vanilla and it was great too! Choice is up to you. If you're used to unsweetened original almond milk, leave it out!

3. Blend for 2 minutes on a high speed.

4. Pour your blended mixture through the nut bag into a bowl and squeeze all of the liquid out with your hands! I love the nylon ones I purchased from Amazon because they are super easy to hand wash and keep clean (I also use them to strain my kombucha!)

5. Store in your glass container for up to 4 days!

YES It's really that easy! Now for the almond meal:

1. Preheat your oven to 100 or 150 degrees.

2. Spread your almond pulp onto a baking sheet and break up all of the clumps with your fingers. The more liquid you squeeze out the easier this will be.

3. Bake for 1-1.5 hours until the almond meal is dry, checking on it every 15-20 min to make sure it's drying out evenly. 

4. If your blender hasn't ground it fine enough, you can put it back through the food processor, blender or even a coffee grinder to make it finer!


One of the cool things about making your own almond milk is that you can flavor it however you want! I cannot wait to add turmeric, cinnamon, and more to my almond milk in the fall to make yummy drinks (Thanks for the suggestion Detroit Wifestyles!) 

Have you ever made your own nut milk? What kinds of combinations do you do? Leave a comment below and let me know!

As always, have a beautiful day!

-Andrea

Disclosure: Amazon links are Amazon Affiliate links meaning that I make a commission off the purchase of the product through my link. I would never recommend a product that I didn't love and all opinions are my own. I am thankful for you choosing to purchase through my links, as it helps me create more content for Andrea Fontana Beauty.

8 Easy Healthy Food Swaps

This post was born out of the idea that I don't believe in dieting long term to stay healthy. It's just not realistic. However, we can make healthier choices daily in order to create a healthier lifestyle for ourselves. Today I'm sharing some of my favorite foods that you can substitute for those that are not as good for you. Regardless of what you decide to swap on a regular basis, remember that it's important to treat yourself every once in awhile; just don't make it a continuous habit. 

1. COCONUT SUGAR FOR BROWN/GRANULATED SUGAR: This is one of my favorites to do, especially in oatmeal and sweet treats. Coconut sugar comes from coconut palm sap and has a lower glycemic index than the others. This means it won't spike your blood sugar as much and is digested slower. Also it contains minerals like zinc, iron, calcium, potassium and more, which isn't the same for table sugar which is simply empty calories. 

2. COCONUT AMINOS FOR SOY SAUCE: If you love soy sauce this one might be a little harder to transition to but it's so worth it. Coconut aminos isn't bad, it's just sweeter and different than soy in my opinion. It's obviously soy-free and also gluten-free which is great for those of you who are conscious of your soy & gluten consumption and doesn't have nearly the amount of sodium as soy sauce. Based on the name, you might have guessed that it contains essential amino acids, which soy sauce does not.

3. AVOCADO OIL FOR OLIVE/COOKING OILS: I love me some olive oil. I am Italian after all, but recently I stopped buying it and swapped it for Avocado oil and I'm obsessed. Avocado oil has tons of healthy fats including oleic acid and with it's high smoke point, you can cook at a higher heat without worrying about breaking down the structure and losing the benefits. I don't notice much of a change in taste either, so I highly recommend this swap.

4. PLAIN GREEK YOGURT FOR SOUR CREAM: I have been doing this one for a long time, but I'm always amazed how many people don't know what an easy swap this is. Make sure you don't make the mistake of buying vanilla, it HAS to be plain. But I honestly barely taste the difference, I get that creaminess that I like from sour cream, and I get a little added protein in whatever I'm doing! I love adding it to the top of a taco salad instead of dressing!

5. LEMON JUICE/OREGANO/AVOCADO OIL FOR SALAD DRESSING: I basically don't buy salad dressing, because I love the simplicity of oil and lemon juice or vinegar. Making a little vinaigrette with oregano, salt and pepper too, makes for an easy summer salad that is light and refreshing! If you can't tell, I don't like heavy dinners in the summer. 

6. ORGANIC BROWN RICE CAKES FOR TOAST: I fell in love with these in my elimination diet because I was able to eat brown rice still and loved that rice cakes gave me the crunch I was looking for without the gluten. Now I still eat them all the time with avocado in place of my old avocado toast! 

7. AVOCADO OR HUMMUS FOR MAYO: This one is another classic, but I love mashed avocado or hummus (or both!) on a sandwich in place of mayo. You still get the creaminess, but a much healthier fat option!

8. FRUIT COMPOTE (HEATED FRUIT & COCONUT SUGAR) FOR SYRUP ON PANCAKES: Now this one is something I made up when I was in my dutch baby obsession because I wanted a healthy alternative to store bought syrup. Maple syrup is obviously a healthier option too, but if you like fruit, I highly recommend this one. Simply use frozen or fresh berries on medium heat in a pan, and sprinkle some coconut sugar on top (a few tablespoons depending on how many berries you have and how sweet they are). The sugar will help to break down the fruit and bring the juices out and if you let it bubble and thicken on a lower heat for a little bit, you'll get a beautiful and delicious fruit compote, perfect to top pancakes, waffles, dutch babies, ice cream, etc!! Depending on the fruit you choose, this can be a great way to get extra fiber, antioxidants and minerals (see coconut sugar above) into your daily diet!

Let me know what you think of these easy food swaps and be sure to comment below what your favorites are!

Have a great weekend,

Andrea


How to make the only Kale Chips I'll ever eat.

Snapseed.jpg

It's no secret that kale is an extremely nutrient dense food that we should be consuming. Did you know that it can help tremendously with your skin? Full of Vitamin K, kale helps strengthen blood vessels, boost circulation and protect your liver. Since it's anti-inflammatory, it helps reduce puffiness and redness in the face and is great for conditions like rosacea. It's also rich in lutein and zeaxanthin (cartenoids that absorb UV light) which help protect us from free radical damage. Loaded with other vitamins and minerals, kale also has Omega-3 fatty acids and helps your skin stay nourished. Overall eating more kale will help with cell turnover, reducing dryness, and restore radiance to your skin. (Source: Eat Beautiful by Wendy Rowe, 2016)

If you want all of the above but don't know how to incorporate more kale into your diet, look no further! This is my sister's "recipe". The reason I say that in quotations is because I asked her how she made them and all I got was "250 until crisper". So let's just say I made it up from there. 

I have never liked kale chips. I have bought them from the store I don't even know how many times, and each time they taste like what I would imagine dirty leaves to taste like. They have no flavor and the texture is weird. Then last week my sister was talking about making kale chips and my nieces got so excited because they love when she makes them. I was shocked because I like healthy food and eating my greens but couldn't imagine trying kale chips one more time. 

After texting my sister and getting the 250 degrees response, I decided it was time to attempt making them. 

You will need:

A couple stalks of Kale
1 TB Coconut Oil
Salt & Pepper
Garlic Powder or whatever you want to season with

You will need to do the following:

1. Preheat the oven to 250.
2. Rip Kale leaves off of the stems and tear into smaller pieces. Wash in a salad spinner and dry really well; add to a big bowl.
3. Melt the coconut in the microwave for 30 seconds and pour over kale and massage into kale to make sure it's distributed evenly. 
4. Season with S&P to taste and garlic powder (or your choice of seasoning) and mix with hands to make sure it's incorporated well.
5. Spread out on 1 or 2 baking sheets to make sure most of kale isn't touching and has plenty of space. This allows it to properly dry out.
6. Bake 20-30 min until it's your preferred texture checking frequently to make sure you don't burn them. 
7. Try not to eat them all at once.

Note: I baked mine for 20 min and I found that this was absolutely perfect. I think the reason I've never liked kale chips before is because they are so dried out. 20 min was the perfect amount to dry the kale out so it was crunchy, but still have a little bite to them. If you prefer a super crispy and dried out kale chip, try 30 min instead.

If you make these let me know what you think and how you season yours!

Enjoy,

Andrea