Chicken Wing Week: Day 6 - Salt & Vinegar Wings

This is my last recipe of Chicken Wing Week! I hope you’ve enjoyed this week because I’ve had a lot of fun. Margie has one more recipe coming at you tomorrow!

salt and vinegar chicken wings

Salt & Vinegar Chicken Wings

This recipe is tailored towards two adults and makes about 12 wings. Multiply as needed.

Ingredients:

Marinade

  • 1 TB of avocado or olive oil

  • 2 TB red wine vinegar

  • 1 tsp kosher salt

  • 1/2 tsp black pepper

Other Ingredients

  • 2 TB avocado oil

  • 2 TB red wine vinegar

  • 1 tsp salt

  • 1/2 tsp dried oregano

  • 12-14 traditional bone-in chicken wings (about 2 #)

  • Helpful tools: wire rack that fits inside your baking sheet, tongs, aluminum foil, and a meat thermometer.

Directions:

  1. Preheat your oven to 425 degrees F.

  2. In a large mixing bowl, mix your quick marinade of oil, vinegar, salt and pepper. Toss your wings in the marinade, making sure to coat every wing evenly. NOTE: Make sure you don’t let the wings sit in the marinade for too long (more than a couple minutes) because the acid from the vinegar will start to cook the chicken).

  3. While you wait for your oven to preheat, cover your baking sheet with a layer of aluminum foil and place your wire rack on top. NOTE: If you don’t have a wire rack, that’s ok too! You’ll just need to flip your wings half way through the baking time. The wire rack allows for better air circulation and crispier, evenly cooked wings.

  4. Bake in the center rack of the oven for 25 minutes at 425 degrees F. If you don’t have the wire rack, make sure you flip the wings halfway through this 25 minute cooking time.

  5. Remove the wings from the oven and turn the oven onto broil. This is the part that is magical for the crispy skin, but you must keep a close eye on it since everyone’s oven is different, and broiling happens quickly. I normally broil wings for 2 minutes in my oven, but for this recipe I want the skin to be extra crispy, to compensate for the super thin sauce. Therefore I broiled for 3 minutes on each side, with the wings on the top rack. They should be close to the broiler but not touching ANY flames. Therefore, they broil for 6 minutes total.

  6. It’s important to measure the temperature of your wings to make sure they are cooked throughout and at least 165 degrees F. If you prefer a drier wing, you can take them up to 175-180 degrees F. This part is up to you!

  7. While your wings are broiling, it’s time to mix up the salt & vinegar sauce. In a large mixing bowl that can fit all of your wings, mix 2 TB avocado oil, 2 TB red wine vinegar, 1 tsp of salt, and the dried oregano. Adjusting the ratio of oil to vinegar here is totally up to you. (i.e. If you love a really acidic salt & vinegar flavor, try using more vinegar)/

  8. Once your wings are done broiling, using tongs, transfer them to your mixing bowl and coat with sauce really well.

  9. To serve, you can pour a little extra sauce on top and top with a little extra oregano if you’d like.

I hope you enjoy this wing recipe and stay tuned for the last recipe tomorrow over on Margie’s blog <<click here>>!

CHICKEN WING WEEK RECIPE ROUND-UP:

Day 1 - Dre’s Original Baked Wings

Day 2 - Margie’s Thai Curry Dry Rub Grilled Wings

Day 3 - Mexican Dry Rub Wings

Day 4 - Chicken Tikka Masala Wings

Day 5 - Margie’s Strawberry Sriracha BBQ Glazed Wings

Day 6 - Salt & Vinegar Wings

Have a great weekend,

Andrea

3 Delicious Veggie Sides For Your Back Pocket

Can you believe Thanksgiving is next week? Even thought I put my Christmas Tree up yesterday, it doesn’t feel like the holidays are as close as they really are. Just in case the holidays sneak up on you like I know they will for me, I decided to share three recipes that you can whip up in no time and bring to your holiday dinners in a pinch.

This first one is one that I bring to every holiday dinner in my family. My nieces always ask my sister if I’m going to bring “my really good potatoes”. While they do take a little bit to bake in the oven, they are super easy. If you are in a pinch, slice your potatoes thinner so they cook quicker!

Tyler Florence’s Scalloped Potato Au Gratin

Next up we have a mushroom side that is great if you’re bringing a dish to make at someone’s house, but don’t want anything that has to go in the oven. We all know how vital that oven space is. These are super quick as well which is nice when you are in a pinch!

Laura Vitale’s Parmesan Sauteed Mushrooms

Lastly, I want to share how I make my yummy sweet potato fries/wedges because what’s thanksgiving without a little sweet potato! I guarantee these will be a hit. You can mix up the seasonings and do whatever herbs you want, but I personally love basil. Rosemary is great too!

Sweet Potato Wedges

  • 3 Sweet Potatoes

  • 2 TB of minced garlic, to taste

  • 3 TB Avocado Oil, or oil of your choice

  • 1 TB Dried Basil

  • Kosher or Sea Salt & Freshly Ground Black Pepper

Preheat oven to 450 degrees. Peel your sweet potatoes and cut each potato lengthwise into wedges. Toss wedges in a bowl with Avocado Oil, basil, garlic, salt & pepper. Line baking sheets with parchment paper and spread wedges onto parchment, making sure they are not touching. Bake for 25 minutes, making sure they are starting to brown and crisp. Flip over and bake for another 20 minutes or until crispy and brown all over. Exact time varies per oven.

I hope you try these recipes out! If you do, let me know what you think and be sure to comment below any of your favorite holiday recipes!

Remember to take a moment every day and practice gratitude,

Andrea

How to Cook More

Welcome back! I hope you had a wonderful Thanksgiving! I am certainly thankful to each and every one of you who read this blog and I hope you enjoyed some time with loved ones this past weekend.

I have been mulling this topic over in my head for the past few weeks and wasn't exactly sure how I wanted to write about it. If you follow my instagram (@andreafontanabeauty) you probably see that I love to cook. Cooking is a way for me to express creativity and relax after a long day. I love to feed others and try new recipes but I realize this isn't the way that everyone feels. I can't tell you how many times people have commented on posts or told me in person that they wish they cooked more or even knew where to start. So I wanted to share some of my tips on how I really cultivated my love for cooking and where I look for inspiration. 

Let's be honest. I have weeks where pouring a bowl of cereal for dinner seems challenging, so don't think that I cook a 3 hour meal every night. However, I hope by reading this post you find some new inspiration for integrating cooking at home more into your lifestyle. Cooking at home can not only save you money but it can also help you create new memories and challenge yourself in new ways. 

First let's talk about how I find inspiration of what I'm going to cook.

Create a recipe book/binder. If I had to give one tip to someone trying to cook more, this would be it. There's a million ways to do this, but the main point is create a space that houses ONLY recipes that you love and enjoy making. I bought a notebook when I was 18 and created sections with tabs and immediately started writing family recipes into it. As I find recipes online or in cookbooks that I make and love, I always write it in. Now, almost 10 years later and it's filled with so many recipes. While I love my cookbooks (trust me I have quite the collection of at least 40), I love that if I'm ever drawing a blank on what to make, I can open this notebook and find tons of recipes that I know I love. I also cannot wait to pass it down to future generations. Some people like Pinterest for this, but personally I like a hard copy book to read while cooking. 

Read cookbooks. I know that you're thinking this is obvious but are you actually doing it? I personally hate reading recipes from my phone. Most of the time my fingers are messy and I end up having to unlock my phone 35 times, so it gets annoying. Having a hard copy book in front of me just makes things smoother for me when cooking so I find I enjoy it more. I also like to have cookbooks on hand because I will browse them for recipe inspiration at night before bed. If I know I have a lot of chicken in the freezer or I'm craving a soup, I'll search in the index and find new recipes to try. I know this seems old school in a world of Pinterest and Google, but sometimes I feel like those can be overwhelming and add to the stress of cooking. Try to simplify. 

Buy used cookbooks. This one is a must for me and  my secret to keeping my love for cooking within a sane budget. I could get lost in a used book store for hours. Many people don't think of looking for cookbooks at used book stores but there are so many goldmines waiting to be discovered! I love the fact that I never know what I'm going to find and I have found some MAJOR steals. There are often classic $40 cookbooks for $6 or $7 at my used book store, so start searching and I promise you it will be worth it. Plus sometimes you find notes from previous home chefs that add to the fun of trying new recipes!

Next, I want to share what I do in my kitchen to make cooking easier and less time consuming.

Stock your pantry. This one is huge for a few reasons. First, I know a lot of people who complain about cooking because if they don't keep much on hand, they are always having to buy almost all of the ingredients in the recipe every time they want to make something. Stocking a pantry is so important for this reason. If you always have your basic grains, spices, onions, garlic, broths, canned veg, and more on hand, you can cut your grocery list in half. This can make a new recipe seem less daunting because you don't have to buy as much. Usually when trying a new recipe out, I only have to buy 3-7 items, because I keep my pantry well stocked. Buying in bulk goes along with this, because you can save so much money. I like to store a lot of my things like oats, rices, lentils, flours, etc, in mason and decorative glass jars so they are always stocked. This allows me to buy them in bulk when I see a great sale and eliminates me purchasing products with extra packaging. Not only will you save money by doing this, but you'll also help save the planet! Sometimes if I'm too busy to grocery shop or simply don't want to spend money on groceries that week, I will challenge myself to create something delicious just by cleaning out my pantry. I usually do this one week a month.

Freeze leftovers. One of the best things I recently started doing was freezing my leftovers instead of saving them in my fridge. I used to put everything in the fridge and I'd find that I didn't want to eat it again so soon so the leftovers would often go to waste. If it freezes well, now I will pop it in a freezer bag to enjoy another day. I know some people don't enjoy cooking because the recipe makes too much and they don't want to eat it for 4 more meals. You can wait a few weeks until you're craving that meal again, defrost it, and you have a quick weeknight meal. 

Lastly, let's talk about planning my meals. How do I decide what to make and when?

Meal Plan. I know this probably comes as no surprise, but in order to save money and not waste food, you really have to meal plan. I like to start by reading my weekly ads for my local grocery stores to see what is on sale. Based on those sales, I will find recipes that use those ingredients. Because I'm usually reading so many cookbooks, I will have recipes in the back of my head that I want to try and will come to mind when I see something is on sale. If you don't want to read cookbooks, simply pop open that homemade recipe book and find all the chicken recipes when chicken is on sale, for example. If I find that a protein is on sale, I will often buy a lot, freeze half or base all of my recipes for that week on it. I usually meal plan every Sunday for one week and only grocery shop once a week. This allows me to not get too overwhelmed and get in and out of the store quickly. 

I hope this post helps you take the step to spend more time in the kitchen. There is so much that can be learned and treasured in my favorite room of the house. Please share your favorite tips for cooking below and share this post with someone you love.

AND GO COOK A MEAL FOR SOMEONE YOU LOVE!

Have a beautiful day,

Andrea

Dre Does Door to Door Organics

Since I was a senior in high school I have gone through periods of vegetarianism (Pescetarian if we want to get technical). It started as a requirement for health issues, but I have loved it over the years because having a restriction on my diet forces me to think about what I'm consuming. Growing up with a Brazilian farm boy father and maternal Italian grandparents who's farm I visited every weekend, I was taught all about the importance of not only eating produce, but growing it and eating locally. When I was two years old my grandparents lost me on their farm and found me with cuts all over my face from biting raspberries straight from the bush. I am so thankful that I was raised to appreciate fresh fruits and vegetables and not just look at them as 'two more bites' on your dinner plate.

My dad currently has a huge produce garden in his backyard that I can't wait to dive into this summer. Since we do live in Michigan and spend a lot of months covered in snow, I got used to visiting the local organic market with him every Sunday when I lived at home. He even visits the same cashier who always makes sure to tell him her latest jokes. He taught me to always take advantage of a good fresh market. Luckily, I have a similar market near where I live today. The only downfall is that it is about 15-20 minutes away from where I live and it's not near anything that I visit on a regular basis.

Over the past year I have noticed organic produce company ads popping up in various places; social media, TV commercials, etc. I personally get very inspired by going to the market and picking out the best looking fruits and veggies in season so I love to grocery shop and plan my meals that way. Since the market was not that convenient to me however, I was always wanting to try a produce delivery system but never got around to it. Luckily, my older sister who is queen of the coupons and getting amazing deals on everything, told me about Door to Door Organics. She recently started working full time for the first time since having my nieces so her free time has dramatically decreased. She raises her kids very similarly to how we were raised including gardening and eating tons of fruits and veggies so I knew that if she was recommending something to me it must be worth trying.

Door to Door Organics is a service that delivers organic produce and groceries to your house on either a weekly or biweekly basis. They offer different sized deliveries from the Bitty Mixed Box at $24.99 (which is the one I got) all the way to the Large Box at $59.99. Mixed refers to getting both fruits and veggies or you can get one or the other. You can also add pantry items and extras onto your order.

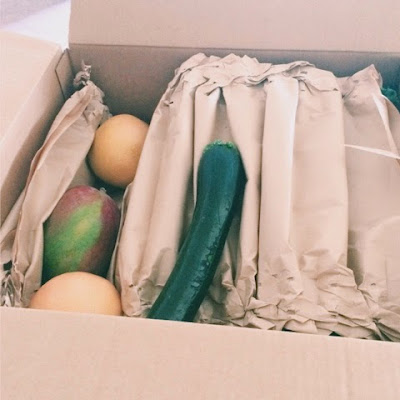
The Friday before your box is scheduled to be delivered, you get an email from Door to Door Organics stating that your box is ready to view. This means they have decided what to put in your box. You can then go view it on their easy-to-use website and either accept that box as it is or they give you the option of swapping up to 5 items in your box. I chose to swap a few but kept the majority of what they gave me. Below is a picture of what I got for my Bitty Mixed Box; 12 bananas, 1 bunch of kale, 2 zucchini, 1 cucumber, 2 grapefruit, 3 gala apples, 1 mango, and 3 small sweet potatoes. (All of it was obviously organic).


Below is what it looked like when I first opened the box.


As far as delivery goes, I like how they give you a space to leave some notes about how you wanted it delivered. I personally live in an apartment complex, so I asked that they leave it to the side of my porch which was nice. While over all I was pretty impressed with my box, I did decide to hold my subscription for the next few months for a few important reasons.

First, as a vegetarian I eat a lot of greens. Spinach and kale are huge for me and I wasn't very happy with how they came packaged in the box. They were just thrown into the mix and not wrapped separately so they came pretty bruised and sad looking. Secondly, with my dad owning a pretty good sized garden, I plan on getting a lot of my veggies from him in the coming months. Lastly, I absolutely hate to waste produce. You have to shop frequently as a vegetarian and this means I either have to get a larger box every week, or still go to the grocery store. As busy as I am, I feel like that will lead to waste and spending too much money. For all of these reasons, I've decided to wait on continuing my subscription until the winter months.

Overall, I think Door To Door Organics is a wonderful idea. If you're someone who is really busy, and doesn't have time to go to the grocery store as often as you need to, this would be a great addition to your diet. It makes eating organic much easier. As for me, I will be returning to my local market because I can't beat the freshness and the prices for the summer time.

If you are interested in trying Door to Door Organics, please email me at andreafontanabeauty@gmail.com and I would be happy to pass along a coupon code for $15 off your first box!

Have a beautiful night,

Dre