The Makeup Lover's Gift Guide

Similarly to the previous Skincare Nerd’s Gift Guide, I wanted to share some makeup products that any makeup lover would be happy to receive. I can tell you that I would be happy to get anything on this list, so whether you have a sister, girlfriend, daughter, or maybe even you need ideas for what you want to ask for, READ ON!

  1. Juvia’s Place Eyeshadow Palettes:

    I’m putting these palettes first on the list for a few reasons. First, the price is unreal. Most of their palettes are around $20 and the quality of the shadows I’ve tried is crazy! They made the list because they are newer to the scene, and I don’t think most makeup lovers will have collected them yet. The pigmentation is amazing and I think any makeup lover would be so excited to unwrap one this year and add it to their collection. My favorite is the Warrior Palette that I got at Ulta for $20.

  2. Brush Cleaning Matte and Brush Cleanser:

    Cleaning your brushes is the least fun part of doing your makeup, but it simply has to be done for healthy skin. Getting a makeup lover a tool to make the process quicker and easier would be amazing! I love this one from Real Techniques because it has a strap that my fingers slide through so it fits right onto the palm of my hand and stays put. It’s really inexpensive and works well! To make it a complete gift, add on a brush cleaner and you’re good to go. My favorite deep cleaning brush cleaner is this bar soap from Dr. Bronner’s. It cleanses my brushes and conditions them to feel so soft!

  3. Makeup Lesson:

    If you know someone who is new to makeup or recently has been getting into it, I highly recommend booking them a makeup lesson with a professional makeup artist. It’s a great way for them to learn new techniques and can be extremely individualized depending on the person! If you are local to the Central Michigan area and would like to gift a makeup lesson with me to someone you love, feel free to email me and we can talk details! I also sell gift cards at the bottom of every page of my website (so scroll down)! 1 hour makeup lessons are $65 with me and I would love to spend time teaching you or someone you love.

  4. Makeup Mirror or Vanity:

    A new mirror to look into while doing their makeup is a great makeup lover gift idea! I personally have one really similar to this one from Conair that was given to me as a gift YEARS ago. I love it because I can take it around my house and do my makeup in any location near a plug, because you guessed it…it also has a light! It’s double sided, one side being more magnified than the other and has lights on both sides.

  5. Beauty Blender:

    It’s no secret that beauty blenders are awesome, but they can be a little pricey. Getting one as a stocking stuffer or an add-on to a gift would make any makeup junkie happy. It’s kind of like getting them the really expensive nice socks that they don’t like buying themselves; but we all need socks right?

  6. Generation G Lipstick:

    I’m obsessed with these. My newest favorite everyday lip product is one of these Glossier Generation G Lipsticks in the shade ‘Cake’. If you have a light to medium skin tone, you can wear it with no makeup and look instantly more put together, or it will compliment whatever makeup look you have on. They give you the perfect lip stain look that I talk about loving all the time! I guarantee that whoever you buy it for, it will live in their purse as a go to product. If you have never shopped with Glossier before, you can click this link to get 10% off your first order!

  7. Makeup Brushes:

    Can a makeup lover ever really have too many brushes? The answer is no, but I think you already knew that. I personally love the Real Techniques brushes and I’ve given them as gifts many times. I especially love their sets for gift giving because you can give more while keeping it budget friendly. The Sculpting set, Enhanced Eyes set, and the Flawless Face set would all be great options. I also really love this Setting brush and have three just in my makeup kit because it can be used in so many ways!

  8. Ulta/Sephora/Target GC:

    Similar to yesterday’s Skincare Nerd’s Gift Guide, I guarantee that if you are giving a gift card to a makeup lover, they have a list of products they are dying to try but don’t want to spend the money on yet. Your money will be very gratefully received so they can try something new! You can always give gift cards with the intention of purchasing a particular type of product (like a new palette or foundation) but allowing them the ability to go in and see products and decide for themselves. I find that this takes away a little of the impersonal-ness that some people fear when gifting someone a gift card. If you tell them the intentions, the thought will not go unnoticed.

I hope this gift guide brought you some ideas for this holiday season. Be sure to come back tomorrow to see my Cookbook Gift Guide and to see how I purchase my cookbooks used and on a budget!

As always, have a beautiful day,

Andrea

Disclosure: Amazon links are Amazon Affiliate links meaning that I make a commission off the purchase of the product through my link. I would never recommend a product that I didn't love and all opinions are my own. I am thankful for you choosing to purchase through my links, as it helps me create more content for Andrea Fontana Beauty.
Dre Does an Adele Inspired Tutorial

I shared the picture above asking if you guys would like to see my Adele inspired makeup look and the response was overwhelming! Thank you always for your support! I obviously bought Adele's album the day it came out and every time I listened to it on my phone, the photo above of her makeup was looking back and me and I knew I wanted to re-create it. I realize it's not a color photo but the defined and contoured eyelook was what I was after. The look is super easy and honestly a great look with or without the liquid liner, for those of you who are still working on the perfect wing! The thing I like most about this look is that it is about layering shadows from light to dark, so you're in complete control of how light or dark you want to make it. Every shadow I used was from the Too Faced Natural Matte Palette and while you certainly don't need this palette to get this look, I highly suggest investing in it or adding it to your christmas wishlist. I don't know what I would have done without this palette for my freelance kit because everything you need to start and blend a look is in it. Without this turning into a Too Faced review....let's begin!
(On my lips is the Maybelline Color Sensational 'The Mattes' Lipstick in Daringly Nude)


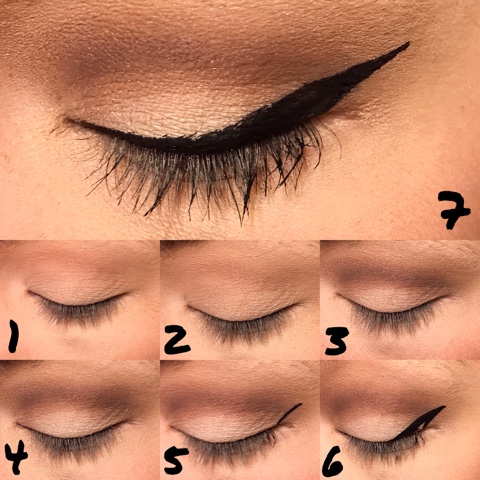
1. As usual I started with a primed eyelid and then applied Heaven from lashline to brow bone using a flat shader brush. 
2. Using a very fluffy blending brush I mixed Lace Teddy and Nude together and applied them throughout the crease. As you can see this doesn't appear too much darker than the Heaven shade, but thats what I want. This look is all about slowly building the color and blending A LOT! Adding the lighter/medium shades in the crease will make blending the darker colors much easier. 
3. Next, I mixed Cashmere Bunny and Risqué on a pencil brush and applied it in my crease. Using the same fluffy blending brush from step 2, I blend the crease color out. I want the edges to be more blended on the top as you can see but the area where my crease meets my lid, I keep pretty intense and not so faded. 
4. The last shadow step is to take some more of Heaven and apply it to the lid to create that contrast between the dark crease and light lid. This is what gives Adele's look that defined and contoured eye shape. 
5. Next it's time for liquid eyeliner. In this look I used the NYC Liquid Eyeliner which is such an inexpensive and great product. It's only a couple dollars and is especially great for those who are practicing winged liner because you won't feel bad wasting expensive liner if you have to remove and re-apply. I always start my winged liner with a small line extending from the end of my lashline outwards. The angle I create is based on following my bottom lashline and extending that line out. 
6. Next, I draw from the end of the tail I've created back to my lashline, creating a little triangle. 
7. Lastly, I create the line along my lashline from the inside of my eye connecting to the tail I've just made. If this seems super confusing let me know and I can create a post completely devoted to how I do winged eyeliner!
(I unfortunately didn't get a picture after I finished my eyeliner, but I always perfect that line of liquid liner along my lid at the end to create a smooth line so please excuse any uneveness!)
8. The last step is lining your waterlines. I used Black on the top lashline and NYX's Wonder Pencil (a nude shade) on the bottom to get that bright open-eyed look like Adele has in the album cover. Two coats of your favorite mascara and you're done!

And that's it! You can get Adele inspired makeup that easily! Let me know if you have any questions or requests of makeup looks to recreate. I really enjoy recreating celebrity looks for you guys!

I hope you all had a wonderful Thanksgiving and please know that I am so thankful for you!

Have a beautiful day,

Dre


Dre Does Makeup Inspiration

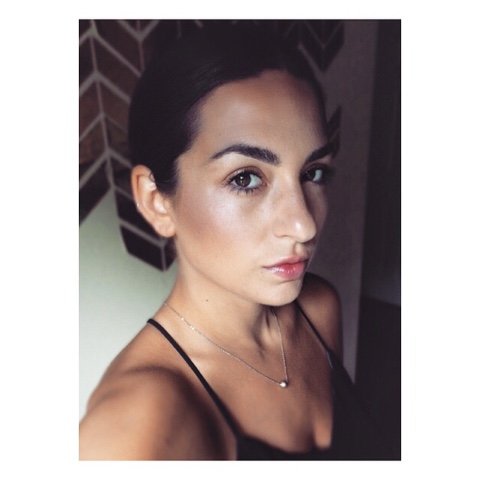
Just in case you don't already follow me on Instagram, I thought I'd post some inspiration photos of looks I have been wearing recently. All are polished and professional looking, yet still quick and easy in the morning!


Lips: Sephora Cream Lip Stain in Always Red 01
Eyeliner: NYC Liquid Liner (The cheapest and best liquid eyeliner! MUST HAVE)

Highlighter: MAC Mineralized Skin Finish in Soft & Gentle

Lips: MAC Cosmetics Limited Edition Matte Lipstick in Mangrove

In all three photos my foundation was the NARS All Day Luminous Weightless Foundation.

Enjoy and follow me on Instagram @drefontana!

Have a beautiful week,

Dre


Dre Does Makeup Looks For The Week

I've been taking pictures of my makeup for work most days and sharing them on my Instagram (@dre_does) for inspiration. I thought it would be nice to every so often share how I created the looks for those of you who are curious!


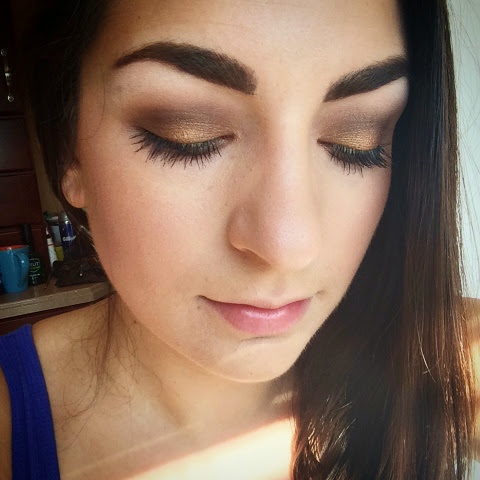
First up is this gorgeous look centered around one of my favorite MAC shadows of all time, Amber Lights. It such a beautiful summer and fall orangey bronze color that really stands out. I also used Orb in the brow bone, Cork as my transition shade throughout my crease and Handwritten to really deepen up the crease and blend out Amber Lights. Lastly I'm wearing my usual mascara, Benefit's They're Real and my upper and lower water lines are lined with Jane Cosmetics' Water Resistent Black Eyeliner. (All three looks are completed with these two steps!)


For this look I started with White Chocolate from the Too Faced Chocolate Bar Palette on my brow bone, Salted Caramel also from Chocolate Bar as my transition color in the crease, Colombia by Cargo Cosmetics in the outer V, and then after spraying a flat shader brush with some MAC Fix +, I gently pressed Loreal's Infallible 24 Hr Shadow in Amber Rush on the lid. I love the look I get by pressing this product over the other shadows. You can still see the definition I gave my outer V through the pressed pigment and it gives a really cool look to the eye! 


For this last look I only used 3 shadows and it was a quick and easy look for a morning I was running a bit late! They all came from the Too Faced Chocolate Bar palette (can you tell how much I love this thing yet? Haha). I used White Chocolate on the brow bone, White Chocolate in the crease and Amaretto on the lid. I just blended everything really well and smoked out the shadows and it looks way more time consuming then it really is! I was really going for an all over bronzed look this day because I'm trying to fit as much bronze in as possible before summer ends! Haha

Let me know if you like these kinds of posts! I love sharing my makeup looks with you because it forces me to try out different combinations and not just stick to my normal looks.

Have a beautiful weekend,

Dre

Dre Does Current Fall Fashion Lusts

As much as I don't want to admit it because it means summer is coming to an end, I am really excited for fall. I baked my first fall-themed recipe (apple cinnamon muffins that were too die for!) and I've been glancing more at fall fashion so I think it's time I admit it. I'M READY FOR YOU FALL! It's like the time when I kept listening to Rhianna songs on repeat but refused to admit that I liked her. Was that a bad analogy? Oh well! Let's talk clothes!!

Warning: I wear a lot of black as a makeup artist, so I gravitate towards black. I just can't help it! It is so easy to pair and always matches a red lip. As Rachel Zoe once said, "I'll stop wearing black when they make a darker color".

I tried this blazer on at H&M last week, in all black (shocker!) and I was in love. This pastel pink color is really starting to grow on me though. The leather detailing along the lapel and the pockets is so great and it fit so well. You're probably wondering why I didn't get it, but the truth is I was visiting this H&M for the first time since it opened and I had a strict list of what I needed and I was trying so hard not to deviate from it. Go me. I'm going to be going back soon and I figured if that size 6 black blazer is still waiting there for me, it will just be meant to be in my closet. Maybe it will even take a trip into Sale-land before then. (A girl can dream)


This skirt from Express gives me life. I love anything that hits at your natural waist because I am definition hour glass shaped and if I don't emphasize my natural waist, I can look much heavier than I actually am. I love how this is knee length but has the sheer panel. I think it adds a classy bit of sexiness in an unexpected way. I will for sure be stalking this online and waiting for some great Express coupons to make sure it becomes mine!


This jacket from The Gap is beautiful. If you know me personally you probably know my obsession with Gap. I get all of my jeans and pants from them and find that if I want a good classic piece that is going to last in my wardrobe for a while, The Gap is my place to go. I love the shade of gray of this jacket and can already think of a million tanks in my closet that I would pair it with to transition my summer wardrobe into fall.

You will be seeing many more of these posts as we get closer to fall and I spend more time browsing fall collections. What do you have your eye on for fall? Send me links, pictures, whatever! I love to get inspiration from others. 

Have a beautiful start to your week,

Dre

Julia Does a Guest Post!

Happy Monday friends! 
Today I bring you a guest post by my beautiful friend Julia! She has a wonderful blog called 'Fit, Fat, and All That' that is about her journey with fitness, healthy living and most importantly self love. We decided to collaborate and write a post for each other's blogs so that is what you will read below! If you'd like to see my post on her blog go visit her link below, but most importantly take some time to read her posts because they are awesome and very inspirational! 

---

Hi all! I am so excited to be doing a guest post for Dre! I absolutely love her blog...I mean come on, she's amazing at make-up and always looks flawless! I love how she talks about accentuating your best assists but also accepting your flaws. I think it's a great message, because no one is perfect. Not even those models in magazines, they don't even look like that, because they are all photoshopped! (Stupid if ya ask me...) 
Anywho.....
A little about me... 
My name is Julia and I write a blog called Fit, Fat, and All That! It's a blog about my journey to living a healthy AND happy life. I have always struggled with my weight, eating, and body image since I was a teenager. I've tried everything from binging and purging, restricting calories, and even tried using those awful diet pills...nothing was working because I wanted a solution fast! I wanted nothing more than to be skinny and all I did was bash my body. I felt awful in my own skin and was constantly worrying about how I looked...and then it finally all changed. My blog talks about my journey to accepting the body I'm in and how I finally started to love my curves and my strength. 

Today I wanted to write to you guys about self-love and learning to accept the amazing body you were given. Like I said, no one is perfect, we have flaws and things we don't exactly love, but you were given one body...and you should love it, no matter what. 

Of course, easier said than done, and I still struggle with it because it's a long process, but it's worth it. 

Here are some things that have helped me work towards loving and accepting myself, curves, cellulite, fat, and all!! 

1. Stop the fat talk! 
Every time I would look in a mirror I would pick apart my body. I hated this spot here and wanted to move that fat there... Of course it doesn't work like that though. I would say I looked fat and gross...and you know what... I started to feel that way too. I hated how negative I was and it was overflowing into other areas of my life. Instead of bashing your body, write down things you love about yourself and your body and put them around your mirror. Each day you will then be reminded of all the wonderful things about yourself! 

2. Find a workout regimen you love!
It doesn't matter if it's walking, dancing in your underwear (which I love!), lifting weights, yoga, swimming... Whatever! Find something that gets your heart pumping and those endorphins flowing! Exercise is not only good for your body but it's good for your mind. I've found I am way happier when I workout regularly. I recently started Crossfit and I AM IN LOVE! It's an amazing workout and I love the family I have become a part of! Find something you feel excited about it and don't give up! 

3. Throw out the scale! 
Not going to lie, sometimes I still weigh myself just to see that I haven't fallen off the wagon tooooo much... But I used to weigh myself multiple times a day, and it got crazy.  I actually am smaller than I was at my lowest weight but it weigh about 10 pounds more. I started lifting heavy weights and I am way more toned than when I weighed less. I try to focus more on how I feel and how my clothes fit. I love to take pictures and compare them, it's amazing the differences you can see that the scale doesn't show. Do not let your happiness be defined by a number on a stupid scale, you are more than just a number. 

4. Find a healthy eating plan that works for you! 
Not every meal plan works for everyone and some people are more sensitive to certain foods. It has taken me years to find what works. I definitely struggle with my eating because I love naughty foods but I try my hardest to eat clean. I try not to eat processed foods because I always feel better when I don't! Also make sure you are eating enough! Lots of protein and veggies guys! Do some research and figure out something that works for you and stick with it! Buuuuut...if you do slip up, don't beat yourself up. We all do it, move on, drink some water, and eat healthy your next meal. Don't sabotage your day or week because of one slip up. 

5. Surround yourself with people who support you! 
This is a major one! If you surround yourself with negative people and people who don't support your journey to a healthier and happier you, then you're going to be a more negative person and it's going to be a lot harder of a journey. Find people who love you, support you, and embrace the true you!!! 

I hope that what I've written today helps you or at least makes you feel you are not alone. It's a long journey and it takes a lot of mental strength...but you can be happy in the body you were given. Everyone is beautiful in their own way and you need to embrace it! 

If you want to read about my journey, head on over to my blog! 

http://fitfatandallthat.wordpress.com

Have a beautiful day everyone. 

~xoxo, Julia


---

Thank you so much Julia for doing this collaboration with me! 

Have a beautiful day friends! 

Dre

Dre Does a DIY: T-Shirt Dress

Here is the other DIY that I have brought over from my previous blog because of the popularity (as you will probably be able to tell, these are the original pictures...haha). I can't even tell you how many of these my friends and I made and wore throughout college for various events. You can use it to cheer on your favorite sports team, celebrate your favorite holiday (This would be a perfect 4th of July Beach cover up), or even a concert outfit!

Four years ago when I was preparing for the World Cup, I came across a T shirt with the Brazilian Flag across it and seeing as I'm a Brazilian I needed to own it. However, the problem was that the only shirt left was an XL and there was no way it was going to fit me. I bought it anyways with the idea that I would some how cut or pin it to make it work. When I got it home I thought I would just chop off the collar and wear it as an over sized, off the shoulder shirt. Then I accidentally cut too much off and realized it wasn't going to work. Too stubborn to admit defeat, I started playing with it until I came up with the design below. It works great for any basic unisex tshirts. I normally wear a small or medium size, so if I want to make a shirt I would use a Large and if I want to make a dress, an XL. Below I've shown step by step directions on how to create your own DIY dress or shirt and provided two other pictures of times I've made them, including the original Brazilian Flag Dress! I hope you enjoy this and find a new use for an oversized T shirt that you might not have ever worn!

Step 1: After laying the T shirt flat, cut it along the bottoms of the sleeves. Also make one huge cut from the top of one sleeve, across the chest (under the collar) and across the top of the other sleeve. So basically cut everywhere you see red above!

Step 2: This is what it should look like. Notice how I wasn't too neat cutting the top? No worries! If you stretch the T shirt from shoulder to shoulder, the edge will roll over, creating a smooth looking 'faux-hem'.

Step 3: That's it for cutting! All you have to do is tie it on now! To do so, step into the shirt. As you can see I'm holding the front of each sleeve in my hands and the back portion is what has fallen to the sides and is behind me.

Step 4: Twist the sleeves and bring them to the back and tie them in a double knot. (Sorry for the exposure of my bra! haha)

Step 5: Hold the back portions of the sleeves that were falling to the side before.

Step 6: Twist the sleeves towards your body.

Step 7: Once twisted, tie them in a double knot and tuck the ends into the dress

Step 8: Adjust the back so everything is covered!


This is the finished product! I hope you enjoyed this! It's quick and easy and a great way to show spirit without wearing a typical T shirt like everyone else. Below are two of the other dresses/shirts that I have made, one for a concert when I was in college and the other is the original Brazilian flag dress that inspired this whole design!


I hope you enjoyed this DIY! If you make your own to cheer on your favorite sports team, celebrate the 4th of July, or something else just as fun, be sure to tag me on Instragram with #dredoes! 

Have a beautiful day,

Dre

Dre Does a Maleficent Inspired Makeup Look

This past weekend on Saturday afternoon, I decided to go see Maleficent. I have heard so many amazing things not only about the movie but the makeup too. I was blown away by the movie and every time they showed Maleficent I was analyzing her makeup. The first thing I did when I got home was go straight to my makeup and figure out how I was going to recreate something. Since I was going to a family BBQ that night I knew I was going to do something wearable so it's a bit toned from the movie but I kept the makeup strong in the areas that were emphasized in the movie. In every look she has cool toned eye looks with really smoked out black liner. It's nothing crazy but still brings some drama. So if you'd like to know what I did to achieve the look below keep on reading.

 
(in Natural Lighting)
1. First off as always, I applied my Urban Decay Eyeshadow Primer and then used the Maybelline Color Tattoo in Tough as Taupe as a base. It's a nice cool-toned gray-taupe color.
2. Next I applied MAC's Espresso Eyeshadow in the crease with my Sigma E39 brush because it's a nice cool toned brown. I concentrated the color more on the outside of my crease since the eye looks in Maleficent were pretty basic on the lids and more dramatic towards the outer portion of the eye. 
3. Next I used my Real Techniques Base Shadow brush (don't be fooled by the name, I find it works amazing in the outer V because of it's pointed tip) to apply the same espresso color in the outer V of my eyelid. Make sure that with each application of color you are blending the shadows out so there are no harsh lines.
4. Now for the lid. I used MAC's Satin Taupe to apply to the lid very softly. It is a great cool taupe color which is obviously what we were going for. I applied this mostly to the inner 2/3 of my lid and blending it slowly into the darkened outer V area.
5. Next I applied a black gel liner to my eyes. I used Maybelline's Eyestudio Gel Liner in Blackest Black. After I let it dry almost all the way, I used a combination of that same Espresso shade and also Carbon from MAC, which is a matte black, to smoke out the gel liner. I used a pencil brush with a fine tip to do this. 
6. After smoking out the top eyeliner, I went back in with my Real Techniques Base Shadow brush but this time applied carbon in the outer V to blend that smoked out liner nicely into the outer V. 
7. Next I applied a black pencil eyeliner to tight line the upper and lower water lines completely from inner to outer corner because the look is so smoked out and dramatic in the lash lines. I really like the black Water-Resistant Eye Liner from Jane Cosmetics.
8. After this I used the same combo of Espresso and Carbon to smoke out the bottom lash line.
9. Next came two coats of my favorite mascara to give me dramatic but not insane lashes since they weren't the focus of the look. I use tarte's Lights, Camera, Lashes! mascara always!
10. Now for the rest of the face I kept things pretty cool toned. I did contour my cheeks but not as intensely as Maleficent because I was wearing this to a family BBQ after! I also used a cool toned natural blush (tarte's Amazonian Clay 12-hour blush in Honored) since her makeup was pretty pale and she never had much of a flush to her cheeks. Lastly, the lips. I was at home visiting so I didn't have my full makeup collection which is why I went with a more blue-toned berry lip. If I had all my products I would have definitely chosen something deeper and more dramatic to go with the look, but you can play up or play down the lips as much as you'd like!

There it is! I hope you enjoyed this makeup look. If you like posts like this where I show you a makeup look and tell you how I do it, please let me know! Also if you have any looks you'd like me to recreate comment below as well. I love doing these types of posts!

Have a beautiful day,

Dre