Dre Does Makeup to Enhance your Tan

On Wednesday I shared my facial self tanning routine that involved two wonderful products from Tarte Cosmetics (click here if you missed it), and I promised I would share the products I've been using to enhance my tan to look very glowy and natural.


 When I have a fake tan on my face, I find that I need to do a few key things with my makeup to make sure it doesn't come off as fake. I try to keep things as simple as possible because adding a lot of  bronzing and tanning will eventually be impossible to pull off as natural looking.


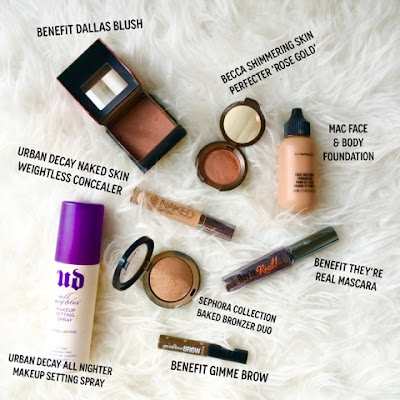
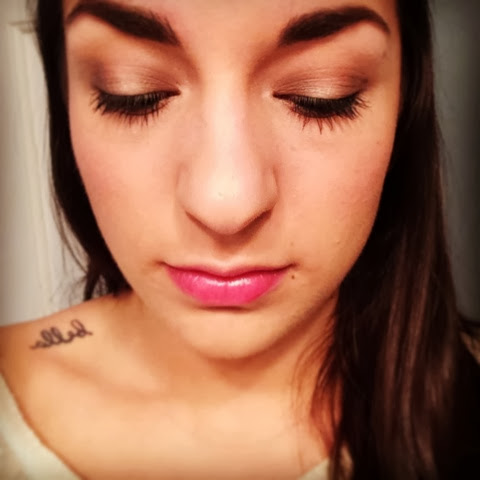
Above are the key products that I have been using in a simple bronzed makeup routine. It's focused mostly on my skin since the tan is what I'm enhancing, with nothing much on the eyes.

The first thing I do is apply my foundation. I love MAC Face & Body because it is a light coverage that is waterproof and natural looking. I want my tan to shine through so I think it's important to find a foundation that compliments my skin tone rather than covering it up. I use a brush to buff this into my skin really well.

Next, I use my Urban Decay Naked Skin Weightless Concealer to cover any blemishes or areas that need a little more coverage. I love how light this concealer feels on the skin and how natural it looks. I really agree that it is weightless and complete coverage.

After concealing, I work on bronzing. I found this Sephora Collection MicroSmooth Baked Bronzer Duo in 01 Honey Heat in my collection that I remembered that I used to love and decided to put it to work. I love how one half is really shimmery and the other is more of a matte finish. I think it's important to use different tones and shades of bronzers when trying to use makeup to enhance your tan because they create dimension. The more dimension, the more natural your look will be. I use a large powder brush to mix the two shades in a 'E3' pattern. This simply means that if you trace from your left temple, down to the hollows of your cheeks, to your jawline, it creates the shape of an E. If you do the same on the right side it creates a number 3. Google this method if you need a little more explanation. It's really easy! I find this method is the quickest and easiest way to add a beautiful bronzed glow to the skin in the areas where you would naturally tan. I then take a smaller fluffy brush and use the darker, less shimmery side to contour my cheeks a little bit.

Next, I apply Benefit's Dallas blush because it is a very natural warm brown tone. It looks less like blush and more like a natural flush on the skin and it complements a tan really nicely. After blush, I move on to highlighter. I've been loving the Becca Shimmering Skin Perfecter in Rose Gold because it is such a rosy highlight shade. It looks beautiful applied to the high points of the face.

Lastly, I apply my brows and mascara. For these I use my favorites both by Benefit; Gimme Brow (a tinted brow gel that voluminizes and keeps my brows in place) and They're Real (my holy grail mascara). As with all of my makeup looks, I always spray a setting spray to hold the looks in place for the rest of the day. For this one I used Urban Decay's All Nighter.

There you have it! My quick, easy, and natural makeup look to emphasize a beautiful fake (or real) tan! As usual, if you have any questions please let me know!

Have a beautiful weekend,

Dre
Dre Does Empties #2

I didn't realize it had been months since I have posted one of these until I looked back. I am definitely due! If you have never seen one of my Empties posts before, it is where I share products that I have used up and give you the verdict on whether or not I would purchase them again. So let's get started!


I decided to split up the products into two categories to make it easier. First I'll talk about skincare and then makeup products.


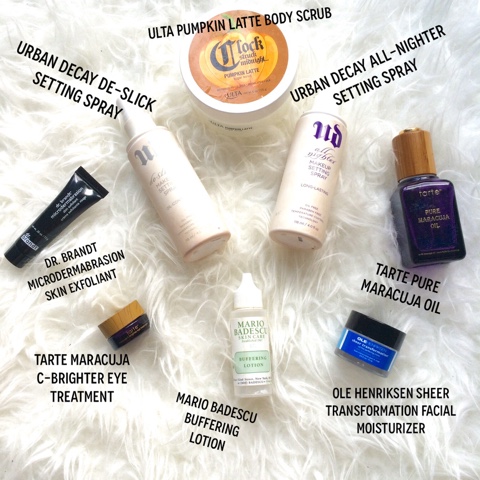
Ulta Pumpkin Latte Body Scrub: I aboslutely love Ulta's body scrubs. This one was a special edition holiday scent they came out with. It was my favorite of the collection so I bought 3 of them I think which is why I'm still using them up in June. Let's just say I'm dying to get into some other scents I have but I'm trying to be good and use these up. If you need a good gritty exfoliating scrub, you need to try these! I use them to exfoliate before shaving since I can't use shaving cream and they work great! Definitely check them out the next time Ulta has one of their frequent Buy # get # free sales!
Verdict: I will purchase the body scrubs again, just not in this scent because I'm pretty sure I've almost OD'ed on it...

Urban Decay Setting Sprays in All Nighter and De-Slick: De-slick was the first setting spray I ever fell in love with and to this day it is my favorite that I have tried. I love how well it controls my shine and makes everything stay put. I use it on every bridal client, especially in the summer so no makeup melts off the face. A few months ago there was an All Nighter two-pack for a ridiculously good deal at Ulta, so I decided to pick that up instead of De-Slick and while I still like it, it's not my favorite. It does help my makeup last, but for oily skin and the summer heat, I still prefer De-Slick. 
Verdict: I am still finishing up the other half of my two-pack of All Nighter, but I am going to try the Makeup Forever Mist & Fix next. Updates to follow.

Tarte Pure Maracuja Oil: Do I really need to talk anymore about this on here? Haha if you have been following me for a while you know that this is my holy grail moisurizer. If not, I can't say enough great things about it! I use it morning and night instead of a moisturizer (or after a moisturizer in the off chance that I am dry) and it helps my skin tremendously. I wake up every morning with soft and supple skin and the vitamin C really helps even out my skin tone and fade old scars. I feel like it has also brought a radiance back to my skin that I love.
Verdict: I will repurchase it until they stop making it. And then I will hide in my room and cry until Tarte decides to bring it back into production. So yeah... You should try it...

Ole Henriksen Sheer Transformation Facial Moisturizer: I really love Ole Henriksen's products and this is no exception. If you're looking for a light moisturizer that will exfoliate and help fade hyperpigmentation and acne scars, try this one. A little goes a long way, it absorbs quickly and feels so nice and light on the skin.
Verdict: Definitely worth trying if you like light, exfoliating moisturizers. I will probablly purchase a full size for the summer for days that I need extra moisture to pair with my Maracuja Oil.

Mario Badescu Buffering Lotion: I was recommended this product when I was suffering from cystic acne on my chin because it is designed to target deep cystic blemishes and this is already my second bottle to go through. I really noticed a difference and hardly ever the deep cystic blemishes anymore! I highly recommend it if you get them! 
Verdict: Already have purchased and am using my third bottle!

Tarte Maracuja C-Brighter Eye Treatment: This is the sample size that I got free with purchase from Ulta, but I currently am using the full size and I love it. I use it as my eye cream morning and night and feel like it is really helping diminish the darkness around my eyes. I mentioned it in my May Favorites if you want to know more!
Verdict: Unless I discover a new eye treatment that I want to try, I will probably repurchase this one when I am out.

Dr. Brandt Microdermabrasion Skin Exfoliant: This is the deluxe sample size that I got from an Ipsy Glambag probably over a year ago, but I made that thing last as long as I possibly could until I got the full size. I love the scent because it smells like lemons. It does a wonderful job of exfoliating the skin but I would be careful if you have super sensitive skin, because sometimes it can hurt slightly. I also like that you don't need a lot of product for one use because it is an expensive one.
Verdict: I probably won't repurchase the large size because it is so expensive and I don't mechanically exfoliate my face as much as I do chemically.


MAC Pro Longwear Concealer in NC30: I absolutely love this concealer and it is my favorite full coverage undereye concealer. It literally does not budge until you use a makeup remover or cleanser to get it off. It's no stranger to my Freelance Kit and something I always go back to.
Verdict: I already have a few backups because I can't go without it. It will always be something I repurchase.

Benefit's They're Real Mascara: I feel like I should be embarrassed that I have 4 in my empties but it's seriously the only mascara I wear because nothing compares to it. I makes my lashes longer while still making them look thick and voluminous. The brush is so easy to use to comb through your lashes so you have no clumps. The part that makes my favorite mascara though is the wear. I have crazy long bottom lashes and 99% of mascaras leave dots on my undereye area because they just can't stay put. Not with They're Real though. I don't have to worry about smudging or dots! It is so worth the $23 price tag. 
Verdict: I have obviously repurchased this many, many times and don't plan on stopping!

Fresh Sugar Lip Treatment: I talked about my love for these Lip Treatments in a recent post (click here to see it) and I used up one of the original Rose Treatments. This one is great if you don't want a lot of pigment. I love that these have SPF so I use them a lot in the summer. 
Verdict: While I love the rose color, I like to try a new shade every time I purchase them!

Benefit Gimme Brow in Medium/Dark: This product is another holy grail for me. I love how easy it is to use. If you are scared to fill in your brows or need a gel that will hold them in place, do yourself a favor and head to a Benefit counter to at least try it. I have gotten so many people addicted to it, due to it's ease of application and natural look! It only comes in two shades (I wear the darker of the two). It has little microfibers in the tinted gel that cling to your brow hairs, giving a fuller but still natural, appearance. 
Verdict: This is another product I will always have on hand because I never leave the house without at least this and mascara!

Well those are my empties for now! I feel like this post turned into an accidental favorites post because I really love so many of these products, but I think it's still helpful to see the products I love. I hope you enjoyed and have a wonderful week!

Have a beautiful day,

Dre


Dre Does an Ipsy Unboxing

Happy Friday friends! In case you missed my last post about Ipsy, I've decided to change how I post about it. Instead of reviewing every product every month, I'm going to write a quick post showing everything I got each month with it's retail value and links to find out more about the products and where you can purchase them yourself. Then every few months I'll share my favorites from various bags. This way I can truly test out products and don't feel like I'm bombarding you with information! If something is horrible however, I'll make sure to share that too. With that being said, here is what I got in my May Ipsy Glambag.

Should we start off by talking about how adorable the bag is? It has a neon lime green lining too so it is amazing! I love the sketch on the front.

1. Klorane Smoothing and Relaxing Patches: I received two sets of these eye patches that are designed to go right below the eyes and do exactly what the name says; sooth and relax. I love when Ipsy gives you a few sets to try the product more than once! You can get 7 sets for $21 at Kloraneusa.com

2. Chella Eyebrow Color Pencil in Tantalizing Taupe: This super fine pointed eyebrow pencil reminds me a lot of the Anastasia Brow Whiz, minus the spooly on the end. I do like that it is automatic so no sharpener needed! Retails for $18 at chella.com

3. Cotz Face Natural SPF 40: A natural and smooth matte finish sunscreen that is 100% free of oils and chemical sunscreens. A full size retails for $19.99 at cotzskincare.com.

4. Luxie Beauty Tapered Blending Eye Brush 205: A 100% cruelty free brush with synthetic hairs and rose gold retails. This exact brush retails for $12 at luxiebeauty.com.

5. Urban Decay 24/7 Glide-On Lip Primer Pencil in Ozone PLUS Bonus samples of the Revolution High-Color Lip glosses in Failbait and Bittersweet: I really like that Ipsy included the samples of both of these new products from Urban Decay so that you can see how they work both together and separately. I always love new lip products to try especially from brands I already know and love. The primer pencil retails for $16 full size and the lip glosses are $22 both at urbandecay.com.

So overall I'm really excited about this Glambag. It's full of things I can't wait to start trying. Not including the value of the bag and bonus lip glosses, the value of this month's bag was $45.23, which is amazing considering the $10 it costs for the monthly subscription!

Does anything stand out for you? I can't wait to try it all! Let me know if you want to see some reviews on any of these specifically and look out for that post on my favorites in a few months!

If you're interested in signing up for the subscription yourself, click this link here!!

Have a beautiful Memorial Day weekend,

Dre

Dre Does a Beauty Haul

Hello there beautiful people! I hope you had a fantastic thanksgiving if you celebrated and spent a lot of time with family and friends. I have so much to be thankful for including all of the support I get from all of you! 

Within the last few months I have been shopping mostly for Christmas presents but couldn't pass up the discounts I get as a ULTA employee to pick up some products I have been eyeing. I also managed to accumulate a lot of ULTA rewards points in the process and desired to cash them in for some items for my makeup kit that I knew I'd eventually want and use. I wanted to share them so that if you have questions, want reviews or tutorials, I can help! 

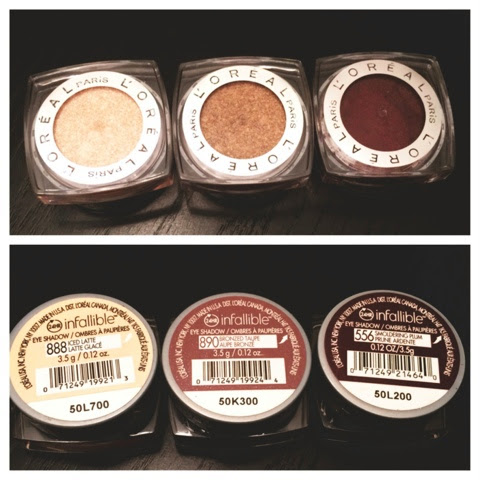
First up were my favorite eyeshadows from the drugstore aisles, the Loreal infallible Eyeshadows in Iced Latte, Bronzed Taupe, and Smoked Plum. I already have Amber Rush and have mentioned how much I love it, so I figured I would pick up some new shades while I had the extra discount.

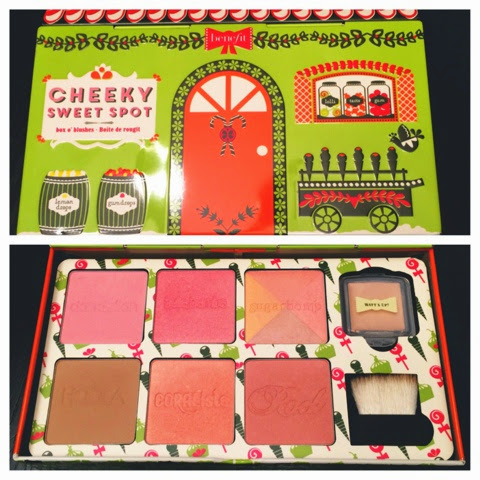
As a Benefit Arch Expert and long time Benefit lover, I am always excited to see what Benefit comes out with for the holidays. I snagged my Cheeky Sweet Spot Box O' Blushes right when it first came out because not only is it an amazing deal but it is so adorable. You get 6 of Benefits Box O' Powders (including Dandelion, Sugarbomb, Hoola, Coralista, Rockateur and even Bella Bamba which is now discontinued), a mini brush and a small pan of Watt's Up highlighter. It all comes in a beautiful tin and lifts up and can be reused later! 

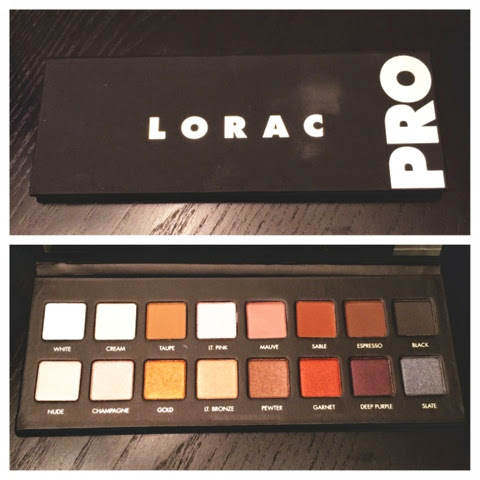
I knew that the original Lorac Pro Palette was a classic that I needed for my kit so I picked it up when I redeemed points. I love that it has one row of matte shadows from white to black, and a row of shimmer and satin shades from light to dark.

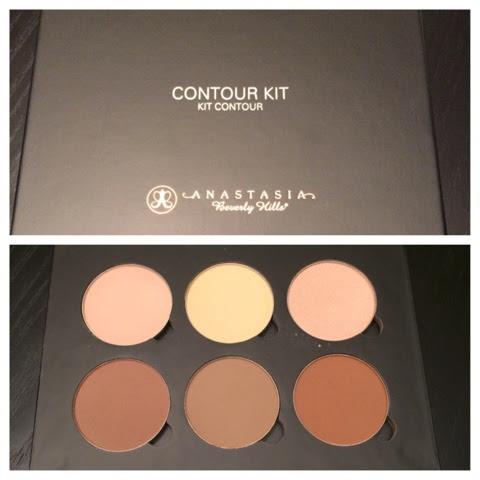
I found it the absolute best coincidence that I had tons of points to redeem the day that ULTA launched the Anastasia Contour Kit in stores. I have a very warm and golden undertone so this is perfect for my skin tone and I had been dying to try it. I've been using it a lot so expect a review soon!

The only Naked palettes I have had for the past few years have been the original and the Naked basics palette (original as well) and I decided to pick up the Naked 3 with my points because the colors are unlike anything I have already. This is the perfect bridal palette so I'm excited to add it to my kit. 

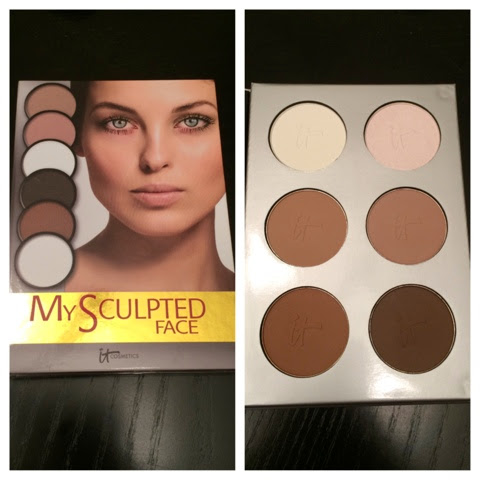
Yes another contour kit...haha I couldn't help it though because the tones are much cooler than the Anastasia one and that dark shade at the bottom allows for contouring a larger range of skin tones so I had to pick this one up too. The It Cosmetics My Sculpted Face Palette is so buttery and smooth and makes blending a breeze so in the ULTA shopping bag it went!

Lastly, we have the only skincare item I bought, but a great one at that. If you've been reading my blog for awhile you know I love the Dr. Brandt Microdermabrasion scrub so I decided to try out the Dr. Brandt pores no more Vacuum Cleaner for blackheads and congested pores! I've done it once and so far I like it so look for a review on this too! 

Reminder, this was not bought all at once and while I did use my own money for all of it, I did buy most of it either during the ULTA employee sale or redeemed with an amount of points that I'm too embarrassed to share with you...haha. If you're not already an ULTAmate Rewards member what are you waiting for? It's a ridiculously amazing program! 

Remember, all questions and ideas could be turned into future blog posts! So comment, share and ask away my beauties! 

Have a beautiful day,

Dre


Dre Does : My Acne Story - Part Three

Part Three is here to give you some amazing products for covering acne while it's healing! In case you missed parts one and two click the links to catch up before reading on. In part one I gave you a little background and introduction to my acne and in the second part I shared what changes I made in both my lifestyle and skincare routine in order to heal it! Today however, I'm going to share some more products, except this time for concealing. These items worked amazing for me and I definitely recommend trying them out. 


First up we have my favorite foundation of all time, the TARTE AMAZONIAN CLAY 12 HR FULL COVERAGE FOUNDATION. This is all I wear most days because it is so light but also build-able. I love that Tarte Cosmetics is paraben and mineral oil free, among many other ingredients as well. I feel like this allows my skin to breathe and doesn't feel heavy at all. It's the closest I've ever gotten to serious full coverage foundation while still looking natural. I get complimented on my smooth and perfect looking skin almost every day at work and I 100% attribute it to this foundation. People don't know my skin is extremely discolored and uneven underneath. I've written many posts on it before but it is truly a holy grail item in my makeup bag. The Amazonian Clay is amazing at balancing my oily skin and keeping me shine-free. I wouldn't recommend it for anyone with dryness or flakey skin however. It is truly best for oily skin because the clay will dry you out even more and cling to patches if there and then it really will look unnatural. 

If you can't shell out the $38 for the Tarte foundation, I recommend checking out COVERGIRL'S OUTLAST STAY FABULOUS 3-in-1 FOUNDATION. This was my favorite before I discovered the Tarte one and it's an amazing foundation and very similar. It also gives a matte finish which I think is key in covering acne. Any bit of shine will call attention to the texture of your skin, so if it is bumpy make sure to use a matte finish foundation. This doesn't mean you have to have a completely matte face. Add dimension in the right places with a highlighter later, but start with a nice matte base to conceal the acne better. This foundation is also long wearing and gives great coverage. I'm not normally into gimmicky products that say they are multiple products in one (in this case primer, foundation and concealer) but I really think it does these things so good job Covergirl!

My favorite concealer is the BENEFIT BOI-ING INDUSTRIAL STRENGTH CONCEALER for concealing blemishes but the SONIA KASHUK HIDDEN AGENDA PALETTE is a close second. Both give great coverage and are a thicker, creamy consistency which I prefer for spot concealing. I like that the Sonia Kashuk comes which a few different shades so you can perfectly match your skin tone and also a setting powder. My favorite way to apply these is to use my ring finger (clean so we don't spread any bacteria!) to really melt the product into my skin and make it look more natural. 

The second key step in concealing your blemishes is prolonging the wear so that they stay covered all day! For this you need a good setting powder. I personally love the RIMMEL STAY MATTE POWDER for not only mattifying my t-zone but also for setting my concealer. I just use a very small fluffy brush to dust this over my concealer and it helps it last all day! 

Lastly I have to talk about my URBAN DECAY DESLICK SETTING SPRAY because I seriously don't know what I would do without it. This product is key in making my makeup and concealing last all day, especially when I'm covering blemishes! I prefer the oil control formula because I am oily but they have two other options as well for dry and normal skin. You cannot feel this spray on your face and it seriously is the secret to how I get my makeup to last a good 12 hours. 

Let me know if you have any favorite makeup products for dealing with acne. I really hope you enjoyed this series and if you like this type of post be sure to let me know! Remember not to get frustrated and to be patient when dealing with skin! Start the good habits and you can clear your acne as well! 

Have a beautiful weekend,

Dre
Dre Does an Ipsy Review

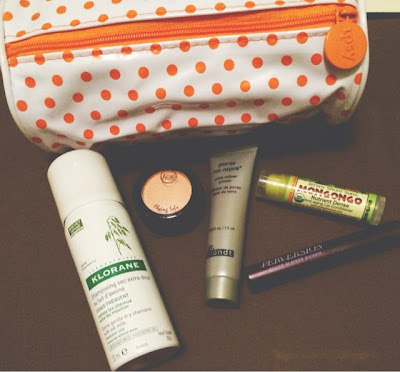
It's that time of the month already and I'm back again with another Ipsy Glambag review for August! Here is a photo of everything I got this month. 

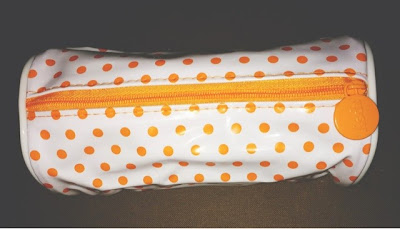
The bag this month was school themed so I liked that they switched up the shape of the Ipsy bag and made it a round pencil case-like shape! 

But now for the good stuff that came inside! 
First up was this Klorane Dry Shampoo with Oat Milk. I really loved this dry shampoo. The dispenser was awesome because it sprays out a very dense mist which is great at getting all of your roots. I also love how it doesn't leave my hair feeling really sticky and dirty like most dry shampoos. It also doesn't smell that bad so it works well in my book! I even found that while it was a white product, it wasn't that hard to work into my scalp to get rid of any sort of white cast that you traditionally get with dry shampoos.The full size is valued at $19.50 so this 1.06 oz size is worth $6.46!
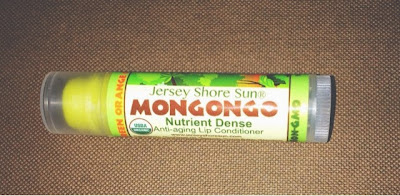
The Jersey Shore Sub Mongongo Nutrient Dense Anti-Aging Lip Conditioner was the next item I found in my bag. It's in the flavor Mandarin Green Orange Ginger and it's a great moisurizer. I've been keeping it by my bed to apply at night before I sleep and I've been loving it! This is the full size chapstick and it's worth $5.50 bringing the total to $11.96!

Next, I received a Flying Solo Individual Eyeshadow from J.cat Cosmetics in the shade Half Naked. While I thought it was very cool that the packaging includes a mirror if you flip up the shadow, I wasn't very impressed with the shadow. The shade is awesome but the pigmentation isn't quite there. It took me a few swipes to get what you see above which is not what I like in a shadow. This is a full size shadow but since it retails for only $2.99 I'm not very surprised with the pigmentation and quality. This brings the bag value to $14.95.
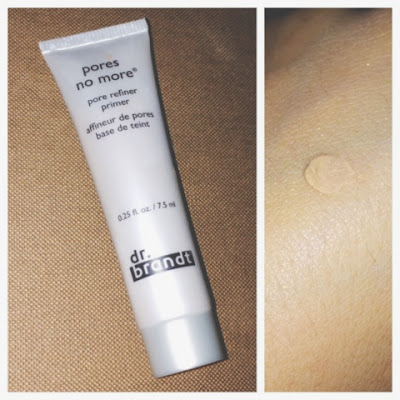
Next up we have the Dr. Brandt Pores No More Pore Refiner Primer. I really liked the texture of this primer as I applied it. However, I felt like it was very drying as I blended it into my skin. Almost as though it felt a little rougher as I blended it in which I can only imagine it feels worse on dryer skin since I am very oily. It's more expensive than my holy grail primer Benefit's Porefessional so I don't think I would ever repurchase it. I did like how my foundation blended over it though so I think it does a good job of filling in your pores. The full size will set you back a good $45, so this .25 oz deluxe sample is worth $11.25! Now we are at $26.20!
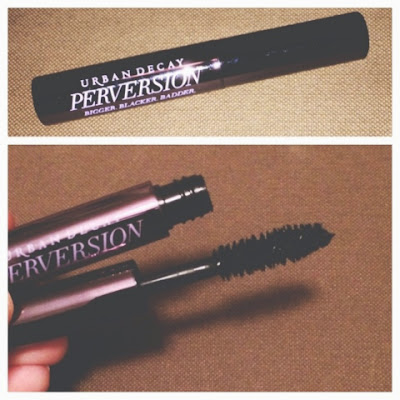
Lastly, we have a deluxe sample size of Urban Decay's new Perversion mascara. I have been curious about it so I was excited to be able to try it out. I was shocked at how much it didn't do for my lashes though! It felt as if the brush was too dense and my eye lashes couldn't properly get through the bristles to pick up any product. I had to do three coats of it to notice any difference on my lashes which honestly just looked like one coat of any other mascara. The worst part was that by the end of the day I couldn't even see any remaining mascara on my lashes. It wore away to the point of looking like I hadn't put any on. Let's just say that I'll be sticking with my favorite Benefit's They're Real Mascara! A full size Perversion mascara is worth $22 so this deluxe sample is worth $5.50 and brings the final value of August's Ipsy Glambag to $31.70!

While this bag was technically the lowest valued bag I've received so far, I wouldn't say I was disappointed with it. The products I liked made the value still way over $10 so as long as I'm getting my money's worth, I'm happy!

As usual, here are the previous months' reviews and values!

August Ipsy Review ($43.73)
May and June Mini Review ($37.67 & 37.36)


Have a beautiful weekend,

Dre

Dre Does a Classic Makeup Look

A while ago I wrote a review on the Naked Basics palette showing how it was an absolute necessity for all women. So today as I was doing my makeup for work I decided to do a look completely with a palette and share with you all so you could see how wonderful it actually is! (Pssst. Urban Decay announced they will be releasing a Naked Basics 2 Palette so you can only imagine how excited I am for that release!!!) The look I chose is very classic because I knew I wanted to pair it with MAC Ruby Woo because I haven't worn it in awhile and I live for this lipstick. (Also don't mind my beautiful pajamas that I was getting ready in....haha)


This look was super easy. I simply first applied W.O.S. all over the lid and up to my brow. Next I used a fluffy crease brush (I'm not sure of the brand because it's old and rubbed off!) to blend Naked 2 into my crease.  Next I concentrated Faint into the outer V with my Sigma E39 that was slightly more dense to give me a more concentrated application. I went back to my other blending brush that I used Naked 2 with, and without adding any extra color I blended everything more. Lastly I used my favorite Real Techniques Eye brush the base shadow brush to further define the outer V by mixing Faint with Crave. After some more blending with my Sigma E71, I used my favorite eyeliner, Benefit's They're Real Push Up Liner to give myself some winged liner. For me this isn't that dramatic but if you're new to winged liner start small and work your way up to more drama! Two coats of my favorite mascara Benefit's They're Real, and the look was done. All I had to do was add my Ruby Woo lipstick and this classic makeup look was done!

What do you think? Let me know if you try this look! Send me pictures on Instagram with the #DreDoes if you do!!

Have a beautiful day friends,

Dre
Dre Does a Maleficent Inspired Makeup Look

This past weekend on Saturday afternoon, I decided to go see Maleficent. I have heard so many amazing things not only about the movie but the makeup too. I was blown away by the movie and every time they showed Maleficent I was analyzing her makeup. The first thing I did when I got home was go straight to my makeup and figure out how I was going to recreate something. Since I was going to a family BBQ that night I knew I was going to do something wearable so it's a bit toned from the movie but I kept the makeup strong in the areas that were emphasized in the movie. In every look she has cool toned eye looks with really smoked out black liner. It's nothing crazy but still brings some drama. So if you'd like to know what I did to achieve the look below keep on reading.

 
(in Natural Lighting)
1. First off as always, I applied my Urban Decay Eyeshadow Primer and then used the Maybelline Color Tattoo in Tough as Taupe as a base. It's a nice cool-toned gray-taupe color.
2. Next I applied MAC's Espresso Eyeshadow in the crease with my Sigma E39 brush because it's a nice cool toned brown. I concentrated the color more on the outside of my crease since the eye looks in Maleficent were pretty basic on the lids and more dramatic towards the outer portion of the eye. 
3. Next I used my Real Techniques Base Shadow brush (don't be fooled by the name, I find it works amazing in the outer V because of it's pointed tip) to apply the same espresso color in the outer V of my eyelid. Make sure that with each application of color you are blending the shadows out so there are no harsh lines.
4. Now for the lid. I used MAC's Satin Taupe to apply to the lid very softly. It is a great cool taupe color which is obviously what we were going for. I applied this mostly to the inner 2/3 of my lid and blending it slowly into the darkened outer V area.
5. Next I applied a black gel liner to my eyes. I used Maybelline's Eyestudio Gel Liner in Blackest Black. After I let it dry almost all the way, I used a combination of that same Espresso shade and also Carbon from MAC, which is a matte black, to smoke out the gel liner. I used a pencil brush with a fine tip to do this. 
6. After smoking out the top eyeliner, I went back in with my Real Techniques Base Shadow brush but this time applied carbon in the outer V to blend that smoked out liner nicely into the outer V. 
7. Next I applied a black pencil eyeliner to tight line the upper and lower water lines completely from inner to outer corner because the look is so smoked out and dramatic in the lash lines. I really like the black Water-Resistant Eye Liner from Jane Cosmetics.
8. After this I used the same combo of Espresso and Carbon to smoke out the bottom lash line.
9. Next came two coats of my favorite mascara to give me dramatic but not insane lashes since they weren't the focus of the look. I use tarte's Lights, Camera, Lashes! mascara always!
10. Now for the rest of the face I kept things pretty cool toned. I did contour my cheeks but not as intensely as Maleficent because I was wearing this to a family BBQ after! I also used a cool toned natural blush (tarte's Amazonian Clay 12-hour blush in Honored) since her makeup was pretty pale and she never had much of a flush to her cheeks. Lastly, the lips. I was at home visiting so I didn't have my full makeup collection which is why I went with a more blue-toned berry lip. If I had all my products I would have definitely chosen something deeper and more dramatic to go with the look, but you can play up or play down the lips as much as you'd like!

There it is! I hope you enjoyed this makeup look. If you like posts like this where I show you a makeup look and tell you how I do it, please let me know! Also if you have any looks you'd like me to recreate comment below as well. I love doing these types of posts!

Have a beautiful day,

Dre

Dre Does a Makeup of the Day


I posted this a sneak peek of this makeup look yesterday. I think it's the perfect Natural makeup look. It's also really quick and easy. I did my normal face routine, but I wanted to point out some key aspects of the look. First off, whenever I'm doing a super natural look I always make sure to fill in my brows. It's a simple way to give your face structure and make you look polished and put together without much makeup on. I use the color Faint (a medium to dark brown) from my Urban Decay Naked Basics palette and a small angled brush. Then I just set it with a clear mascara so my brows stay put and the color lasts longer. 

Next, I did all of the tips from yesterday's post on making your eyes look bigger and brighter. You can especially see how I defined my eyelids. I applied a Maybelline Color Tattoo cream shadow in Barely Branded (70) and then on top I used my Naked Basics palette again (I wasn't exaggerating in that post a couple of weeks ago about how much I loved it haha). I added the lightest shade Venus in the middle of my lids, added Faint in the inner and outer corners, and blended everything together nicely. That's it! Even though they're matte shadows, I love the glow it gives my eyes. They really pop and look bigger! 

All I did after this was apply my Rimmel Lash Accelerator mascara and add some Chapstick and I was done! I've listed all the products below to achieve this look. It's seriously my go-to easy makeup when I'm rushed and still want to look put together! 

Laura Geller Spackle Tinted Under Makeup Primer in Bronze
Covergirl Outlast Stay Fabulous 3 in 1 foundation in buff beige
Sonia Kashuk Hidden Agenda Concealer Palette in 07 light
NYX Wonder Pencil in 01 Light
tarte Amazonian Clay Bronzer in Park Avenue Princess
tarte Amazonian Clay 12 hour blush in treasured
tarte Amazonian Clay Highlighter in Champagne
Revlon Photoready Transulecent Face Powder
Maybelline 24 HR Color Tattoo Metal in Barley Branded
Urban Decay Naked Basics Eyeshadow Palette (colors Venus and Faint)
Maybelline Great Lash Mascara in Clear Transparent (for brows)
Rimmel Lash Accelorator Mascara in Extreme Black

Have a beautiful day,

Dre

Dre Does a Makeup of the Day

We've had quite the blizzard in the Midwest these past few days. Seeing as work and school were both cancelled, I took the opportunity to play with some new makeup items I picked up before the holidays that I never got to play with. I thought I'd share it as well as a list of products I used. If you have questions or would like a review of any of the products, leave a comment below and I'll get right on it! 


Products used:
Laura Geller Spackle Tinted Under Makeup Primer in Bronze
Covergirl Outlast Stay Fabulous 3 in 1 foundation in buff beige
Sonia Kashuk Hidden Agenda Concealer Palette in 07 light
tarte Amazonian Clay Bronzer in Park Avenue Princess
tarte Amazonian Clay 12 hour blush in treasured
tarte Amazonian Clay Highlighter in Champagne
Revlon Photoready Transulecent Face Powder
Urban Decay Naked Basics Eyeshadow Palette (colors Venus, Foxy, Naked 2, and Faint)
Bh cosmetics 120 color palette 5th edition
Loreal Carbon Black Lineur Intense Felt Tip Liquid Eyeliner
Rimmel Lash Accelorator Mascara in Extreme Black
NYX Butter Gloss in Creme Brûlée 

Dre Does Her Favorite Eyeshadow Palette

Eyeshadow palettes are always huge. It seems like every few weeks there's a new one getting hype from bloggers and YouTubers alike. I had my eye on the Urban Decay Naked Basics palette for a long time, but since it's 6 matte neutral shadows I figured it could be easily be duped with other colors. Boy was I wrong. The problem with most palettes today I think, is that they may have an array of beautiful colors in them, but they don't possess every color you need to create a full eye look. I found myself still having to carry a highlight color, crease color, and matte black. This is where the Naked Basics has changed everything. I think it is a must have because not only is it a stand alone amazing natural eye or even dramatic eye palette, but it's addition to whatever palette you already have allows you to completely multiply the possibilities of looks. You have highlight colors, crease colors, and that matte black can turn up the drama for any look.

(Naked Basics compared to my iPhone 5s)

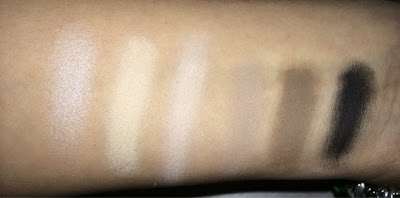
If you travel a lot, being able to add one small palette that can do so much is beneficial. You could bring just this one, or you could bring another palette with some shimmery, more dramatic colors, and you would have all of your bases covered for any eye look you could want. Below are the eyeshadow colors in the palette and swatches without any primers or other products. 

(L to R: Venus, Foxy, W.O.S., Naked 2, Faint, and Crave)


Starting from the left, Venus is a light shade with only a slight satin sheen. It's so slight I wouldn't even call it a satin finish. It's a great inner corner color. Next are two wonderful highlight shades, Foxy (more yellow toned) and W.O.S. (more pink toned). Naked 2 is a great gray/brown/taupe color that I love for the crease. Next we have Faint which is a perfect matte brown color for adding more dimension to your look. Lastly, Crave is the matte black that is key in transitioning looks into more dramatic, night looks. 

Overall for only $27 I think this palette is an amazing addition to anyone's collection and a must have for those who like mattes or travel a lot. 

Have a beautiful day,

Dre