Everyday Glowing Skin Makeup Tutorial Video

Welcome back to Andrea Fontana Beauty!

I have finally filmed a YouTube video on the glowing skin look I've been wearing nonstop since I got back from my Florida vacation. I love how healthy it makes my skin look, but also how quick it is!

Please be sure to LIKE and SUBSCRIBE to my channel so you can always stay updated!

INSTAGRAM: www.instagram.com/andreafontanabeauty

FACEBOOK: www.facebook.com/andreafontanabeauty

Welcome back to my channel! Today I'm sharing the glowing skin look I've been wearing all the time since my recent vacation. Please be sure to LIKE and SUBSCRIBE to my channel so you can always stay updated!

Here are the products and links I mentioned in order of appearance:
-It Cosmetics CC Cream in Light
-Becca Cosmetics Shimmering Skin Perfecter in Opal
-Urban Decay Naked Concealer in Light Warm
-RCMA Makeup No Color Powder
-Sonia Kashuk Undetectable Creme Bronzer: Video on this--> CLICK HERE
-Benefit Cosmetics Dallas Powder
-Glossier Haloscope in Moonstone
-Glossier Boy Brow in Black
****For 10% off your first Glossier order! CLICK HERE
-Loreal Voluminous Mascara in Carbon Black
-Lash Boost Growth Serum & Post --> CLICK HERE

If you'd like to support Andrea Fontana Beauty in an easy way, click this link before buying what you were already going to buy on Amazon. The price stays the same for you and I get a commission of your purchase! If you choose to use it, thank you always for your support!
***http://amzn.to/2HA8Aj5

Let me know if you have any more makeup look requests! I have really fallen in love with creating these videos so I hope you enjoy them!

Have a beautiful weekend,

Andrea
 

Romantic & Soft Valentine's Day Makeup Tutorial

I'm back with the second makeup tutorial for Valentine's Day! Over on my Instagram (link is to the right-->) I created a poll in my stories asking if you wanted to see a romantic & soft makeup look or a bold & daring one. I already created the bold & daring, so here is the second one, romantic & soft!

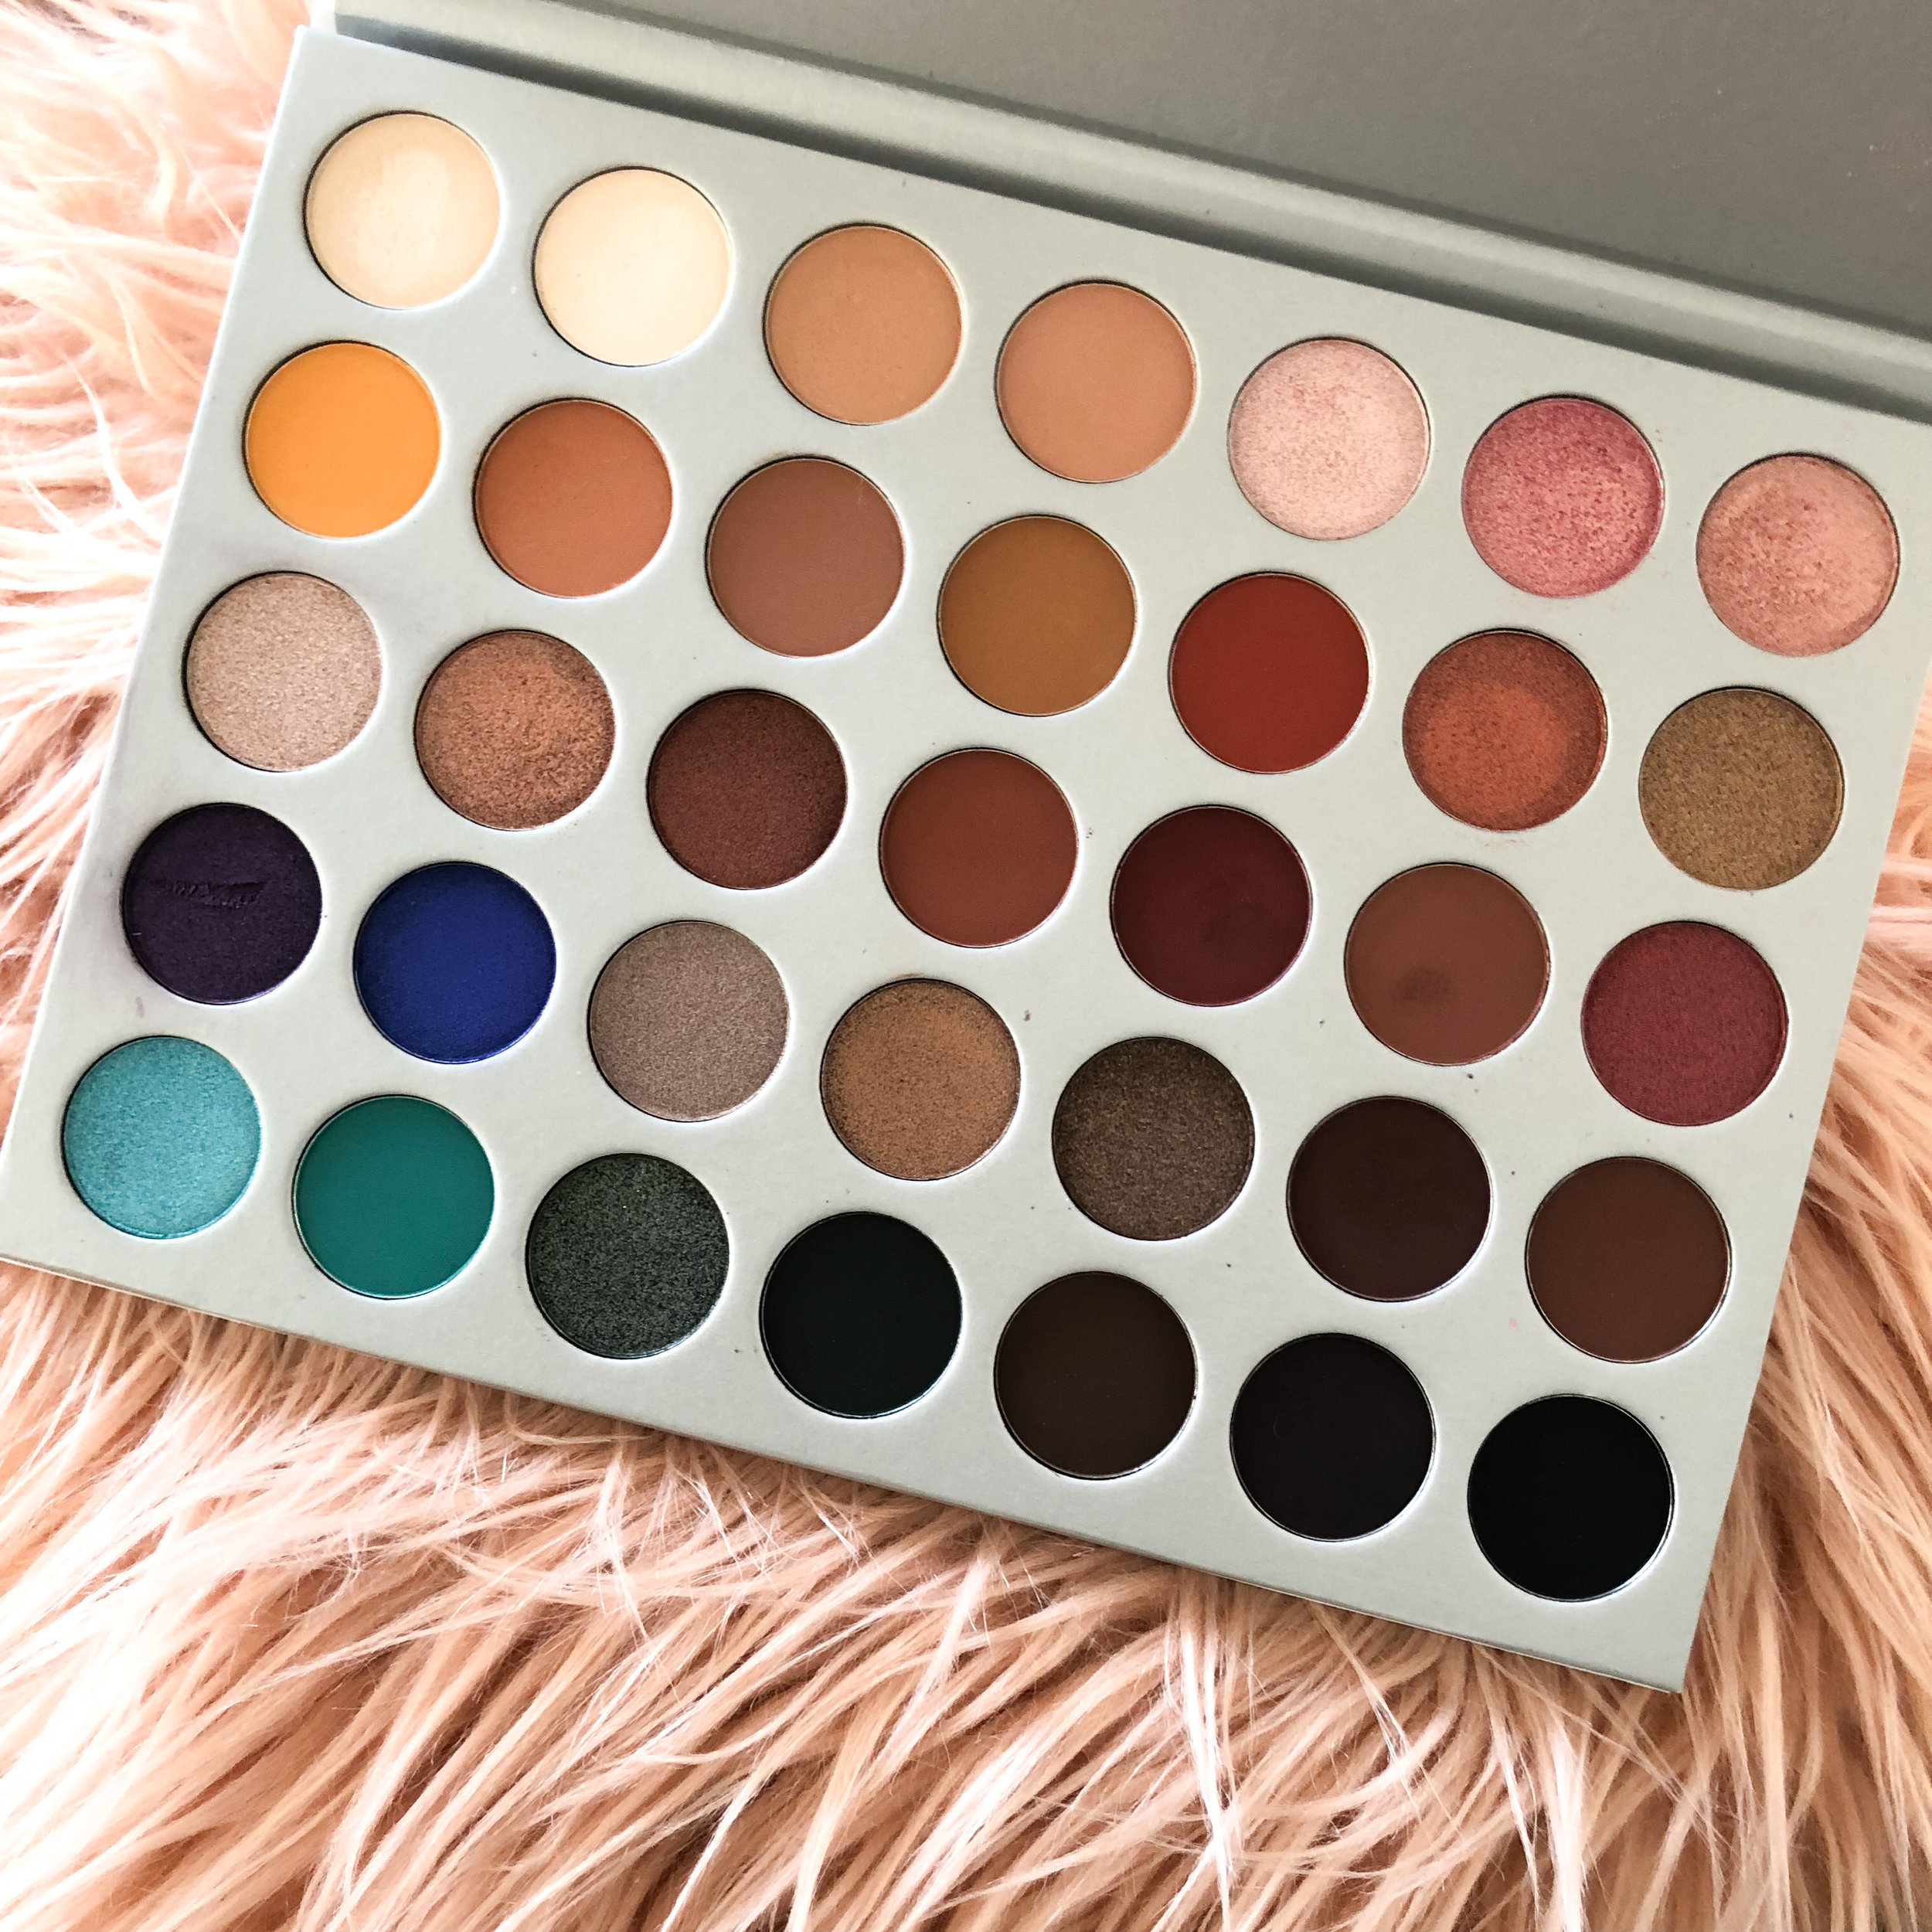
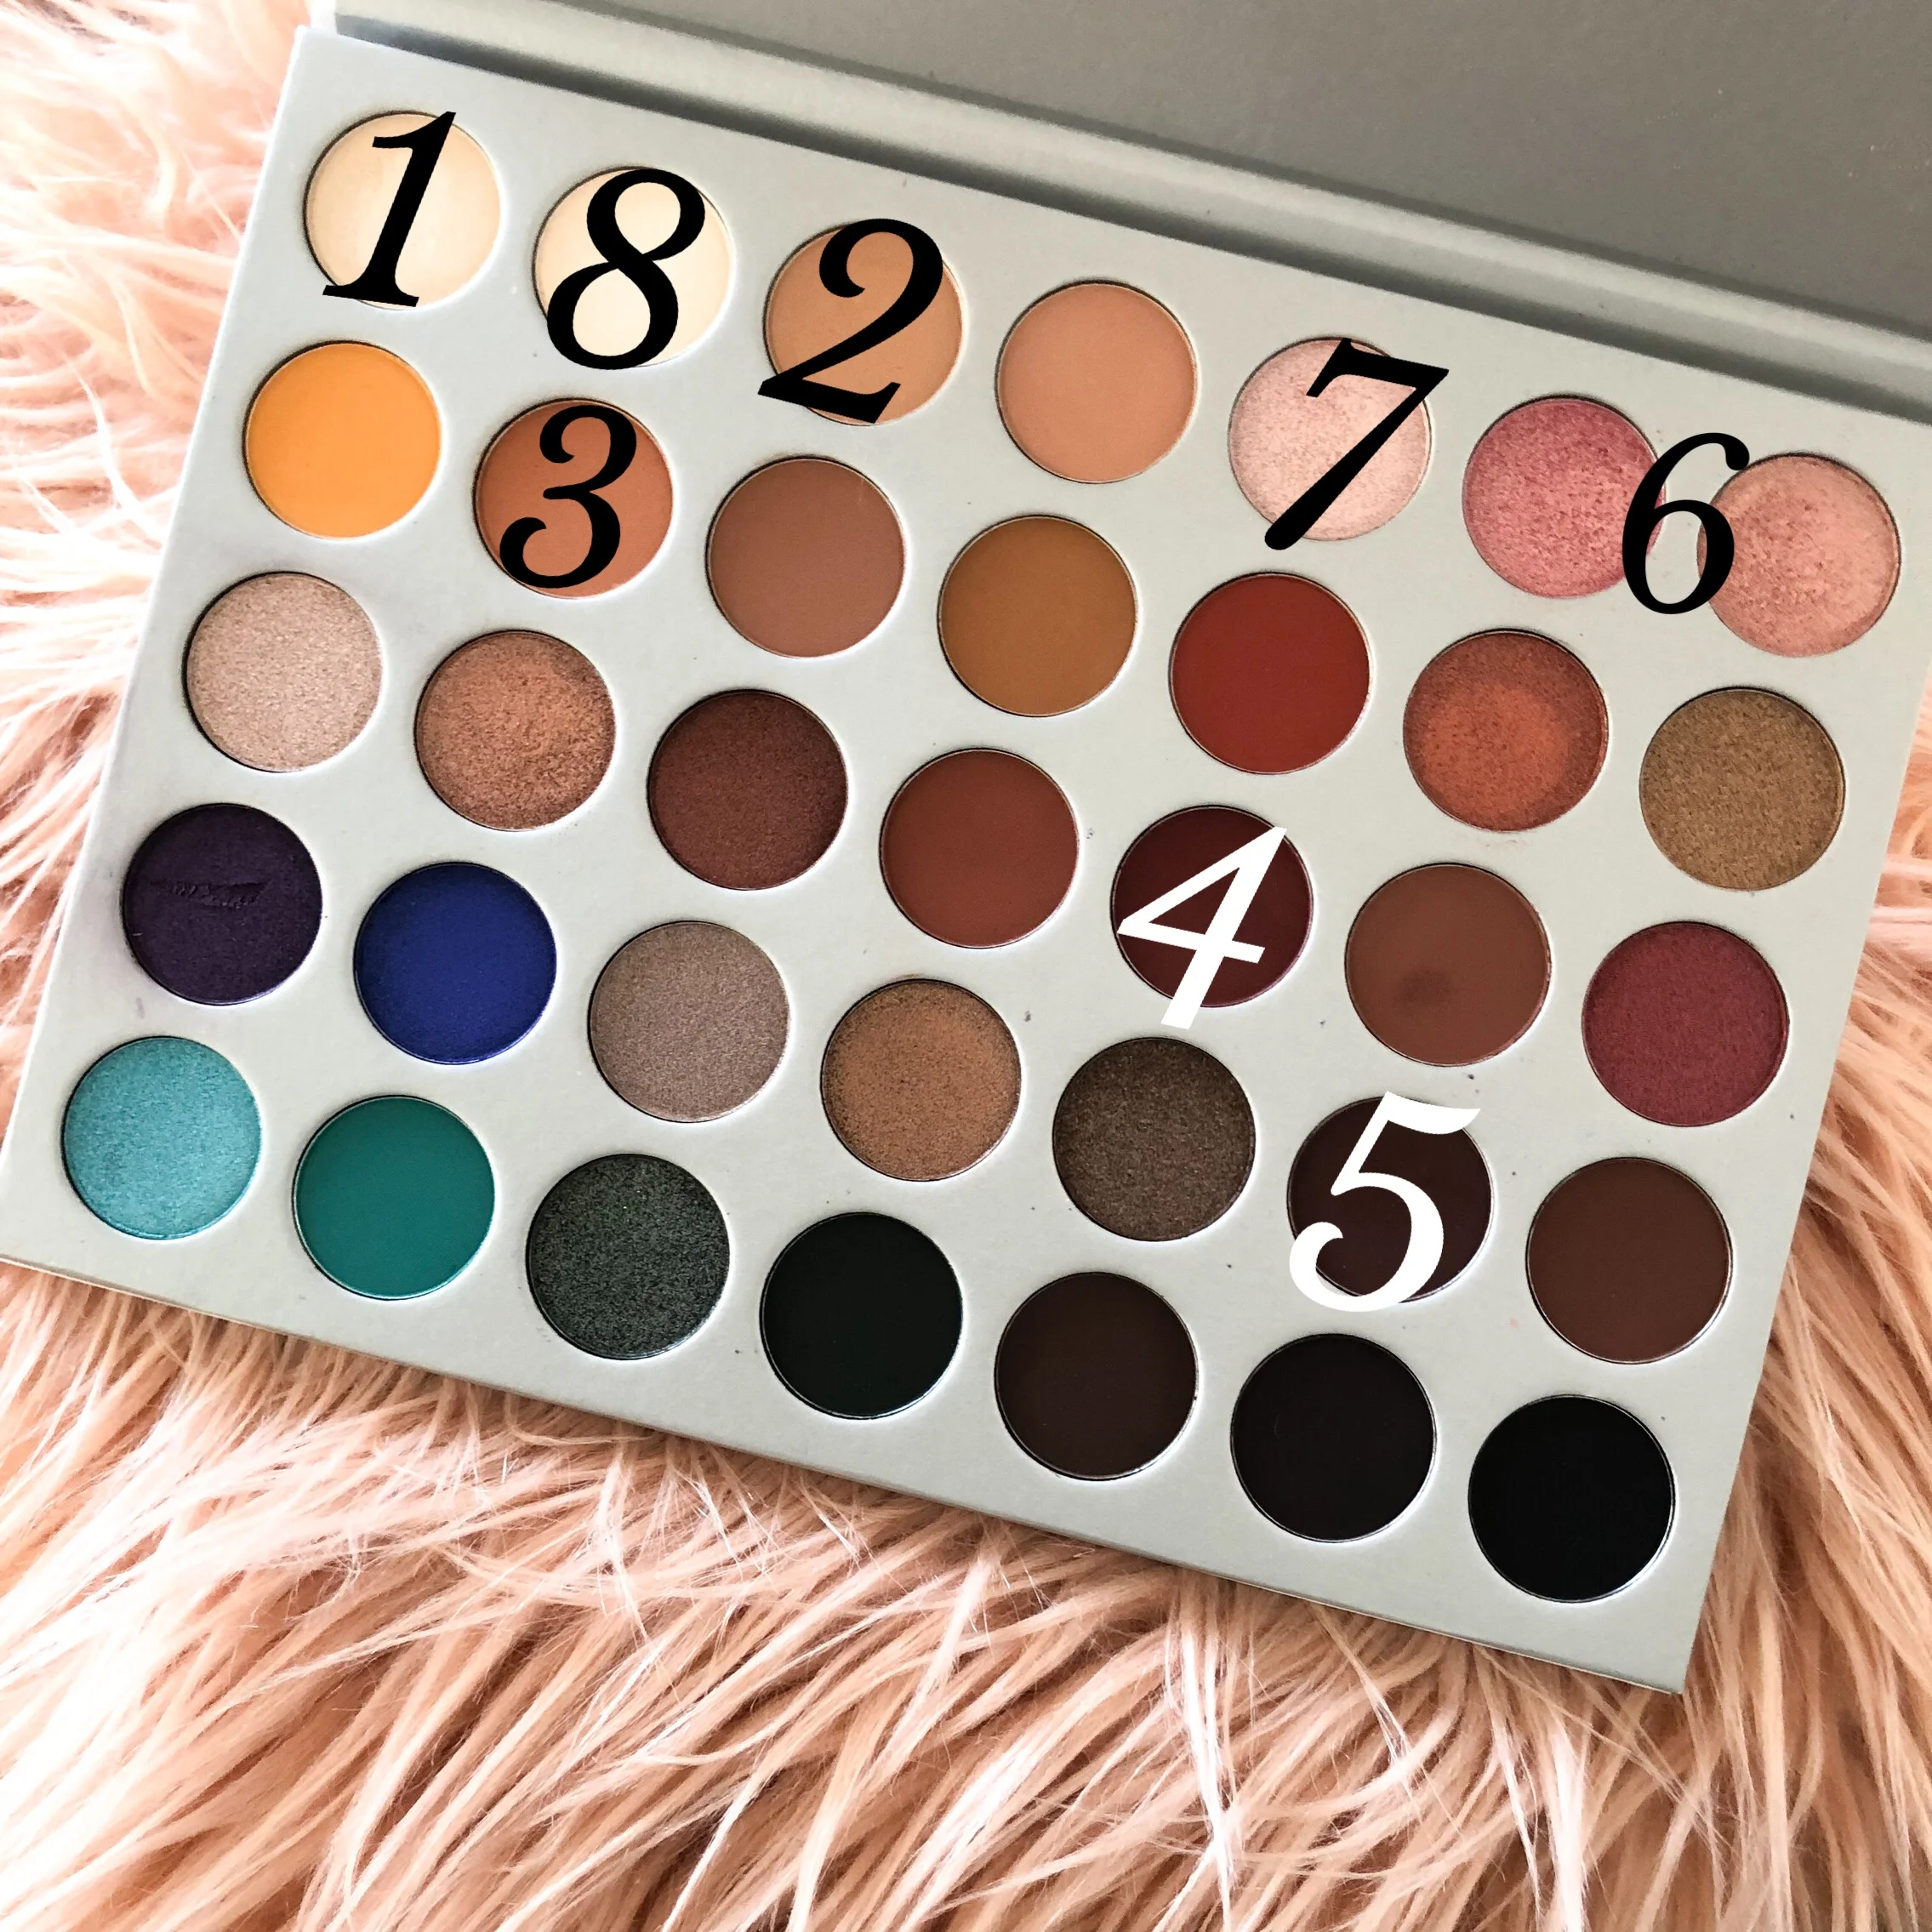
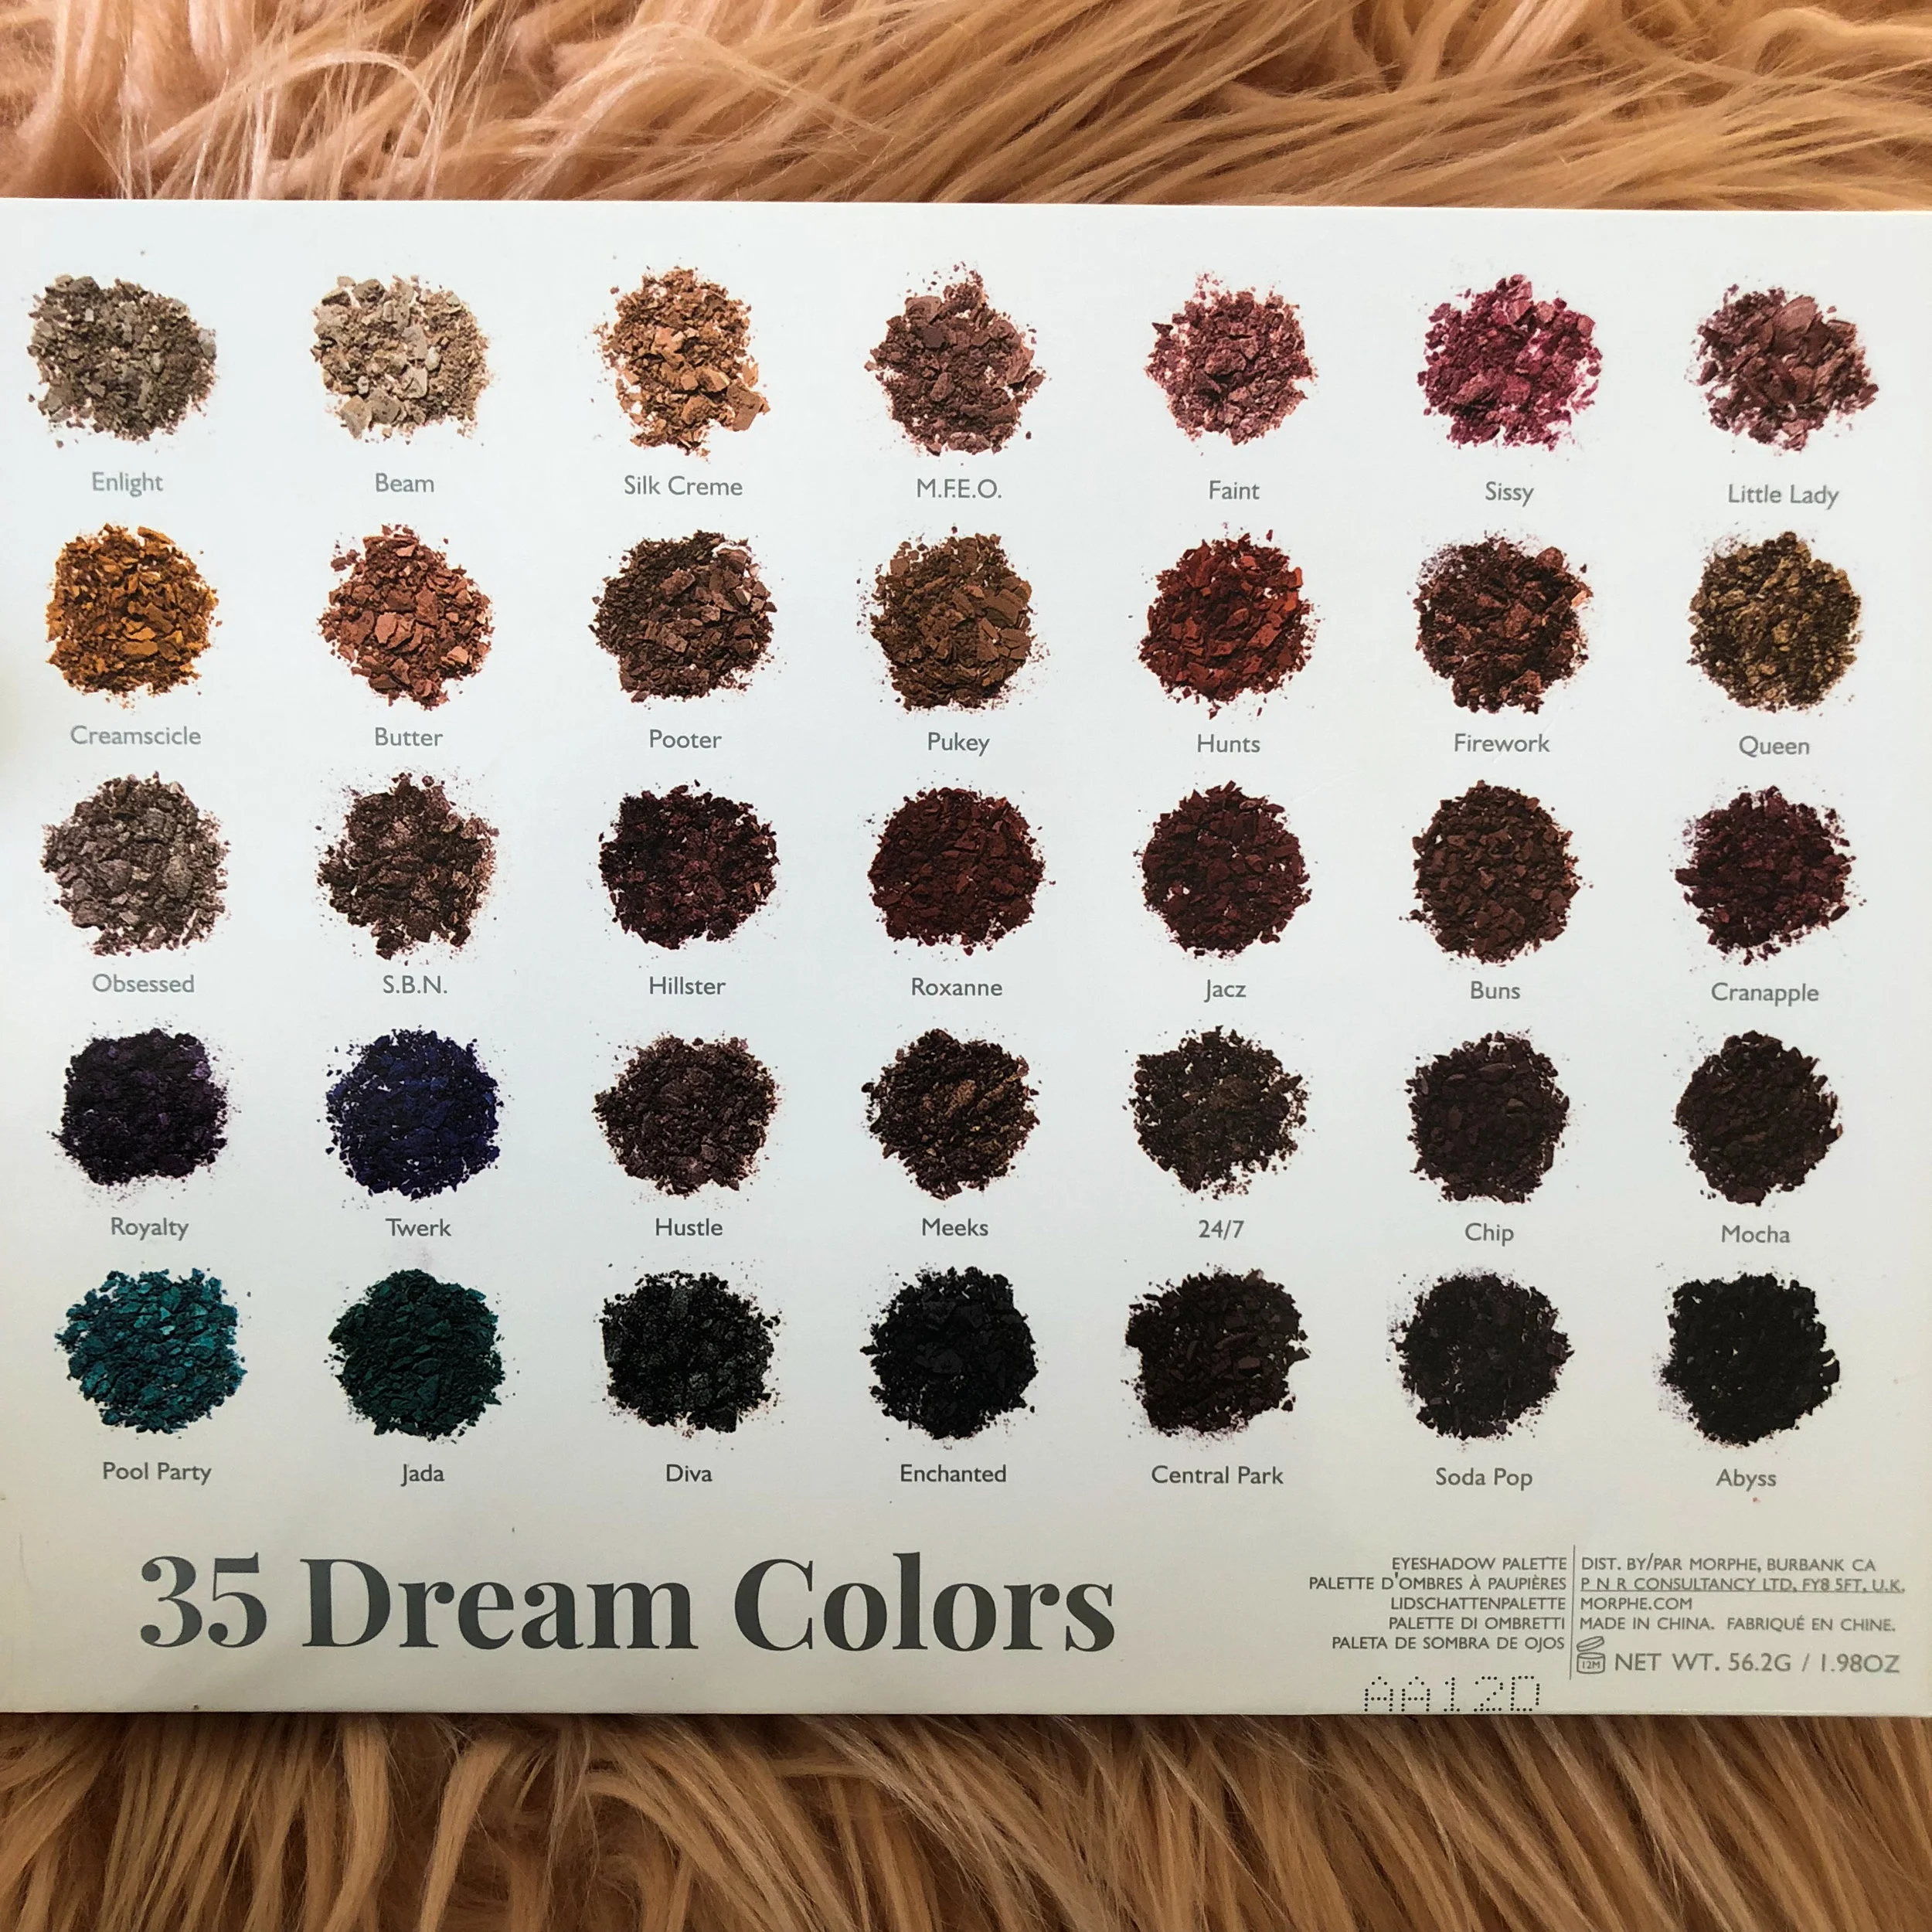
This time around, I created a look that is much more subtle, but still just as beautiful as the last. I used only one palette, The Jaclyn Hill Palette from Morphe, to create the whole look! It was my first time using any Morphe eyeshadows and I really fell in love with this palette. I can't wait to create some more looks with it.  Products used are listed in the description of the video on YouTube, so be sure to click on the video and visit it there if you want details!

Remember, just like the last look, you can swap out any shadows for the ones shown and make the look your own. 

Here's a better look at the shadows that I used!

IMG_1482.JPG
IMG_1483.JPG
IMG_1485.JPG

As I mentioned in the video, if you have any requests for specific looks or palettes to use to create looks, leave a comment below to let me know!

Have a beautiful start to your week,

Andrea

Dre Does an Adele Inspired Tutorial

I shared the picture above asking if you guys would like to see my Adele inspired makeup look and the response was overwhelming! Thank you always for your support! I obviously bought Adele's album the day it came out and every time I listened to it on my phone, the photo above of her makeup was looking back and me and I knew I wanted to re-create it. I realize it's not a color photo but the defined and contoured eyelook was what I was after. The look is super easy and honestly a great look with or without the liquid liner, for those of you who are still working on the perfect wing! The thing I like most about this look is that it is about layering shadows from light to dark, so you're in complete control of how light or dark you want to make it. Every shadow I used was from the Too Faced Natural Matte Palette and while you certainly don't need this palette to get this look, I highly suggest investing in it or adding it to your christmas wishlist. I don't know what I would have done without this palette for my freelance kit because everything you need to start and blend a look is in it. Without this turning into a Too Faced review....let's begin!
(On my lips is the Maybelline Color Sensational 'The Mattes' Lipstick in Daringly Nude)


1. As usual I started with a primed eyelid and then applied Heaven from lashline to brow bone using a flat shader brush. 
2. Using a very fluffy blending brush I mixed Lace Teddy and Nude together and applied them throughout the crease. As you can see this doesn't appear too much darker than the Heaven shade, but thats what I want. This look is all about slowly building the color and blending A LOT! Adding the lighter/medium shades in the crease will make blending the darker colors much easier. 
3. Next, I mixed Cashmere Bunny and Risqué on a pencil brush and applied it in my crease. Using the same fluffy blending brush from step 2, I blend the crease color out. I want the edges to be more blended on the top as you can see but the area where my crease meets my lid, I keep pretty intense and not so faded. 
4. The last shadow step is to take some more of Heaven and apply it to the lid to create that contrast between the dark crease and light lid. This is what gives Adele's look that defined and contoured eye shape. 
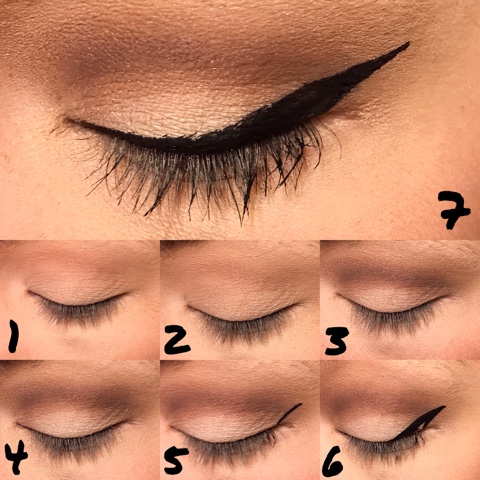
5. Next it's time for liquid eyeliner. In this look I used the NYC Liquid Eyeliner which is such an inexpensive and great product. It's only a couple dollars and is especially great for those who are practicing winged liner because you won't feel bad wasting expensive liner if you have to remove and re-apply. I always start my winged liner with a small line extending from the end of my lashline outwards. The angle I create is based on following my bottom lashline and extending that line out. 
6. Next, I draw from the end of the tail I've created back to my lashline, creating a little triangle. 
7. Lastly, I create the line along my lashline from the inside of my eye connecting to the tail I've just made. If this seems super confusing let me know and I can create a post completely devoted to how I do winged eyeliner!
(I unfortunately didn't get a picture after I finished my eyeliner, but I always perfect that line of liquid liner along my lid at the end to create a smooth line so please excuse any uneveness!)
8. The last step is lining your waterlines. I used Black on the top lashline and NYX's Wonder Pencil (a nude shade) on the bottom to get that bright open-eyed look like Adele has in the album cover. Two coats of your favorite mascara and you're done!

And that's it! You can get Adele inspired makeup that easily! Let me know if you have any questions or requests of makeup looks to recreate. I really enjoy recreating celebrity looks for you guys!

I hope you all had a wonderful Thanksgiving and please know that I am so thankful for you!

Have a beautiful day,

Dre

Dre Does a Warm Smoky Eye

I decided to keep the bronze theme going from my two previous posts (facial self tanning routine and makeup to enhance your tan) with this photo tutorial that will compliment a tan perfectly. I prefer super warm and smoky eye looks over cooler ones for tan skin, especially on my skin tone. I used only three shadows to create this look so it is really easy. All three shades were from the Stila 'In the Know' and 'In the Moment' palettes. You can still order the In the Moment palette on Stila's website if you're interested but to be honest, you could find shades like these anywhere. The rest of my makeup is the routine I shared in my last post on enhancing your tan. I hope you enjoy!


1. The first step for any eye look is to apply a primer or eyeshadow base. For this look I used my Stay Don't Stray Eyeshadow Primer from Benefit Cosmetics and applied it from my lash line up to brow.
2. Next use Desert (In the Know) as a transition color on a fluffy brush and blended it into the crease. This adds a little dimension but it's purpose is mostly to make blending darker shadows easier. 
3. Add Fire (In the Know) on a fluffy brush a little at a time, blending as you go. I know this color looks intense on its own, but I promise it won't be after you add your lid shade. I love using these types of oranges to warm up a look. It's always easier to add shadow, so rather than accidentally getting it too intense in an area you don't want, apply a little at a time. 
4. Using a flat shader brush, pack Whim (In the Moment) onto the lid. Go back in with the fluffy brush and blend the edges of the brown with the warm burnt orange color. You may loose a little bit of the intensity of the brown when you do this, so pack a little extra color on the lid if you need you. 
5. On a pencil brush mix the burnt orange and brown and blend them into the lash line. Depending on your skin fine you might have to be careful with how much of the orange you use. It can sometimes make your eyes look sick, so definitely add a little at a time and don't smoke it out too crazy the first time you try it. 
6. Lastly, add your eyeliner (I just used a brown pencil in the upper and lower water lines), and mascara and you're good to go! 


Let me know if you like the format of this photo tutorial and if you'd like me to do them this way from now on! Also if you have any requests as usual, be sure to let me know!

Have a beautiful week,

Dre


Dre Does a Plum Smokey Eye


I recently posted a picture on Instagram of some items I purchased from Ulta due to redeeming a ridiculous amount of reward points. One of those items was the new Artist Palette from Anastasia Beverly Hills. I immediately started getting questions about whether I thought the palette was worth it, so I decided I would test it out ASAP by doing a makeup look for you guys. 

So far I have to admit I'm in love. I was definitely one of those people who swatched it in store and didn't think it was worth it. Honestly if it wasn't for those points I probably wouldn't have even gotten it. Once I got it home however and started playing I could tell I was going to love it. Even though it's filled with some crazy colors, I think it's a great addition to a makeup collection because it's not just another neutral palette. I mean we can only have so many shimmery taupes right? Haha (Jk I still think I need them all!)


So I've created this look below for you using the shades Buttery, Dusty Rose, Orange You Fancy, Aubergine, and Baby I'm a Star. I know it doesn't translate on camera as being very purple but in real life it's a little more obvious. I personally like wearing color as natural as possible so I like that it's not very intensely purple. 


Let's be nice to my brows. Every so often I leave them alone for a month so I can reshape them and you are witnessing this process firsthand below. 


So back to the tutorial. After applying my eyeshadow primer (my fave is Benefit's Stay Don't Stray) from lid to brow bone, I applied Buttery to the entire lid and brow bone area. Next using a fluffy crease brush, I blended Dusty Rose into the crease as a transition color. Then to warm it up a little bit, I blended some Orange You Fancy with it going slightly above the crease. Next I packed the Aubergine shade all over my blend and blended the edges out into those two transitions shades. Lastly, I added a little bit of Baby I'm A Star into the outer corner to darken it and give a little extra dimension. For the lower lash line, I simply added some black eyeliner to the water line and then smoked it out with that Aubergine shade concentrating more of the shadow on the outside and fading it towards the inner eye area. That's it! I'm super happy with how the look turned out and plan on sharing more of what I create with this unique and colorful palette!

Other products used on my face:
Primer: Benefit Porefessional
Foundation: Nars Luminous Weightless
Concealer: Maybelline FitMe
Setting Powder: Dermablend Translucent Setting Powder
Bronzer/Contour: Anastasia Contour Kit
Blush: Milani Luminoso
Highlighter: MAC Soft & Gentle
Brows: Benefit Browzings
Mascara: Benefit They're Real
Lips: MAC Spice Liner & Khroma Beauty Joy Stick in Sea Coral

Have a beautiful day,

Dre