Dre Does a 5 Minute Fall Transformation

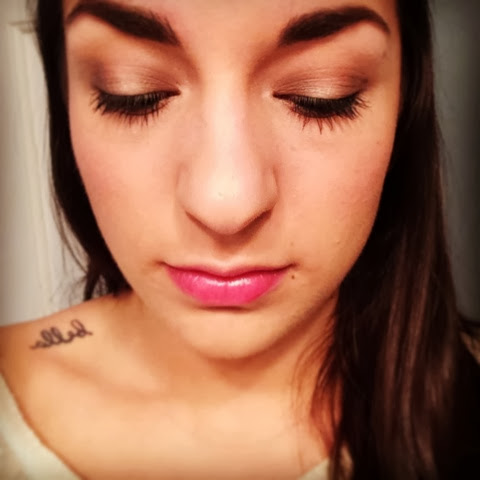
I wanted to create a really simple look that only required a few extra minutes added onto your normal face routine to be fall ready. The focus of any quick look for me will always be my lips because it is the quickest way to add drama and let's be real...fall is all about the drama on the lips. 

When I think of fall makeup I think of warm earth tones; oranges, reds, plums, berries. All of these shades work really well with trying to extend your summer bronze and still look ready for the fall season. Below you'll see that I did my normal face routine (let me know if you want to see exactly what that looks like recently), and then used ONE eyeshadow and ONE lip product to transform my look.


For my eyes I simply applied my normal primer (Benefit's Stay Don't Stray in Light/Medium) and then packed MAC Cosmetics' Amber Lights onto the lid. It's a beautiful metallic orangey bronze color that compliments the warmth of fall so well. The thing that I love about metallic colors like this is that if you just buff out the edges with a blending brush, you look like you have a complete look because the metallic sheen giving so much dimension on your lid. Apply your mascara and you're done!

For the lips I used one of my favorite products ever; the Lorac Pro Matte Lip Color in Merlot. These lipsticks are amazing because they go on so smoothly, are so pigmented, don't require a liner to stay put, and they last forever. I love how this deep shade screams fall. 

There you have it! I took a really basic look from natural to dramatic with the use of only two products. I highly suggest you go through your collection and find duos like this that work well together and take note of them. This way when you're running late in the morning or at night, you can quickly amp up your look in no time at all. You could even wear just the shadow for work and add the lips just in time for happy hour with your friends!

Let me know if you find any great combos! 

Have a beautiful day,

Dre

Dre Does a Plum Smokey Eye


I recently posted a picture on Instagram of some items I purchased from Ulta due to redeeming a ridiculous amount of reward points. One of those items was the new Artist Palette from Anastasia Beverly Hills. I immediately started getting questions about whether I thought the palette was worth it, so I decided I would test it out ASAP by doing a makeup look for you guys. 

So far I have to admit I'm in love. I was definitely one of those people who swatched it in store and didn't think it was worth it. Honestly if it wasn't for those points I probably wouldn't have even gotten it. Once I got it home however and started playing I could tell I was going to love it. Even though it's filled with some crazy colors, I think it's a great addition to a makeup collection because it's not just another neutral palette. I mean we can only have so many shimmery taupes right? Haha (Jk I still think I need them all!)


So I've created this look below for you using the shades Buttery, Dusty Rose, Orange You Fancy, Aubergine, and Baby I'm a Star. I know it doesn't translate on camera as being very purple but in real life it's a little more obvious. I personally like wearing color as natural as possible so I like that it's not very intensely purple. 


Let's be nice to my brows. Every so often I leave them alone for a month so I can reshape them and you are witnessing this process firsthand below. 


So back to the tutorial. After applying my eyeshadow primer (my fave is Benefit's Stay Don't Stray) from lid to brow bone, I applied Buttery to the entire lid and brow bone area. Next using a fluffy crease brush, I blended Dusty Rose into the crease as a transition color. Then to warm it up a little bit, I blended some Orange You Fancy with it going slightly above the crease. Next I packed the Aubergine shade all over my blend and blended the edges out into those two transitions shades. Lastly, I added a little bit of Baby I'm A Star into the outer corner to darken it and give a little extra dimension. For the lower lash line, I simply added some black eyeliner to the water line and then smoked it out with that Aubergine shade concentrating more of the shadow on the outside and fading it towards the inner eye area. That's it! I'm super happy with how the look turned out and plan on sharing more of what I create with this unique and colorful palette!

Other products used on my face:
Primer: Benefit Porefessional
Foundation: Nars Luminous Weightless
Concealer: Maybelline FitMe
Setting Powder: Dermablend Translucent Setting Powder
Bronzer/Contour: Anastasia Contour Kit
Blush: Milani Luminoso
Highlighter: MAC Soft & Gentle
Brows: Benefit Browzings
Mascara: Benefit They're Real
Lips: MAC Spice Liner & Khroma Beauty Joy Stick in Sea Coral

Have a beautiful day,

Dre


Dre Does Quick Skin Care Tips for the Eyes

I can't believe how long it's been since I've done a quick tips post! So here I am with some of my go to tips regarding a very important skin care topic; your eye are. The eyes are one of the first areas to show signs of aging so it's never too early to start thinking about incorporating some steps into your skin care routine, no matter your age!

1. Eye Cream First! Always apply your eye cream before you apply your moisturizer for the rest of your face. I see a lot of women apply it last or not really thinking about what step it should be. If you're applying a product for a specific problem (say to de-puff and moisturize under the eyes) you want that product to penetrate first in your target area before you put something more general (like an all over face moisturizer). The skin around your eyes is the thinnest and first to get dehydrated so applying the products in the correct order is crucial!

2. Under-Eye Concealer: I am no stranger to dark circles under my eyes so when it comes to doing my makeup I don't ever skip the undereye concealer. Regardless of what concealer you are using, always make sure you are tapping the product into your skin with your ring finger instead of swiping it. This will allow you to really warm up the product with the heat from your finger tips, while being really gentle. It will also help it blend into the area instead of smearing over it. You'll get a much more natural application that will cover the dark areas more effectively. 

3. Cold Spoons: If you have a problem with puffiness in the mornings because you're either tired or have allergies, try leaving two spoons in the freezer overnight. In the morning, pop them out and place them right over your eyes to cool and help taking down any swelling. The curves fit perfectly into your eye sockets! This is a great tip for the summertime to stay cool too. 


Remember, preventative skin care is always a good idea! Do you have any tips and tricks relating to the eyes that you'd like to share? Leave me a comment below and let me know!

Have a beautiful day,

Dre

Dre Does an Ipsy Review

Long story short, I moved and my Ipsy Glambags got lost and delayed. So we're here now 3 months behind. Whoops. Instead of completely skipping over two months worth of IPSY Glambags, I've decided to include what I got for my May and June bags with the price breakdown and then I'll do my normal July review within the next week! 


To be honest this bag for May was the most underwhelmed I've felt so far with Ipsy. I was surprised to calculate that it was worth $37.67 because I didn't think it would be. If it wasn't for the Pur-lisse hydra-moist face moisturizer sample valued at around $16 though, it wouldn't have been worth as much. I do like to see deluxe sizes of expensive products though so in the end I think it was a smart move for Ipsy if the rest of the products weren't going to be valued at as much. I think for a spring bag it was great to get more skincare related products than makeup because I really like to keep my skin in check with the summer weather changes. Both the Hang Ten SPF 50 sunscreen and Avène Thermal Spring Water are great to keep in your purse for when you need a high SPF or your face deeps some moisture from a facial spray. Click here to read about my pool routine so you can see why I like to keep them on hand! I always love a good cream shadow base, so it was nice to try one from City Color in a pretty gold shimmery shade. Lastly, the full size Nailtini Polish was a nice addition since in May it's time to start making sure those toes are looking good at all times with the upcoming sandal weather! 


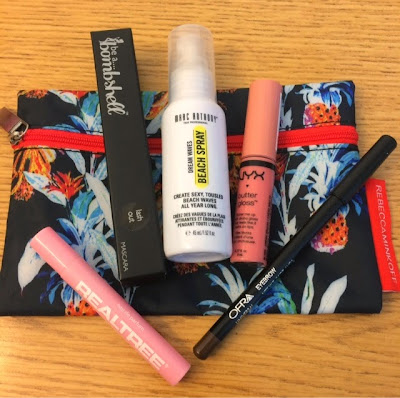
My June bag was valued at almost the exact same at $37.36! While I was completely in love with three products, I threw out the Be a Bombshell mascara (because it smelled so terribly of cheap tar) and I'm not a huge fan of perfume samples in a sample pack I'm paying for, so the Real Tree sample wasn't my favorite. A NYX butter gloss that I already love is always a plus in my book, so when paired with a Marc Anthony Beach Spray for your hair that smells like summer and a universal eyebrow pencil from OFRA, I was happy with the month of June. I like that you can get various shades of the product based on how much pressure you apply, so many people can use it! And can we talk about how great the bag was for June, designed by Rebecca Minkoff?! I love the floral print! 

Stay tuned for my July Ipsy Review friends! We will get back to how I normally review the bags with descriptions of each product individually and price breakdowns! I can't wait to show you how great the July bag is! Thanks for hanging tight in the mean time because I know how much you guys love the Ipsy reviews. If any of the products above caught your attention though, please feel free to comment on them and I'll be happy to answer questions or review them further!

And as usual, here are the links to my previous Ipsy Reviews! You can tell just by the numbers the past few months haven't been worth as much as previous months, but I like that I'm getting a larger variety of products so this doesn't bother me. The whole point of a subscription service like this is to try new types and brands of products, so as long as I'm getting a value of over $30 for spending only $10, I'd consider it worth it!


Have a beautiful day,

Dre

Dre Does an Ipsy Review

I'm back with a review on my March Ipsy Glambag and it was an awesome bag this month! I only received four products compared to the normal amount of five, but as you'll see in the totals later, this didn't decrease the value of the bag at all. Three out of four of the brands were higher end products which is great to see! Below is a summary of all the products and the bag.

The bag this month was really unique and featured the artwork of the artist Klari Reis. The design was inspired by the neighborhoods of San Francisco and I love the unique print. I think this is an awesome aspect of this months bag! 
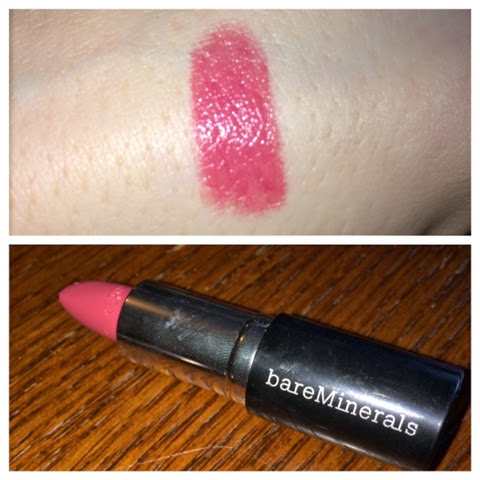
First product up is the Marvelous Moxie Lipstick by bareMinerals in the shade Get Ready. It's a great natural shade that will look good on most skin tones, as it isn't extremely cool or warm. I absolutely love the formula of this lipstick and would definitely look into purchasing more after trying this mini one. As a typical woman I'm obsessed with the cute little size of this lipstick and I think it's a great shade and size to keep in your purse for everyday wear since it can match any makeup look and outfit choice. This 1.5g mini lipstick is valued at $7.71 (full size is $18). 
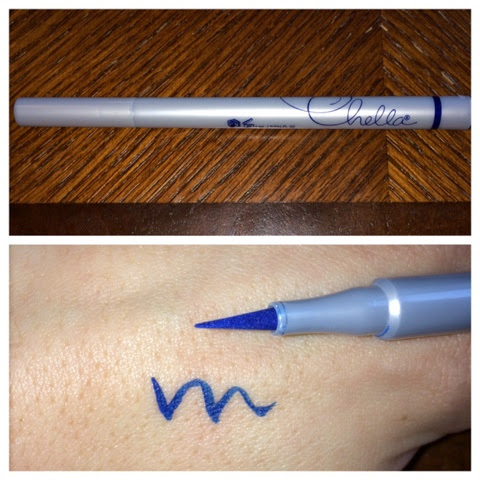
Next up is the Chella Felt Tip Eyeliner in Indigo Blue. It claims to be water resistant, smudge proof, and stain resistant as well, while being free of parabens which is awesome. While I found all of these claims to be true when I wore it, I did have a problem with the application using the felt tip. When you swatch it on the back of your hand it has great flow and pigmentation, but when you hold it up to your eye to draw a wing like I did, I found the tip didn't get enough saturation so it took a long time to get an exact fine tip to my wing. The color is gorgeous however and I received many compliments on it, so I'll definitely keep testing it out! This is a full size product valued at $24! This brings the total so far to $31.71.
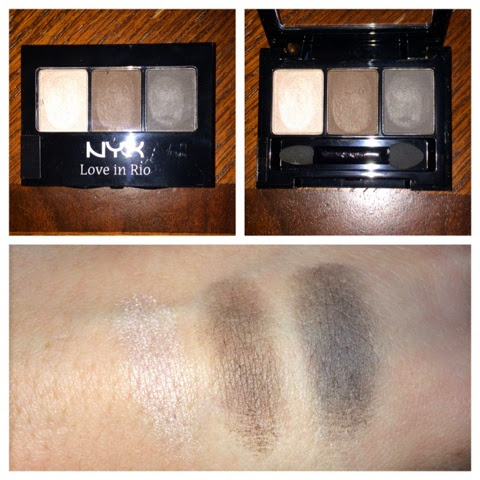
Next I received a Love in Rio Eyeshadow Trio from NYX Cosmetics in the shade Voodoo Love Spells. I really like these shades. It's a great little everyday palette as there are two mattes (the darker shades) and one shimmer (the lightest). While these shadows aren't the most pigmented that I've ever tried from NYX, they are still good for that everyday eye look. This is the full size palette and it's value is $6.00, bringing my bag total to $37.71 so far!
Pixi is a brand that I always seem to swatch and look at when I'm in Target, but due to their larger price tag (for Target) I have never actually bought anything from the line before. I'm a sucker for face primers so I was really excited to see this really deluxe sized sample in my Glambag. It has a great sheen to it but it doesn't make you look oily. It doesn't have that silicon texture that a lot of primers have (i.e. Smashbox photo finish and Benefit's Porefessional) so if you don't like that, I recommend trying this one out. It has a subtle pink undertone to it, but it doesn't show up when blended out on your skin. I really like the smooth texture it gives my skin before applying my foundation. This deluxe sized sample is valued at $9.00 so my grand total value of my March Ipsy Glambag is $46.71! This is an awesome value for only getting 4 products! It's the second highest valued bag that I've gotten so far! Good job Glambag :) 

As usual I've linked my previous month's bags and my link to sign up if you're interested! 


Have a beautiful day,

Dre


Dre Does Top 4 Mascaras

Mascara. It's like the one thing us women are never satisfied with. We always want the newest, thicker, more volumizing, more lengthening, darker than black....mascara. It's a never ending quest so I'm here to share my favorite mascaras, mostly drugstore, but also one high end. Keep in mind that what may work for one person may do nothing for another, so let me tell you a bit about my lashes and what I personally like in a mascara.

My lashes are generally long and dark, however they don't like to curl whatsoever and I wish they were fuller. When I look for a mascara I gravitate towards volume, curling, and separation. I always buy them in the blackest black shades as well. I'm a huge lash junkie so I do multiple coats and sometimes layer different mascaras, but let's meet the winners!


1. tarte Lights, Camera, Lashes!: We're just going to start off with my favorite because I can't help it! I recently featured this one in my February favorites and I've fallen in love. It is really dark and very buildable. The wand is skinny enough to really get every little lash and get really close to your lash line.The thing I love most besides all the volume it gives is how great it is at holding a curl. While it is more expensive than the others I've shown here, it's not bad compared to some other high end mascaras. It is a little harder to remove than the others but since this is what comes with great staying power, I don't mind. If you're looking for a comparison, it is much easier to remove than Benefit's They're Real mascara. Since it's more expensive, it's a great one to keep on hand for special occasions or nights out.

2. Maybelline's The Falsies Volume Express: This ones an oldie but a goodie. The slight curve of the wand allows you to get right into the base of your eyelashes and really build the volume. I've gone through at least 5 of these babies and it's a mascara I just always have on hand. It's a great addition to other mascaras if you just want a little more fullness.

3. Rimmel London's Lash Accelerator: This is my favorite lengthening mascara ever. It separates and lengthens your lashes so beautifully and is really buildable as well (as you can see I love multiple coats, so being buildable without getting clumpy is a huge quality I look for in a mascara). I really like to apply this one first to get good length on my lashes and then apply the Maybelline Falsies or another that's more volumizing, to get the desired fullness. Adding this mascara before another definitely helps you achieve that big, long, voluminous lash look! 

4. Physician's Formula Organic Wear Jumbo: This is a new favorite of mine that I finally tried out due to various YouTube beauty gurus, regardless of the tacky packaging...haha. The wand reminded me of the Covergirl Lash Blast wand which I'm not a fan of so I was hesitant at first, but I'm really glad I tried it. It gives you great volume without clumping your lashes. This is another one that is very...get ready for it... BUILDABLE! (I can't help it! Haha). I got mine in a 'two for the price of one' pack so keep an eye out for those! This is definitely one of my go-to every day mascaras. 

All of these prices are based on ulta.com but most drugstores do various Buy one get one half off sales and promos so keep a close look on weekly ads! 

What are your favorite mascaras? Any holy grail ones you think I should try or ones you'd like me to review? Leave me a comment below and let me know because I'm always down to try more! 

Have a beautiful day,

Dre

Dre Does February Favorites

| Click to Enlarge |
Happy March friends! We're officially one month closer to spring and warmer weather! While that is one of my favorites I'm here with the things I loved most in the month of February. 

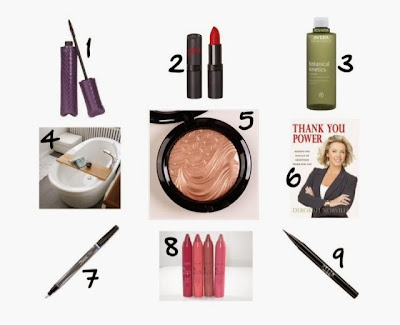
1. tarte Lights, Camera, Lashes! Mascara: In February, tarte sent out a coupon code for valentines day so I took the opportunity to pick up their Christmas gift set I had wanted since it was already marked down. It came with two of these mascaras and I'm obsessed. It lengthens and volumizes so well and I feel like it holds curl really well too. The only con is that it's a little more difficult to get off at night than some of my other favorite mascaras but it's nothing compared to Benefit's They're Real, so that's good. I gave my sister a tarte eye set for Christmas and this came in it and she's obsessed too! While it is $19, I think it's a great mascara to keep on hand even if you use it only for special occasions. 

2. Rimmel Lasting Finish by Kate Moss Lipstic in 01: I love the finish of these lipsticks. Great pigmentation and they really do stay on for a long time. I love the finish because it's a happy mix of matte and gloss but I'd say they lean more to matte side. Whenever I wear this shade I get compliments and people think it's a really high end lipstick. So if you're daring enough to try something bold, go out to your local drugstore and pick this one up. I haven't tried the matte line by Kate yet, but after such success with the Lasting Finish line, I know it won't be long. 

3. Aveda Botanical Kinetics Liquid Exfoliant: I'm working on a few posts dedicated to my skin care routine so I'll go more in depth about this product there, but I recently added this chemical exfoliant to my night time routine and I think it's helping tremendously with getting rid of the acne and scarring on my chin. If you're new to exfoliation, check out my post on why it's so important here.

4. Bubble baths: We can't rid our lives of stress, but we can work on how we manage it so it doesn't affect our mind, body, skin, and everything inbetween. Bubble baths are one of my favorite stress management techniques. I made a promise to myself that is was going to take more of them in 2014 and so far I'm doing pretty well. If you're having trouble sleeping at night, try a bath beforehand to calm and relax you. 

5. MAC Cosmetics Extra Dimension Skinfinish in Superb: How does one stay away from beautifully packaged Rose Gold products? Don't look at me for the answer because I took one glance at the MAC counter and I was sold. Right now since I'm a little paler, I love using a little of this with a matte blush to give me more of a glow. I think in the summer time though this would make an amazing highlight for bronzed skin. I'll keep you updated on that if we ever see the sun again here in Michigan...

6. Thank You Power by Deborah Norville: My dad gave me this book for Christmas and I absolutely loved it. It's a quick and easy read about focusing more on our gratitude in all aspects of life because situations will not only turn out better for us, but we will be much happier. It's filled with many short stories and examples of how thank you power has helped others in all kinds of problems, big and small. I really recommend reading it. We can't control the things that happen to us, but we can control our attitude while we handle them. Gratitude plays a huge part in making us stronger through the tough times. 

7. Sharpie Pens: I'm not really sure how I survived life before these guys, but they are the only pens I will use. I love how they come in many colors so that my planner can be super organized. Just stay away from the clickable ones because I find those dry out faster. I like the simple skinny ones with the caps.

8. tarte Lipsurgence Lip Cremes: This set of 4 came with that Christmas set I mentioned earlier and I'm obsessed with them. The Lipsurgence line has multiple finishes but this is by far my favorite one so far. Great pigmentation with just enough gloss to keep your lips moisturized. I especially love the shade because it's a dark brown nude that I honestly might never have tried if it hadn't come in this set. It's a great color if you want something besides red to stand out boldly. I'm excited to try more shades like this.

9. Stila's Stay All Day waterproof liquid eye liner in Intense Black: I had been hearing tons of great things about this eyeliner so I decided to pick it up last time I was in Ulta. It has the best staying power I've ever seen in a liquid eyeliner which is exactly what I need when I'm doing more dramatic cat eye looks. I also love how fine the felt tip is so you can get a really precise and thin wing. I'm curious to see how long it lasts before drying up though, so I'll keep you updated on that! 


What were your favorites this month? Leave me a comment below if you're loving something you think I should try. I'm always excited to hear what others are loving at the moment!

Have a beautiful day,

Dre
Dre Does a Makeup of the Day


I posted this a sneak peek of this makeup look yesterday. I think it's the perfect Natural makeup look. It's also really quick and easy. I did my normal face routine, but I wanted to point out some key aspects of the look. First off, whenever I'm doing a super natural look I always make sure to fill in my brows. It's a simple way to give your face structure and make you look polished and put together without much makeup on. I use the color Faint (a medium to dark brown) from my Urban Decay Naked Basics palette and a small angled brush. Then I just set it with a clear mascara so my brows stay put and the color lasts longer. 

Next, I did all of the tips from yesterday's post on making your eyes look bigger and brighter. You can especially see how I defined my eyelids. I applied a Maybelline Color Tattoo cream shadow in Barely Branded (70) and then on top I used my Naked Basics palette again (I wasn't exaggerating in that post a couple of weeks ago about how much I loved it haha). I added the lightest shade Venus in the middle of my lids, added Faint in the inner and outer corners, and blended everything together nicely. That's it! Even though they're matte shadows, I love the glow it gives my eyes. They really pop and look bigger! 

All I did after this was apply my Rimmel Lash Accelerator mascara and add some Chapstick and I was done! I've listed all the products below to achieve this look. It's seriously my go-to easy makeup when I'm rushed and still want to look put together! 

Laura Geller Spackle Tinted Under Makeup Primer in Bronze
Covergirl Outlast Stay Fabulous 3 in 1 foundation in buff beige
Sonia Kashuk Hidden Agenda Concealer Palette in 07 light
NYX Wonder Pencil in 01 Light
tarte Amazonian Clay Bronzer in Park Avenue Princess
tarte Amazonian Clay 12 hour blush in treasured
tarte Amazonian Clay Highlighter in Champagne
Revlon Photoready Transulecent Face Powder
Maybelline 24 HR Color Tattoo Metal in Barley Branded
Urban Decay Naked Basics Eyeshadow Palette (colors Venus and Faint)
Maybelline Great Lash Mascara in Clear Transparent (for brows)
Rimmel Lash Accelorator Mascara in Extreme Black

Have a beautiful day,

Dre

Dre Does a How-To: Bigger and Brighter Eyes

Do you get way less sleep than you should and have the resulting exhausted looking eyes when you wake up like me? Don't worry. Thanks to my third cup of joe I've compiled a list of tips on how to make your eyes look brighter and bigger and thus fooling everyone into thinking you've gotten enough shut eye! 

1. Highlight your inner tear duct. Do yourself a favor and get a nude colored pencil eyeliner now! I love this new one from NYX called the Wonder Pencil because it comes in concealer-type shades but is in a easy to apply form as a pencil eyeliner. This new best friend makes it super quick and easy to highlight the inner area of your eye. You'd be surprised how quickly this trick brightens and makes you look more awake. 

2. Highlight your bottom waterline. You can use the same nude pencil liner to line this area. Normally you would put a darker color here to define your bottom lash line, but applying a nude color will help open your eyes and make them look bigger. Some people like to use white for this, but I prefer nude because it's less harsh and more natural looking. 

3. Set your under eye concealer. If you want to keep those dark circles under your eyes hidden until bed time and avoid creasing, you must set your concealer. Make sure to use a good concealer in this area that brightens this area (try pinkish tones) and set it using a fluffy brush and a finely milled powder. I like the Sonia Kasuk Hidden Agenda palette because it comes with three concealer shades and one setting powder. I use this 'setting brush' by Real Techniques to set the powder and I love how it applies the powder! You want to make sure you use a fine powder so that you don't run the risk of it settling in any fine lines, making you look more tired.

4. Define your eyelids. One technique that I love for a really natural look is to define both the inner and outer areas of my lids and highlight the center of my lids. This makes your eyes look huge and gives them a really nice glowy appearance. In the picture below I've done my makeup this way and you can see how it enlarges my eyes and gives them that glow. You might be surprised when I say that all I used is two matte shadows to complete it. So it's an extremely quick and easy look. Come back tomorrow for a post on how exactly I created this look! 


Have a beautiful day,

Dre