Dre Does Brows for Beginners

I had a good friend reach out to me lately asking for some pro tips regarding brows and it got me thinking that I've never really covered the basics regarding filling in brows, here on Dre Does. So I decided to share some of the basics with you incase you have never filled them in before and don't quite know where to start. 

1. Start small: If you've never colored your brows in before ANYTHING is going to look more dramatic than what you're used to. Just because you notice a huge difference doesn't mean they look bad. I would recommend starting with a tinted brow gel first, working your way up to a pencil, and then moving on to a tinted wax or pomade if you're really feeling confident. Filling your brows in for the first time should be subtle and minimal to avoid going too dramatic. 

2. Small Strokes: If you are using a product to fill them in always use small hair-like strokes because after all you are trying to make your brows look like they are full of more hairs. No one has perfectl straight and opaque brows naturally, so don't make long and intense lines with your product. 

3. Get a spooly: You'd be surprised how different and much easier filling your brows in is when you have a spooly for blending. A spooly is simply a disposable mascara wand and you can find a pack of them for only a few bucks at your local beauty supply store. If you don't want to go out and buy one, simply wait to use up your current tube of mascara (if it's one with a traditional bristle brush wand) and sanitize it for use in place of a spooly! Simply apply your brow product like you normally would and then use your spooly to slowly brush through the brow hairs and blend the product. This will ensure that your filled in brows don't look so fake.

4. Start in the middle: Whenever you are filling in your brows, I recommend starting to fill the middle of the brow first for a few reasons. If you're using a product that has a wand or brush (so a tinted gel or pomade for example) you will have the most product on it initially. You don't want to put all that product right in the front of the brow because naturally we aren't the fullest right where the brows start. It's also hard to master how to start your brow, so slowly building the front with only a little bit of product will help you acheive a much more natural look. This will help you avoid the obvious, too squared off brows. 

5. Shade is key: Don't use too dark or too light of a product. Brows should always stay a little darker than your hair if you're blonde, or a little lighter than your hair if it's darker. Also unless you are a red head, your brows should stay ashy and cool-toned. No one really has warm brows except for red heads, so picking the right tone of product will help you avoid your brows looking fake!

6. Get them shaped by a professional: I tell all of my clients that they beauty of getting their brows shaped is that I give them the blueprint to fill in their brows. Simply follow the shape I've waxed them to and in no time you'll get the hang of what you should be filling in. I take the guesswork out of adding product and will even show you how to do it if you need help. If you're in the Lansing area I would love to help you in person, but if not, find someone you trust to help shape your brows and get rid of unnecessary hairs!

7. Get them tinted: If all of this seems way too difficult and intimidating, look into tinting. This is a service I personally perform at the spa and it allows me to tint the hairs and underlying skin, to look like the brows are fuller than they are and to help emphasize the shape I give by waxing. The tint lasts up to 3 weeks so it's a great option for those who don't want to fill them in with product every morning. 

If this post stirred up any questions you might have regarding brows, please feel free to leave a comment below or on my Facebook page! I hope this helps!

Have a beautiful day,

Dre
Dre Does My Current Go-To Makeup Look

For most of December and January so far, I have worn the exact same makeup look, give or take a few products. I have been obsessed with making my skin look flawless and then accentuating my lashes, brows and lips. So basically this look has been about taking natural makeup one step further towards glam. Today I'm sharing what products I use to achieve this natural glam look!


The face: The skin is key in this look. Before I start makeup I have been applying Puff Off, the newest product from Benefit Cosmetics that instantly depuffs and smoothes the undereye area. It also brightens and absorbs super quickly. I then begin the makeup with my Benefit Cosmetics Porefessional primer because it smooths out and helps hide the larger pores in my T-zone. I love how smooth it makes my skin feel, which helps my foundation go on better. Speaking of foundation, I next apply the Tarte Amazonian Clay 12 Hr foundation with a brush and really buff it into my skin. After that is my MAC Pro Longwear Concealer which I apply in my under eye area to conceal my dark circles. I conceal any blemishes if I need to with the Sonia Kashuk Hidden Agenda Palette. To set my undereye concealer I use the Banana powder from the Anastasia Contour Kit in Light, and then I mix the Banana and Vanilla powders to set any blemishes I've concealed. Next I contour my face using a combination of all three bronzers in the bottom row of the Contour Kit. A little bit of matte Tarte blush on the cheeks in a natural peachy pink color and lastly, all I need for the skin is to highlight the cheek bones. First I use my absolute favorite highlighter Watt's Up by Benefit followed by Sand from the Contour Kit. Now the face is done! I know this seems like a lot of products but it really makes my skin look flawless which is one of the main features of this look. I forgot to show my setting spray in the photo above but I never go a day without my Urban Decay Deslick Makeup Setting Spray for oily skin. I spray this once I'm completely don't with my makeup before my mascara. This is because we tend to squint or squeeze our eyes tightly when we spray our faces and this prevents any mascara from getting anywhere we don't want it. 

The brows: You probably know by now how important brows are to me (if not go read my Top 5 brow tips from last week). Even on no makeup days I do my brows with Benefit's Gimme Brow but for this look I love using my Gimme Brow first and then giving them a touch more definition with my angled brush and Benefit's Browzings wax and powder duo. My brows still look natural, they are just a little more intense than normal. 

The eyes: Most days I just apply my primer Benefit's Stay Don't Stray from lash line to brow bone and blend a nude tone (either Fresh or Legend) from either the Amrezy or Tamanna palettes from Anastasia Beverly Hills. Sometimes I blend a little bit of a warmer tone like Bengal or Caramel into the crease and into the bottoms lash line. Then it's simply curl my lashes and apply my absolutely favorite mascara, Benefit's They're Real. Yes you read that right, I haven't been wearing any eyeliner recently! For some reason I've been really loving the look of just my lashes being dark. 


The lips: The last feature of this look is the lips. I've been lining them with either Wiity Pink from Napoleon Perdis or Spice from MAC. Then I'll either go with Cosmo or Kinda Sexy both from MAC. If I want a browner look I go with Spice as a liner, and for a pinker look I use the Witty Pink liner first. In the photo above I'm wearing Witty Pink and Cosmo. 

You probably noticed that a lot of these products are by Benefit, Tarte or Anastasia. I am not sponsored by any of these brands they are just products that I really love and always give me consistent and beautiful results. What products have you been wearing a lot recently? Is there a particular look you've been loving? Let me know in comment below!

Have a beautiful day, 

Dre

Dre Does Top 5 Brow Tips

So you probably know by now that I am an Arch Expert for Benefit Cosmetics. 95% of my job is either waxing and shaping brows or helping women (and men too) learn how to fill them in. With that being said, I've seen a lot of brows and fixed a lot of them. I absolutely love brows and think they are the most important thing about your face. 

If you want to look more put together without looking like you're wearing more makeup, give some attention to your brows. They frame your face and when done right, can be the thing that makes you look so much better that people can't quite put their fingers on. So I bring you my Top 5 a Brow Tips; the things that are crucial and most important when filling, waxing, etc.

1. Grow them out! If you are unhappy with the way your brows look you need to grow them out. I'm talking at least a month of no touching, tweezing, or anything! Even on that hair that you're positive would get removed anyways! You can't expect your esthetician, hairstylist or who ever does your brows, to change much, if you look like you just had them cleaned up. 

2. Go to a professional and get them waxed. If able, go to a Benefit Brow Bar in your area because you will not be sorry. The Benefit Brow wax is an experience; you get to know what your brows will look like before we remove the hair, we conceal you so you aren't red, and most importantly, we can teach you how to fill them in CORRECTLY! Now I'm not just saying this because I wax brows for a living but because I have never met a pair of brows that I can't help. Even if you think there is no hope for your brows and there is nothing to wax, go talk to an Arch Expert at least. Even if you need to fill them in to look like you have something, let us do the hard work by shaping your brows so you have the perfect blueprint to fill them in! It will make your life easier!

3. Bring inspiration. If you like a certain shape or arch bring a picture in. The biggest difficulty when it comes to brows is miscommunication. Clean up to you may mean something completely different and extremely thin to the person doing your brows. 

4. Look at the brows of the person doing yours! I can't emphasize this enough. The amount of women that have told me they shouldn't have had the last person who did their brows, do them because of the look of their own brows is crazy! If you don't like what they do with their own brows, don't trust them with yours! As an esthetician my brows are my biggest billboard and advertisement. Women have told me the first time that I do their brows that they trust me more because of how they like my brows. So don't let anyone touch your brows that you don't want to! Be observant. 

5. Fill them in. So many women are terrified to fill them in because they don't want to look like their grandma who uses a red pencil to draw thick lines where their brows used to be. Brow products have come a long way. There's new techniques and tools to help you. I personally haven't touched a brow pencil in a very long time because I prefer gels and wax/powder duos, so find what works best for you. Also accept that you may never have the fullest and thickest brows in the world. Yes, there are things to help them look fuller than they are naturally, but sometimes you have to sacrifice fullness if you want them to still look natural. 

I hope you enjoyed these tips! Let me know if you'd like to see my brow routine and how I fill in my brows both on natural and full makeup days! 

Have a beautiful day, 

Dre

*This tips and views are completely my own opinion and don't represent Benefit or Ulta. 

Dre Does September Favorites


My favorite post of the month is here! I don't have that many favorites because I've been very much stuck in a routine lately as far as makeup and skin care goes. I just purchased some new things though so look for some new things come October Favorites time! 

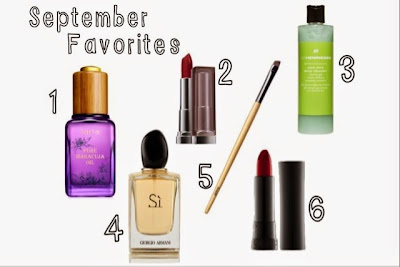
1. tarte Pure Maracuja Oil: This oil is a repeat favorite because it is seriously amazing. I feel like not that many people know much about it but it's a holy grail item for my skincare routine. I use it at night as my moisturizer and I wake up every morning with baby soft skin. It has tons of vitamin C in it so it does wonders at brightening and evening out my skin tone. You can use it all over your body to moisturize but I am so obsessed that I will only use it on my face so it lasts longer. Haha 

2. Maybelline Color Sensational Matte Lipsticks: I have been obsessed with these since I bought them a few weeks ago. They really are as wonderful as everyone has been saying. I have 5 shades but I've been wearing Daringly Nude and Divine Wine the most. Click here for my review on these that I shared last week!

3. Ole Henriksen Aloe Vera Deep Cleanser: I have yet to find my perfect cleanser. While I did like The Body Shop's Tea Tree Oil Cleanser for Oily Skin, I just wasn't in love so when I took a trip to Sephora a few weeks ago I spotted this guy and I'm obsessed. It gives me such a good deep clean and I really think it does a great job at soothing and cleansing my skin. I feel like my breakouts are slowing down and becoming fewer and this has to be a part of it. 

4. Si by Georgio Armani: This perfume is amazing. When I first smelled it at work I thought it was a tad too old for me, but I slowly became more and more obsessed with it. I spray it almost every time I go to work and I can't get enough. I love the sophisticated warm aroma it gives and I get complimented on it all the time! 

5. Benefit's Hard Angle Brow Brush: This is my go to brow brush to use my Benefit Browzings wax and powder duo. It is the brush we use at work to do our brow mapping and filling in so that is how I discovered it and fell in love. It is the perfect amount of firm bristles for a brow brush because you can get a very precise line without it taking forever. If I could change one thing about it, I would just want there to be a spooly on the end to comb through my brows with, but other than that I'm obsessed and won't ever use another brow brush! You could use it as a liner brush too if you wanted.

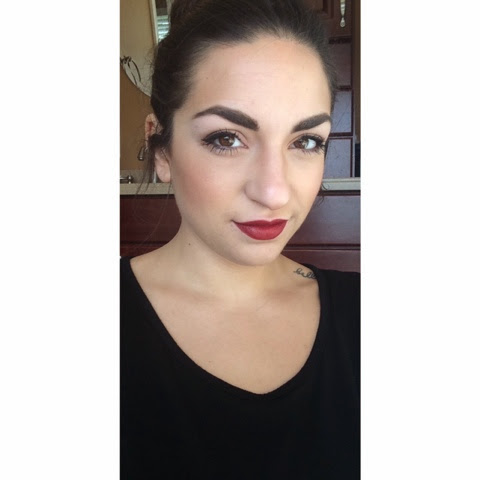
6. Sephora Rouge Cream in Passion Red: This is one of my all time favorite lipsticks. It's probably tied with that Rimmel Kate Moss deep red I shared a few weeks ago, but the formula of this lipstick and color are both to DIE for. I am being serious when I say I would wear this shade every day if I could. Here's a picture of me wearing it below. Seriously you need it...all of you. I promise you won't regret this color if you like dark fall tones! 


What were you loving last month? Let me know in a comment below and if you ever try any of my recommendations be sure to let me know what you think!

Have a wonderful October my beautiful friends,

Dre


Dre Does July Favorites

| Click to enlarge |

I never really realize how fast the months go by until I do my favorites posts. I feel like yesterday was the 4th of July! As usual my month was really busy, getting used to a new job and dealing with a severe allergic reaction to something so while I didn't try that many new products out, I have been loving some good ones! So let's recap the items I've been obsessed with this month! 

1. Browzings by Benefit Cosmetics: I have been using this product nonstop since I started working as a Benefit Arch Expert. I use it on every guest to map their brows for waxing, but also use it daily on my brows. I love that it comes with both a tinted wax and powder. I use a quick tap of them both together to fill and define my brows. The wax helps hold brow hairs in place and also makes the powder adhere better. It gives a very natural, yet defined look that I love!

2. Revlon Colorstay Foundation: I hadn't tried this foundation until June but I'm obsessed. It really does last all day and I love that it comes in two formulas (one for drier skin types and the other for combo/oily skin types). I really like mixing it with other foundations to give a long lasting flawless finish to my skin. 

3. Tarte Amazonian Full Coverage 12-HR Foundation: This foundation is a holy grail product as well. I'm not sure if I've ever mentioned it before, but I love the texture. It's a mousy one that gives a liquid to powder feeling to the skin. It's buildable from medium to full coverage and for oily skin it's a dream! When you rub it in, it really feels like nothing on the skin! It's no secret that I have a love affair for tarte cosmetics so if you're oily and wanting to try out a new higher end foundation, go give it a look!

4. Benefit's They're Real PushUp Liner: I know that this new product from Benefit has been getting mixed reviews but I truly love it. I have a very hard time finding a liner with an applicator that I love but this one is amazing! One unique feature that I love is that you control the amount of product you use by clicking it up at the bottom. If you're comfortable with liquid and gel liners I definitely think you should try this one. I can apply a big dramatic winged liner in the morning before work and know that when I get home 10 hours later it will look the exact same as when I left. I love the matte finish too. It looks very natural. I love to show guests how using the flat and wide applicator you can create a "no eyeliner, eyeliner" look to make your lash line look fuller. Comment below if you'd like to see how I accomplish this!

5. White Straw Tribal Clutch from LOFT: I hate to include things you can no longer find but I like the idea behind this bag so I had to include it. I bought this at LOFT probably about 2 or 3 summers ago because I loved it. It was neutral and summery, but could fit a lot. The tribal print trend has been going for awhile but I thought this was a more subtle way to incorporate it into my wardrobe because it wasn't as flashy. I can't even begin to tell you how much I use this bag. It pairs with everything in the summer and gives an interesting texture to outfits and can be paired with black and white or even bright colors! If you find something you love and you can picture using in multiple ways, I say always get it. 

6. Essie quick-e Drying Drops: I can't do my nails without these drops anymore. Half the time I skip out on doing my nails because I don't have time to sit around and wait for them to dry. Not anymore! Just use the little dropper to apply a 1 to 2 little drops per nail and you're polish will be dry in no time! I love them and highly recommend them to all nail polish junkies or women on the go!

7. Cargo Swimmables Water Resistant Bronzer: I bought this bronzer because the ULTA I work at is no longer carrying Cargo Cosmetics so it was ridiculously discounted. I actually bought 12 other products too for a steal so look for a review on all of that soon! Luckily you can still buy the products on Cargo's website so when I fell in love with this bronzer I had to share. While I haven't gone swimming with it on because I'm not a fan of wearing makeup in the water, I do find it has great lasting power all day! The tone is really nice, a little warmer then I like to use for contouring but since it has shimmer I use it to give my face more of a glow anyways! It's also very smooth and blendable.


What were you loving this month? Leave a comment and let me know! I'm always down to try new things :) Hope your July was fantastic and happy August!

Have a beautiful day,

Dre

Dre Does How To Conceal Between Brow Waxes


There could be multiple reasons why your brows aren't perfectly tweezed and shaped. You could be growing out a bad wax job or simply haven't found the time to visit your favorite esthetician yet (wink wink). Regardless of the reason, sometimes we just need tricks to help us look more put together when we simply do not have enough time. Today's trick works best on those extra stray hairs that we are always waxing away. Do yourself a favor and go buy a concealer stick/pencil. My current favorite is by Covergirl Tru Blend and it's readily available and cheap. You are just going to apply this concealer right in the areas where you need waxing. You want to be light handed because if you apply too much it can start to get obvious that you are trying to hide something. The pencil shape makes it easy to apply along the curve of your brow. Now the key to this is to use concealer because it is completely shimmer-free. You may be thinking why can't I just use a highlighting pencil that's specifically designed to be placed under the brow. The problem is that these will sometimes contain shimmer or shine which is great for highlighting when you are smooth and just waxed. However, shimmer and shine emphasize texture so if you're covering baby hairs you're going to attract attention to them. So a semi-matte concealer is going to be your best bet! This trick isn't going to make you look like you just got your brows done, but it will help get you by an extra few days until you can get them taken care of! 

Have a beautiful day,

Dre