Current Fave Beauty Products

Last Thursday I did my first Instagram Live video per your request! It was so much fun. Thank you to everyone who watched and participated live, and also those who watched it afterwards. I'm always thankful for your support. In case you missed the live video or wanted more info on the products I talked about below is a list of links to everything I mentioned.

1. Belif Peat Miracle Revital Eye Cream
2. Exuviance Moisture Balance Toner
3. Peter Thomas Roth Cucumber De-Tox Hydra-Gel Eye Patches
4. First Aid Beauty Ultra Repair Cream
5. NARS All Day Luminous Weightless Foundation
6. CoverFx Custom Cover Drops
7. It Cosmetics CC+ Cream
8. Benefit Stay Don't Stray Eyeshadow Primer
9. Makeup Geek Contour Powders
10. Makeup Geek Highlighters
11. Color Pop Super Shock Eyeshadows
12. NYX Microbrow Pencil
13. Makeup Geek Foiled Pigments

Thank you again for all of your support and love! I cannot wait to do my next Instagram Live. If you have a topic that you would like to see, please leave a comment below!

Have a beautiful week,

Andrea Fontana

Fall Favorites

This is one of my favorite posts to write every year. I think it's because I love all things cozy and comforting and that's what this post is all about. I'm going to be sharing everything from products I'm loving to recipes and cookbooks I've been obsessed with. So grab your favorite warm fall drink, grab that soft blanket, cozy up and read on! Oh and be sure to share with me your favorites for this time of year. 

PRODUCTS:
I know this probably doesn't come as a surprise but I love a good pumpkin mask in the fall. So let's talk about how I have been incorporating them into my 'At Home Fall Facial'! My skin type is extremely oily in the summer, but as the cooler months approach, I start to normalize and even feel dry from time to time. I have two favorite pumpkin masks that I use to prep my skin for super hydrating masks (This also helps to brighten my skin and even my skin tone). If you read my last post on my BFF Glycolic Acid (click here if you missed it!), I shared the Andalou Naturals Pumpkin Honey Glycolic Mask ($14.99) , but I also like the Peter Thomas Roth Pumpkin Enzyme ($58)  if I'm feeling a little flakier and dry on the surface. It has little beads that you scrub your face with for 1-2 min before letting the mask sit and the pumpkin enzymes go to work. Once I remove which ever one of those I've chosen that night, I like to add my serums, eye creams (yes I'm using two right now), and then which ever sleeping mask I'm loving at the moment for some super hydration while I sleep. Spoiler alert: I'll be sharing my favorite sleeping masks soon!

As far as my makeup goes in the fall, I start to gravitate towards warmer and darker tones. Think deep browns, bronzes and even oranges and burgundies to warm things up. Last year I bought the Makeup Geek Autumn Glow Eyeshadow Bundle ($49) and I'm still obsessed with it. It included 9 shadows of various warm shades that make the best fall looks. (Please note that this is an affiliate link where I can earn money if you make purchases. If this bothers you, feel free to visit Makeup Geek separately). While the Autumn Glow bundle is no longer available, the Autumn Glow Bundle II is or you can purchase shadows from the bundle individually. MAKEUP GEEK EYE SHADOWS are LIFE! Go get you some now. 

My lip colors for fall start to get bolder and darker as the days get cooler. I love the wine and burgundy shades in the fall, one of my favorites being the Lorac PRO Matte Lip Color in Merlot ($19). Another favorite is the MAC Cosmetics Matte Lipstick in Diva ($17.50).
Now I can't skip over the fact that I love browner lip shades as well in the fall. Think of that 90's lip color that has been super popular the past few years. A few of my favorites include MAC Lip Pencil in Spice ($17.50), Smashbox Always Sharp Lip Liner in FIGGY ($21), Glo Minerals Suede Matte Crayon in Trademark ($18). 

BOOKS:
I have an amazing cookbook to share and also two non-cookbooks. The cookbook is the amazing Eat Beautiful by Wendy Rowe, a well known makeup artist who has written a beautiful book full of recipes for healthy skin. I love that this book combines my two passions, food and skincare. I also love how this book is structured. There are four sections for each of the seasons. Each section includes ingredients and what benefits they have for your skin and body, and then recipes that correlate with those seasonal ingredients. I highly recommend this one (it also looks beautiful on your bookshelf)! (Huge shout out to my best friend Emily who knows me better than I know myself sometimes and gave me this one for my birthday...talk about hitting the nail on the head!)

Next we have two books recommended by my dad. If you've met him, this comes as no shock but these two books are AMAZING! The Referral of a Lifetime by Tim Templeton, and The Go-Giver by Bob Burg and John David Mann are two of the best books I've ever read. I've always believed in treasuring every relationship that I've created with my clients and these books validate this belief for me. If you are in a service or referral based industry, you NEED to read these now. 

RECIPES: 
For those of you who follow my Facebook Page Andrea Fontana Beauty, I shared a picture of the pumpkin bread I've made my whole life. The recipe comes from the good old fashioned Fanny Farmer Cookbook and luckily many people have shared it online, so here you go! It's the bomb and more often than not, I make them into muffins instead of loaves, so I can take my pumpkin bread with me easier. Enjoy and don't come back here and yell at me when you want to eat 5 muffins in a row (totally not speaking from experience....)

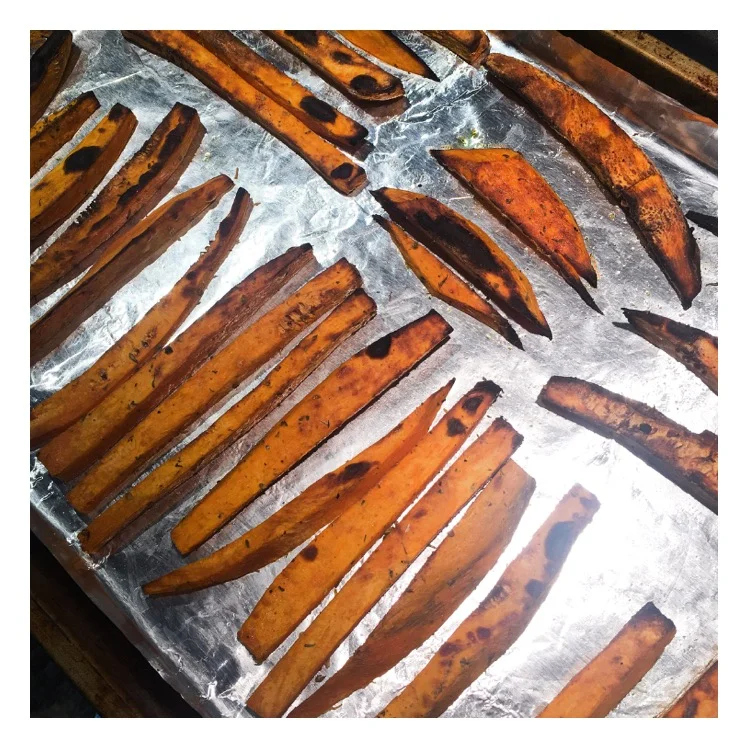
For some reason, sweet potato fries always make me think of fall. I'm realizing now as I'm typing this that it's probably because sweet potatoes are orange, but whatever! Here's how I make my super easy sweet potato fries. I preheat my oven to 450 degrees F. Then I peel my potatoes and cut them into long wedges. Next, cover a sheet pan with aluminum foil, toss them with olive oil and whatever seasonings you want. I like garlic powder, S&P,and basil or oregano. The most important thing I've found with these is that you don't over crowd your pan. Make sure the fries aren't touching and bake them in the center rack of the oven for 10 minutes at a time, checking and flipping when they are browned on top. It usually takes mine 20 on the first side and 10-15 on the second but every oven is different so check often! I LOVE dipping mine in mustard but ketchup is great too! Enjoy!

IMG_8697.JPG

RANDOMS: 
I have two random favorites that I have to mention. I seem to drink way more tea when fall comes around and I'm currently obsessed with the Tazo Wild Sweet Orange tea. It has hints of orange, lemongrass, and licorice root and I drink it a few nights a week before bed (Yay caffeine free!) 

The other random is wearing olive green clothing. My absolute favorite fall coat for the last 4 years has been this one from Gap.  They usually do a similar one each year, but I can never get enough of it. I love the fit, the color, how broken in it feels. I highly recommend a jacket like this because I think the olive green can often act as a neutral, depending on what you're wearing. I love to pair it with a gray t shirt and denim jeans or black leggings. 

gap jacket.jpg

So that wraps up my fall favorites. Be sure to share with me the products and things you love for this time of year. I love when you guys share new things with me!

Have a beautiful and cozy fall,

Andrea

Bridesmaids Makeup Tips

Recently, a common conversation topic that I've been encountering is getting your makeup done as a bridesmaid. I'm at the age where every weekend someone is getting married, so it's not a surprise that so many clients and friends are asking me questions about being a bridesmaid. Some of you have never had your makeup done, so I decided to compile a list of tips for you to have on hand for the next time you are in a wedding!


1. Make sure you have a consultation before the makeup artist begins. Since bridesmaids rarely have a trial before the big day, it's important that the makeup artist chats with you for a few moments to discuss things like your skin type, how much makeup you feel comfortable in, anything you love or hate, your favorite features, etc...If they aren't asking you these questions, speak up! If you know you get super oily throughout the day, that's something the MUA will need to know. 9 times out of 10 the bridesmaids pay for their own makeup which means you are their client. It's your face! Don't be afraid.

2. If you wear dramatic makeup on a regular basis or want a dramatic look for the wedding, okay it with the bride first! After all, it is her day and she may have an idea of the look she wants for the bridesmaids. On multiple occasions I've had a bride let me know ahead of time that she doesn't like the look certain bridesmaids might ask for so please don't do it! It's always better to double check with her first to make sure she's comfortable with what you want.

3.  Be on time! Getting ready for the big day will take some serious time. If the bride gives you a specific itinerary with a time slot for you to get your hair or makeup done, make sure you're there 10 min early. I can't tell you the amount of times I've seen girls not show up on time and this could cause a cramp in the schedule! The last thing you want to do is stress the bride out hours before she walks down the aisle! 

4. Bring pictures! Sometimes the most difficult part of a MUA job is understanding what you mean when you're describing what you want. Everyone is different and depending on your makeup knowledge, you might describe a natural eye as a dark smokey eye. Pictures allow the MUA to instantly see what you're talking about and help them understand you better.

5. If you've never gotten your makeup done before I'd recommend going with a natural look that's a little more glam than what you wear every day. You can't go wrong with that! 


I hope these tips help you the next time you are in a wedding. Remember, it's the bride's day and you may have to sacrifice your signature red lip which will be ok. Just remember that the most important thing is you standing up with her on the biggest day of her life!  

 -Andrea


The Bane of My Existence

If you wear makeup you generally associate washing makeup brushes with being annoying, time consuming, and all over the worst part about wearing makeup. I feel like there's just a general consensus that it's the least favorite task to do. Thankfully, many companies have used this to their advantage and created tools and products to help us clean our brushes quicker and better. Until recently, I had yet to buy anything of this nature because I figured washing brushes was always going to suck and just accepted it as a part of my routine. That is until now.

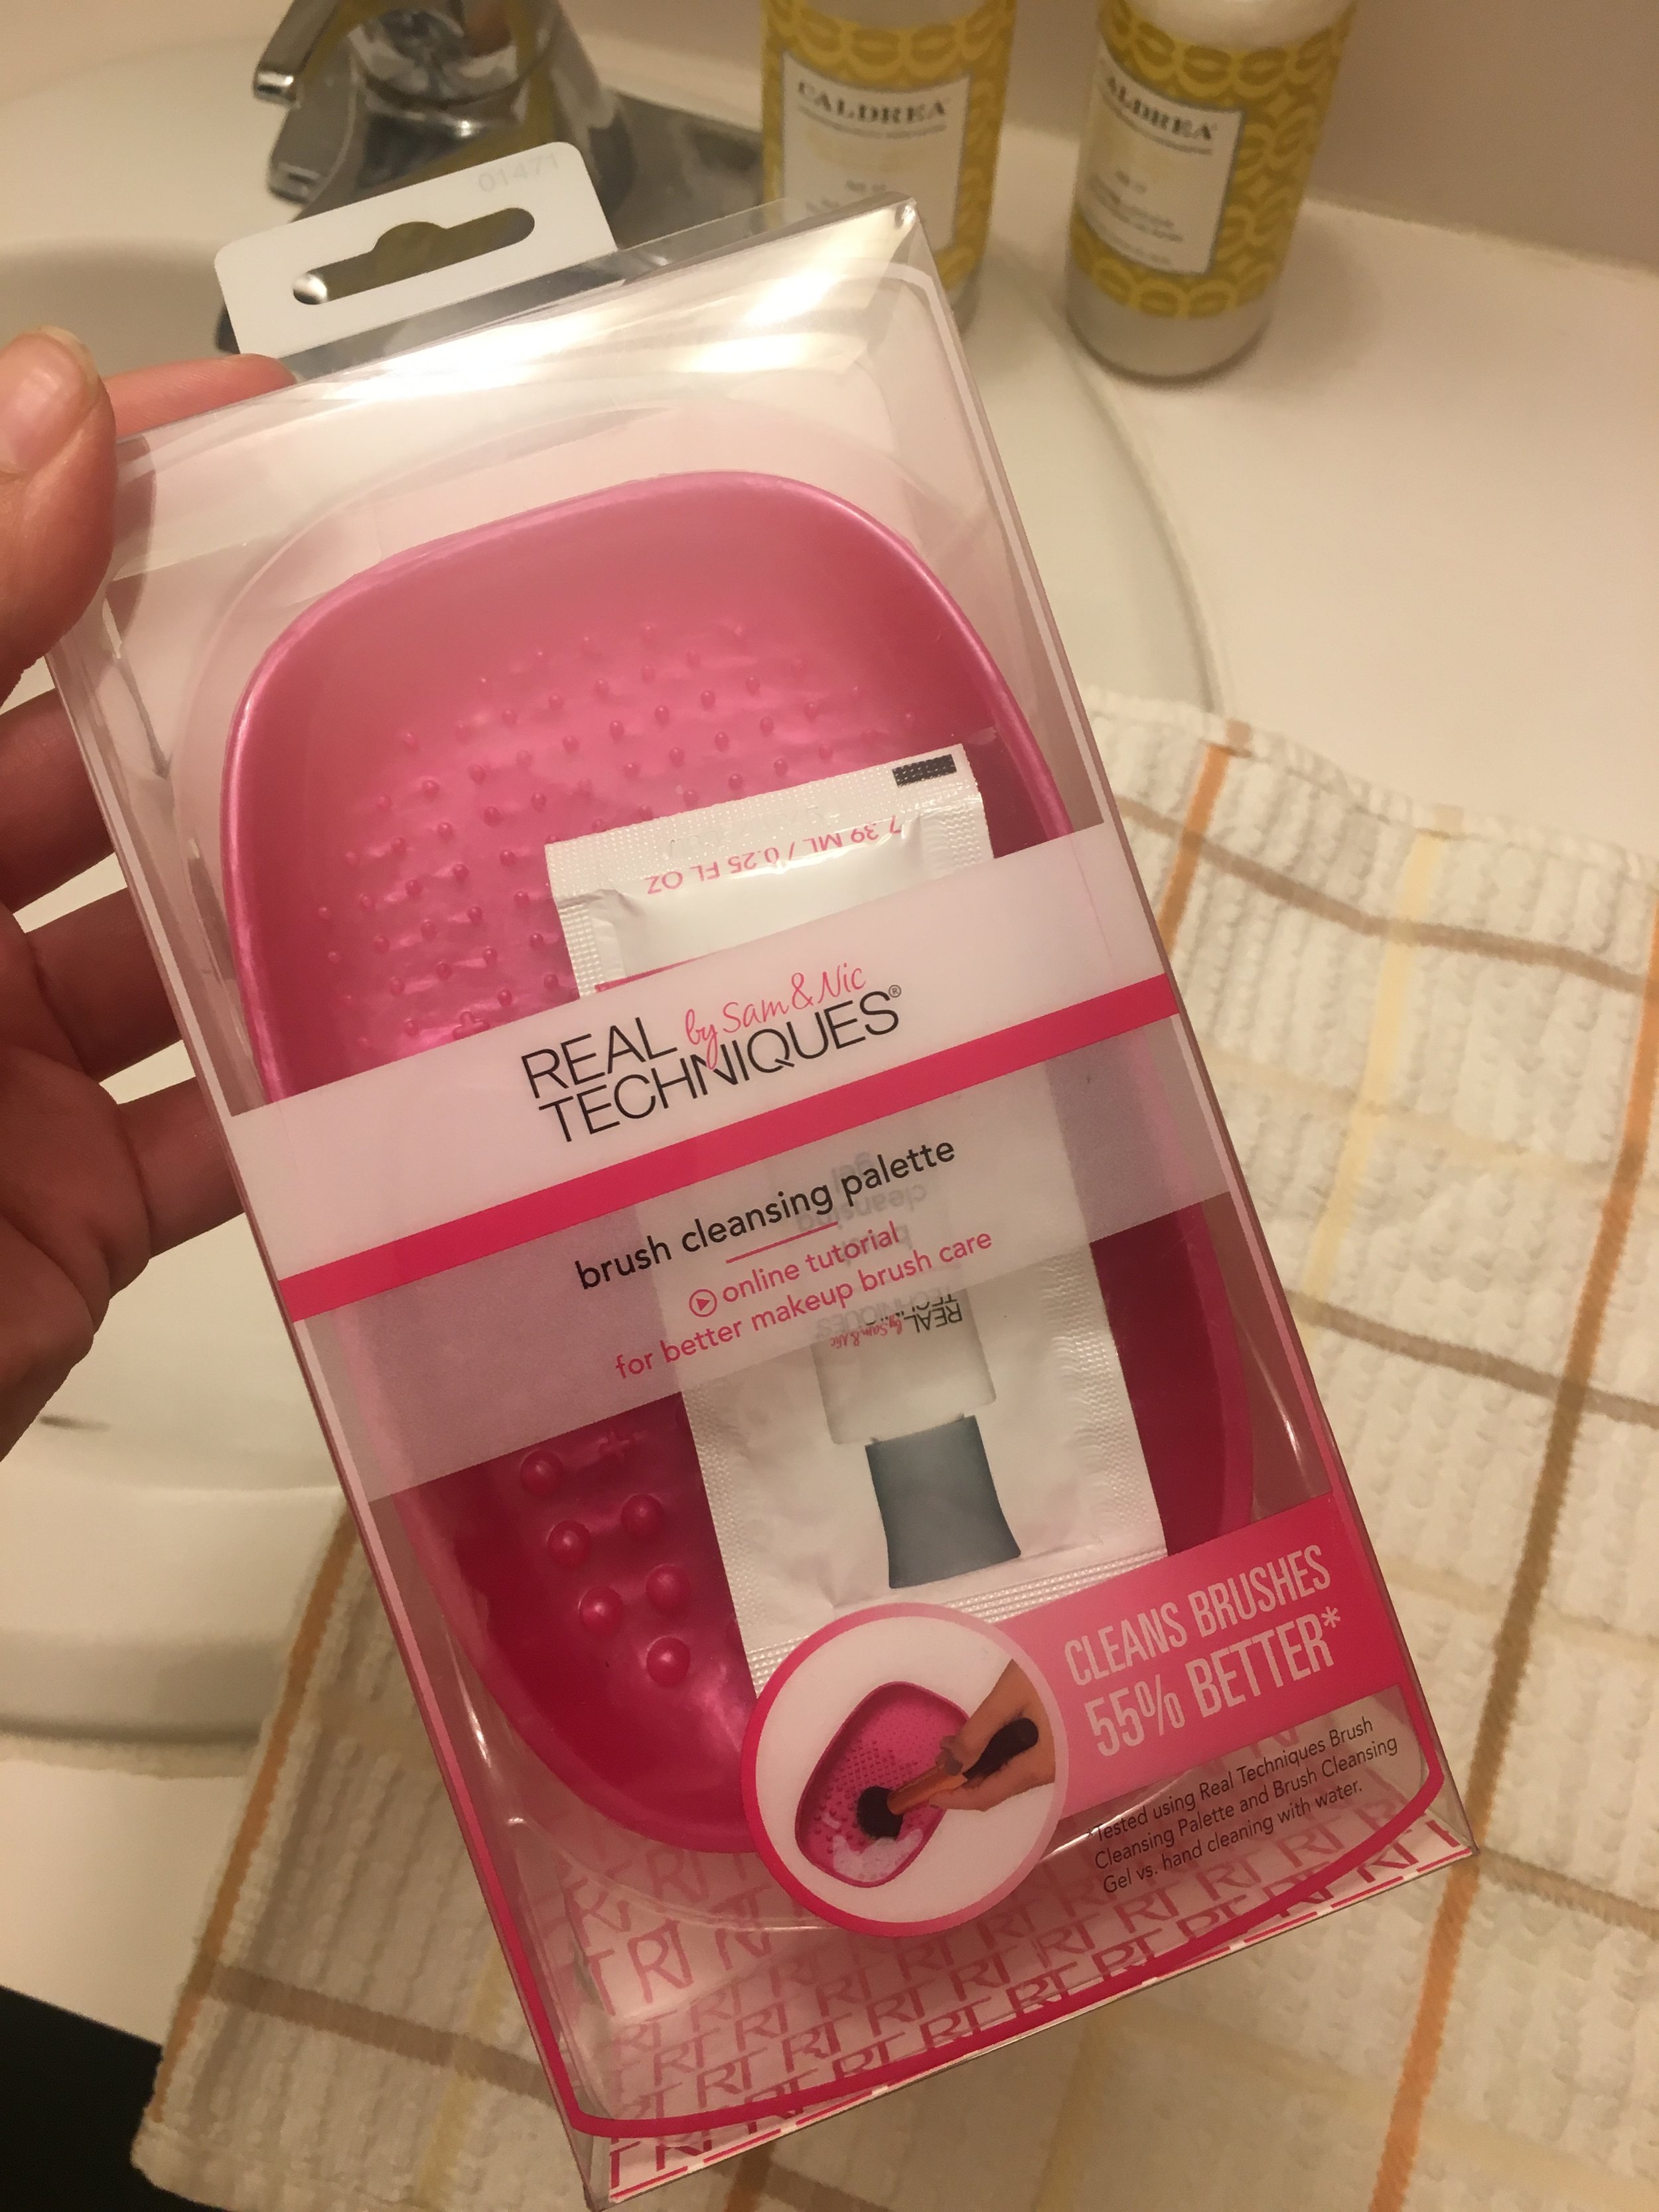
I believe Sigma Beauty was if not the first, one of the first, to come out with brush cleaning mats and gloves with bumps and ridges to aid in the cleaning process and help break down makeup quicker while still being gentle on your brushes. I wanted one for a long time, but again always put it on that list of products I didn't reeeeally need, especially with the $25-$40 price tags. Fast forward a few years and product launches by many companies, Real Techniques came out with a Brush Cleansing Palette that had a handle on the back for you to slip onto your hand and essentially clean your brushes in your palm. Oh and did I mention it was only$14.99 (plus I feel like Real Techniques is always Buy One Get One Half OFF at Ulta. It is right now so hurry and snag some products if you want to try this after you're done reading!) Now if there's a company that can create great tools for a good price, it's definitely Real Techniques. You've heard me say before that I stand behind their brushes and sponges 100% so I was hoping this brush palette would be no different. 

IMG_8083.JPG

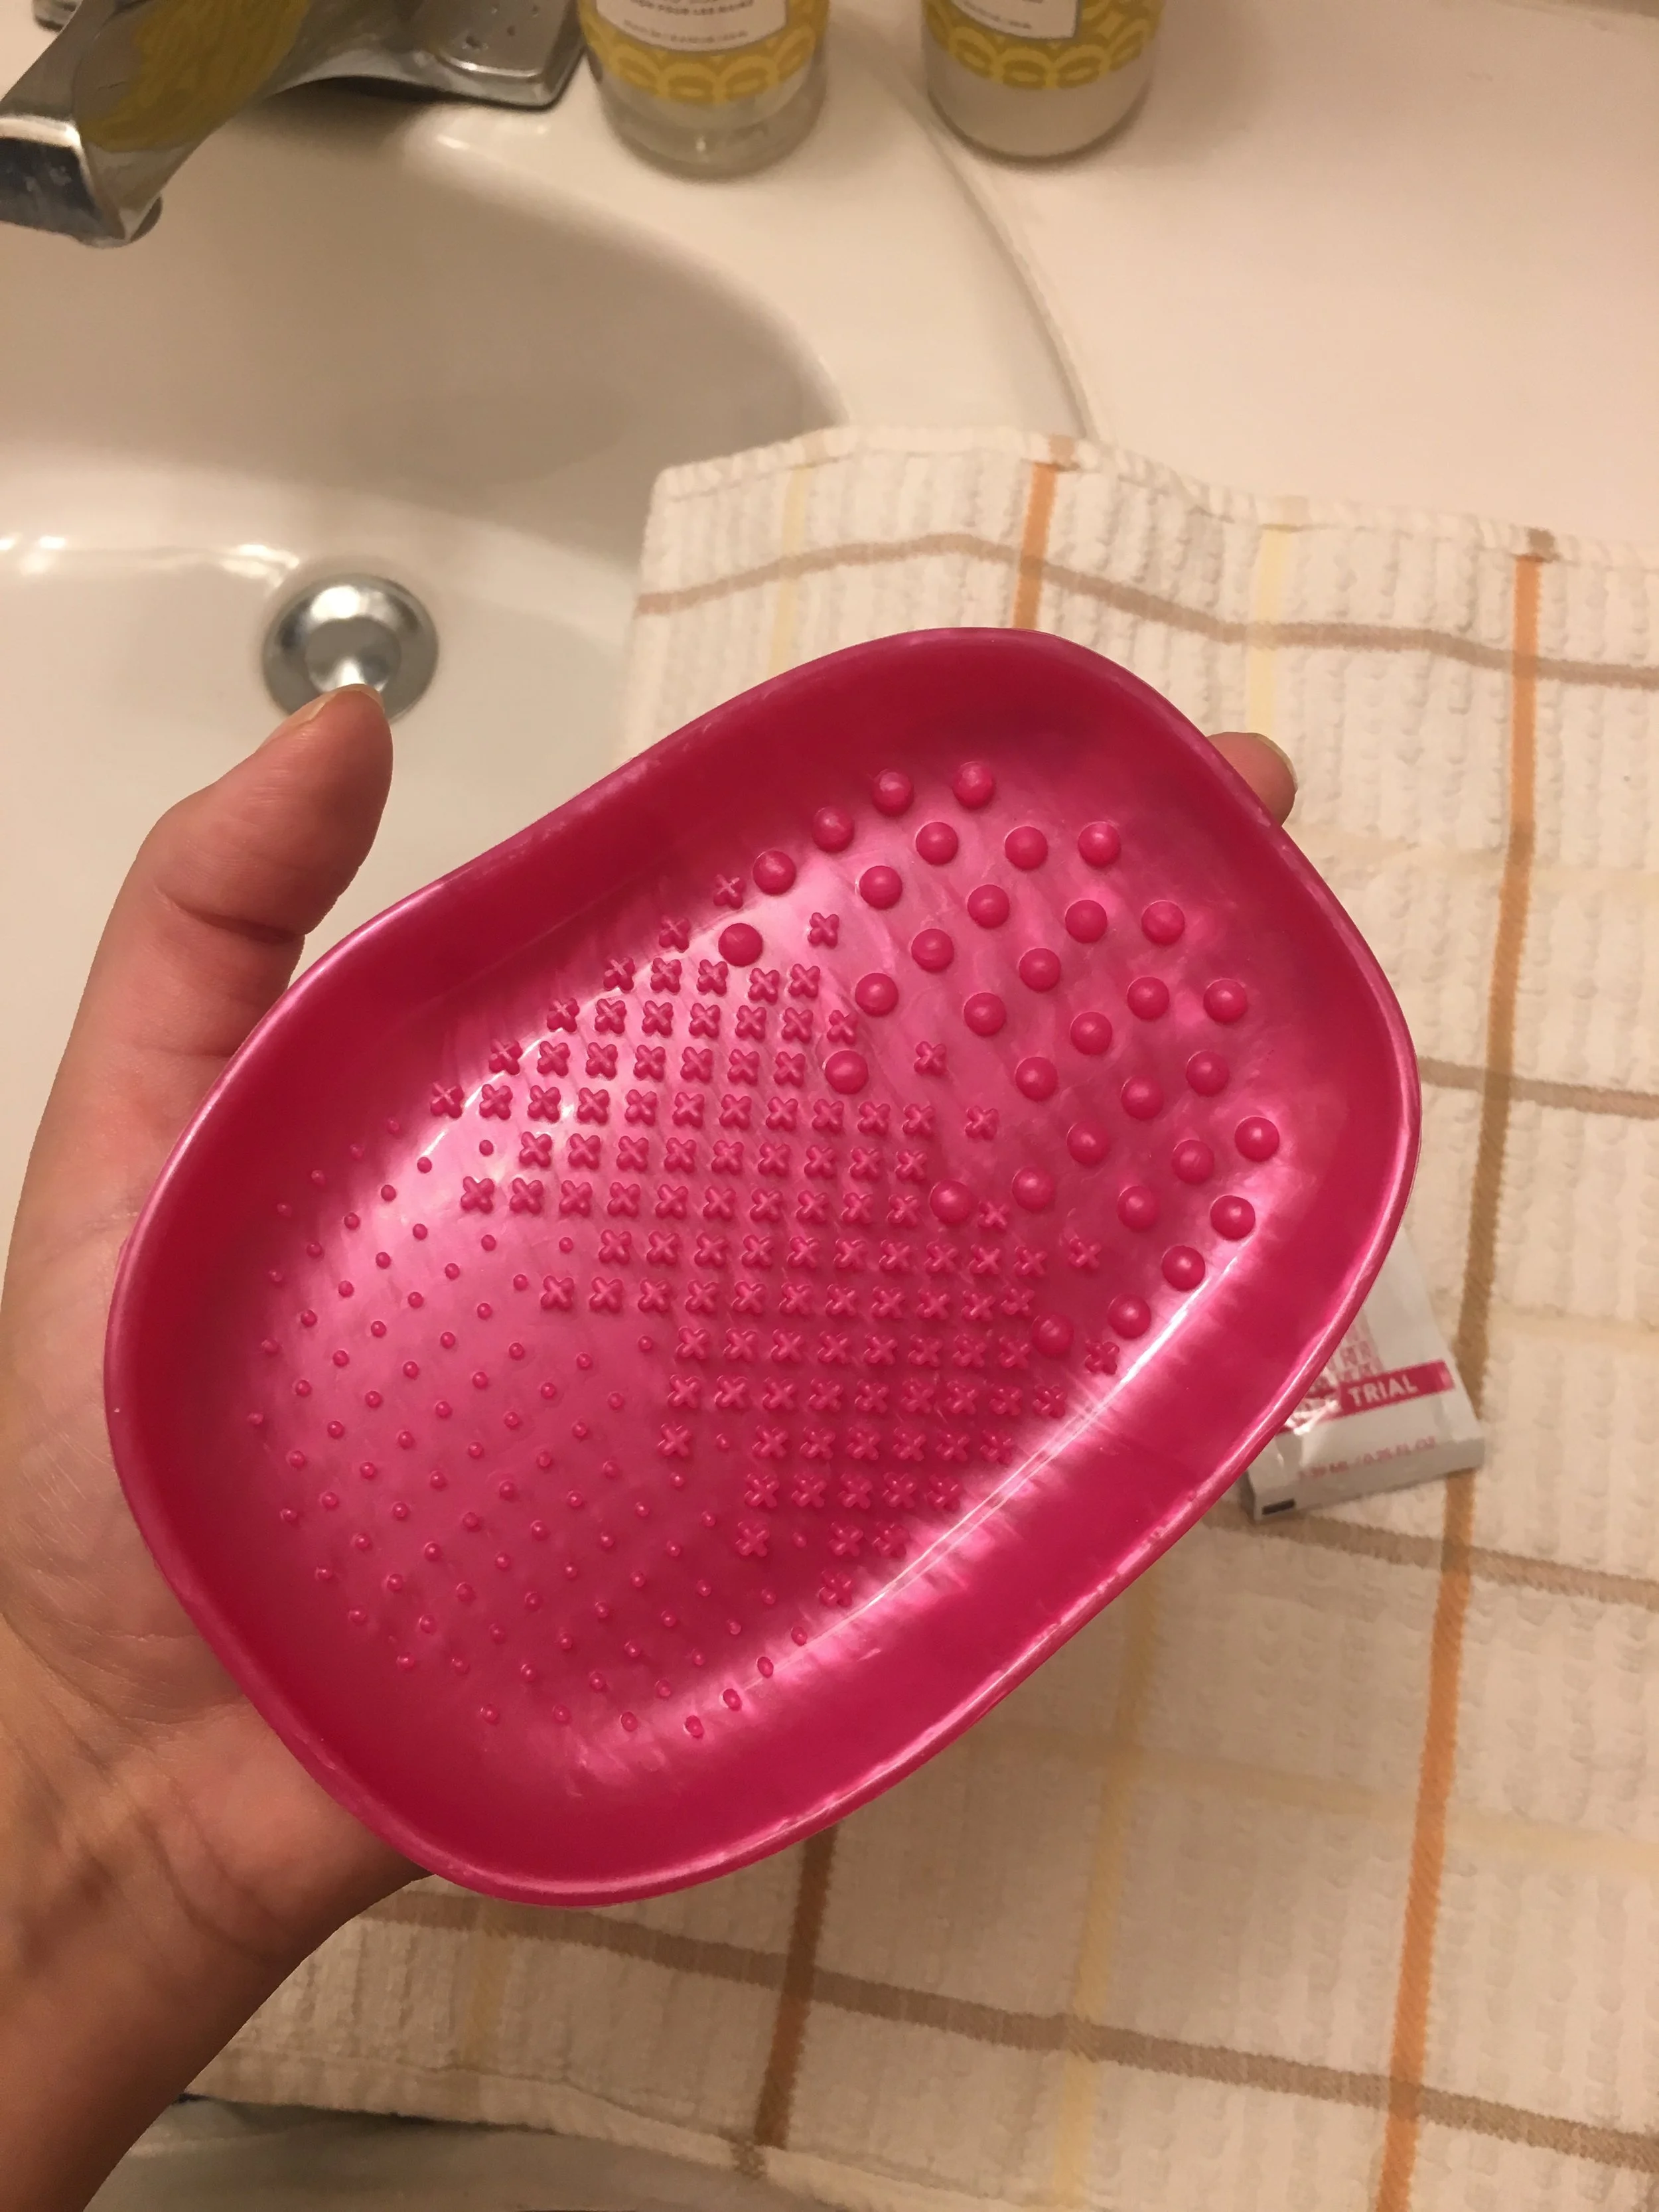
It came with a few free samples of their brush cleansing gel, but if you read my post here (CLICK ME) you know that my holy grail brush cleanser is a $5 solid bar of Dr. Bronner's Soap. If you haven't read that post, read it and get yourself some Dr. Bronner's NOW! (I wrote this whole post then went back to that one and apparently washing brushes was the bane of my existence in November 2015 too haha) So I got out my soap and started washing away. As you can see below, the palette has three different sized and textured bumps; little dots, medium x's and large bumps. I loved the different sizes because they helped clean the different brushes depending on size and density of bristles.

IMG_8084.JPG

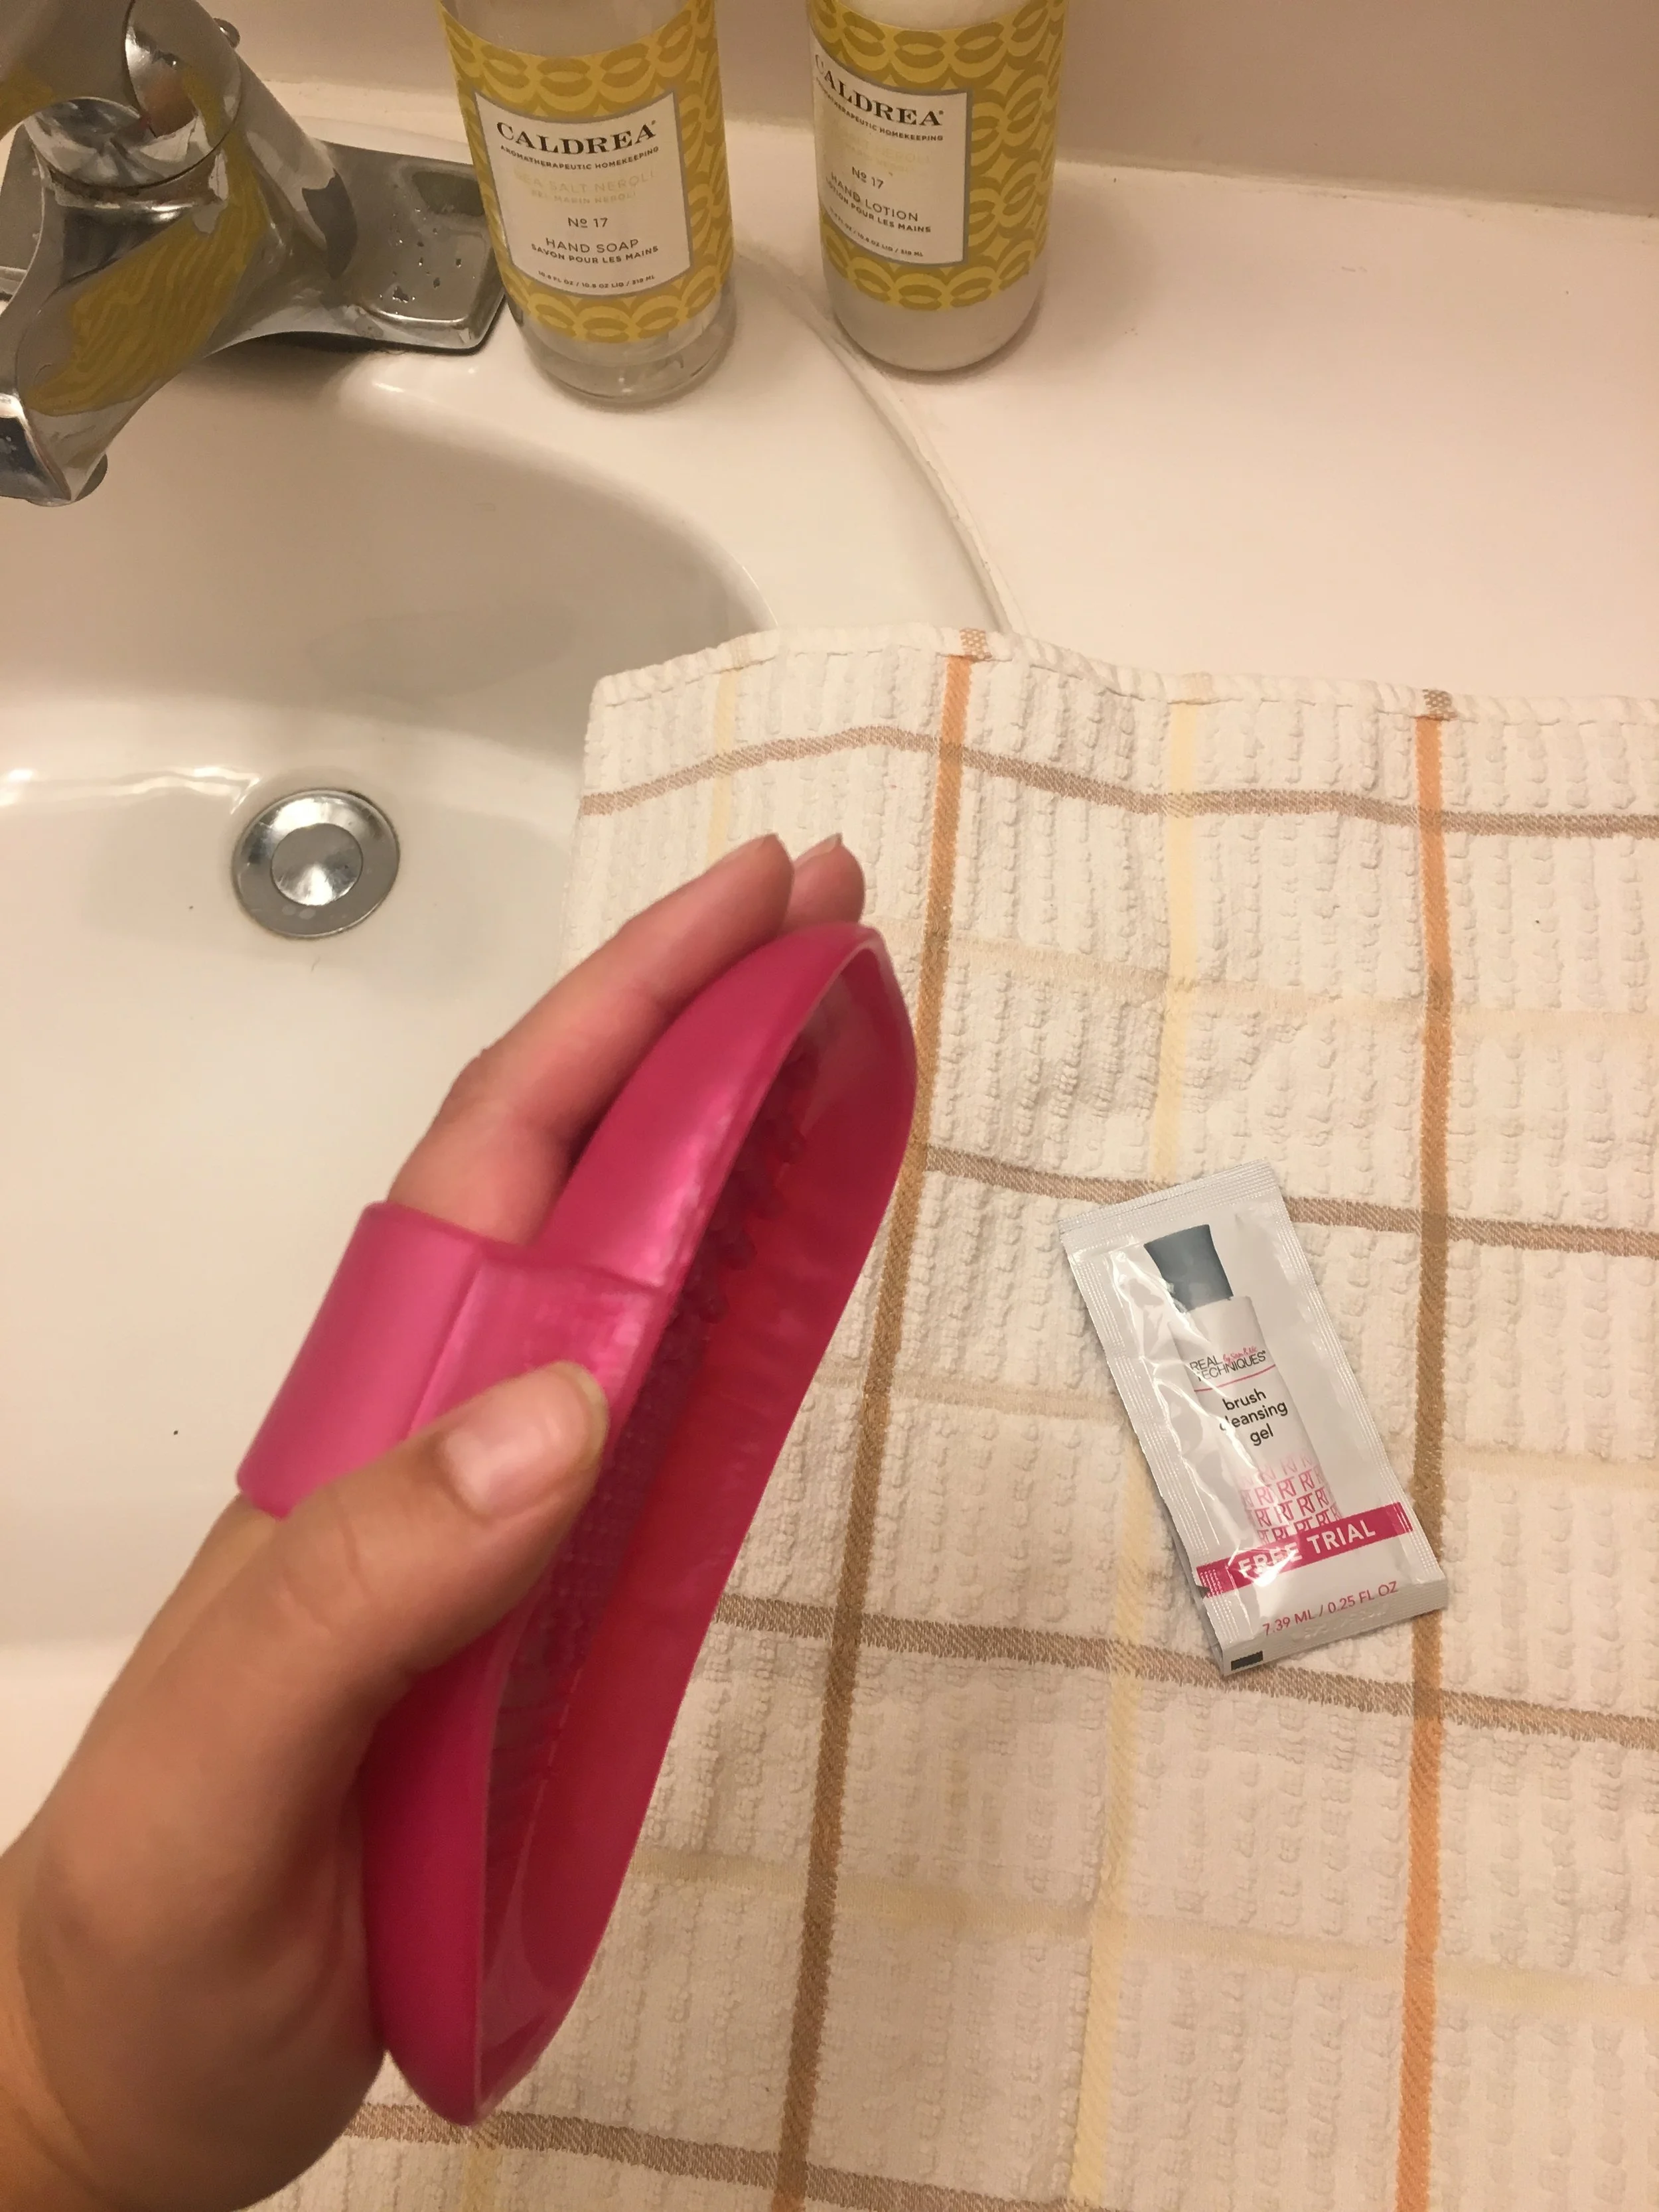
Another thing I really like about these types of cleansing mats and gloves is that they are usually made of silicone which allows for the tool to bend easily and stay clean. I feel like I will get thousands of uses out of this product which is again very typical of Real Techniques. Just because it's affordable doesn't mean they skimp on quality.

IMG_8085.JPG

So what's my overall opinion of the Brush Cleansing Palette? If you wear makeup often  or simply have a lot of brushes, you'd probably really enjoy having this tool. While I feel like it's difficult for a product to drastically cut down my wash time because let's face it, I have A LOT of brushes, I do feel like they came out really clean and quicker than I expected. Even the brushes that are really hard to wash cleaned quicker. You can buy Real Techniques products online or in stores at Ulta, Walmart, Target, Walgreens, Meijer and many other places! 

Have a beautiful day friends! 

-Andrea

Current Favorites

Since product recommendations have always been a huge hit on my blog, I figured I would kick off Andrea Fontana Beauty with a post sharing what I've been loving recently. It's officially the time of year when things start to get a lot cozier! 

Epsom salt baths: If you've never taken an Epsom salt bath you need to try it. I take at least 2 a week (don't judge) because after massaging sometimes more than 12 people in a week, my body starts to ache. Epsom salts are made of magnesium sulfate, which naturally relieves the aches and pains in our bodies. Magnesium helps regulate enzyme activity, reduce inflammation, helps muscle and nerve function and loads more. Sulfates improve nutrient absorption in our bodies, flush toxins, and can also help ease the pain of migraines. Dump a cup or two of these in with your bath water and soak for about 20 minutes and you will feel much better. If you live a very active lifestyle, I highly recommend incorporating these into your routine. Plus, I buy Epsom salts with essential oils added and they make the best aromatic bath experience ever!  

Makeup Geek Cosmetics Blushes: You will not find better blushes for this price. For $10, yes I said $10, you get a blush that is so smooth, pigmented, and long wearing. I have them in the pan form and pop them in a Z-Palette and then I have all my favorite shades in one spot. They have a great shade range and are a must in my makeup kit for all jobs. Some of my favorite shades include Puppy Love, Heart Throb, Spellbound (all mattes), and Romance (slight sheen). I know this fall I will be reaching the most for Puppy Love though because of it's a berry toned BEAUTY!

NYX Microbrow Pencil: I have been using the shade Espresso for about a year now and I have probably gone through about 5 of these. I use other brow products here and there but I always come back to this one for two reasons. First, it's so budget friendly. I swear they are always BOGO 50% off at Ulta and are only $9.99 originally. So I always snag two at a time and don't have to buy as often. The second reason is that they are so easy to use and give me the exact brow I want without having to put too much time in. I'll do an update brow routine soon but know these are also a staple in my makeup kit and you should try them if you like simple and easy (which I know you do).

Glo Minerals Suede Matte Crayon in Crimson: The newest shade in one of my favorite lip products of all time! I love these lip pencils because they come with a sharpener in the lid and are an extremely long wearing and comfortable lip pencil. They deliver pigmented and smooth color and are perfect for keeping in your purse. I love deeper red shades for fall, so when I saw this new shade was launched, I immediately ordered it. If you've yet to try these pencils, come in to Remedi and I would be happy to help you test one out! 

KeVita Sparking Probiotic Drink and Masterbrew Kombucha: If you like carbonated drinks that are more bitter and tangy than sweet like La Croix, I highly suggest checking these out! Kombucha is a fermented tea drink that has active probiotic cultures to support digestive and immune health. My favorite flavors include mango coconut, Lavender melon (I know it sounds weird but try it), and the Masterbrew citrus flavor. I try to stick with the fruitier favors and everyone I've tried so far I like. They are low calorie and low sugar so if you're looking for a refreshing and healthy treat besides water, give these a try! I get mine at my local Whole Foods and they seem to go on sale a lot!

Sleeping masks: I have been so into sleeping masks for the past 6 months because you can simply apply them as your last step of your skincare routine and you don't have to wash them off. It's the lazy girl's secret to skincare. I will be doing a post within the next week on my favorite ones and how I have incorporated them into my weekly routine, so look for that soon! 


So there are a quick few of the things I've been loving recently. I could add more but I want to do specific posts on some of the things that need a little more explanation so look for these posts to come! If you have questions about any of the items mentioned please let me know! 

Have a wonderful day,  

Andrea 


Dre Does a Target Beauty Box Review

About a year ago I cancelled my Ipsy subscription and am always on the look out for intriguing subscription services. I had heard good things about the Target Beauty Box as far as value goes, so when I woke up to an email last week saying they were in stock, I jumped at the chance to get my own. For only $10 you can have deluxe sized samples and even full size products sent to your house!
Starting in the top left and moving clockwise, I received the Andalou Age Defying Night Repair Cream, Hair Food Kiwi Dry Shampoo,  L'Oreal Paris Sublime Bronze Towelettes, Laneige Water Bank Moisture Cream, Derma e Firming DMAE Moisturizer, L'Oreal Paris Colour Riche Lip Pen, Burt's Bees Facial Cleansing Oil, CeraVe Foaming Facial Cleanser, and the Egyptian Magic All Purpose Skin Cream.

Not only did I get all 9 of these products but I also got a $3 Off a $15 Target Beauty Purchase. I believe these coupons are included in every Beauty Box. I love how this box comes with a card explaining every product because I hated that I never had a list and description of every product in my Ipsy Subscription.

Now let's talk products. While I can't give reviews of products yet, I can at least let you know the things I'm really interested in trying and what their value is!

Andalou Age Defying Night Repair Cream ($24.99 for Full Size; Sample Value- $6.00): I've heard really great things about this all-natural brand so I'm excited to try a night repair cream from them. It has antioxidants that help stimulate circulation and healthy cell renewal while slowing the damage of cells while you sleep!
Hair Food Kiwi Dry Shampoo (Travel Size Value $4.99): I use a dry shampoo at least 4 times a week so I'm always open to try new ones. I like that this one is paraben and sulfate free and light on your hair.
L'Oreal Paris Sublime Bronze Towelettes ($7.79 for 6 Towelettes; Sample Value-$1.30): I've heard amazing things about the L'Oreal Sublime Bronze line, for a drugstore self-tanning line. I'm really excited to try something from it. My only complaint is that since you are supposed to use the product every day until you like how dark you get, I feel like one towelette might not do that much, but we shall see!
Laneige Water Bank Moisture Cream ($32.00 for Full Size; Sample Value- $12.80): Ever since this brand came to Target I've been dying to try it. I'm excited to start with this product because it is supposed to keep you hydrated for 24 hours!
Derma e Firming DMAE Moisturizer ($19.99 for Full Size; Sample Value- $5.00): This moisturizer claims to visibly firm and lift the skin and since I'm always looking to prevent the loss of elasticity in my face, I can't wait to try it.
L'Oreal Paris Colour Riche Lip Pen ($8.99 Full Size Lip Pen): I've been meaning to pick one of these Lip Pens up since they came out so I'm excited to try this one. I got the shade 207 Laque-y You.
Burt's Bees Facial Cleansing Oil ($15.99 for Full Size; Sample Value- $2.67): I am obsessed with cleansing oils to remove my makeup so I'm thrilled to try this one. I have loved Burt's Bees products in the past so I'm excited to try another from them.
CeraVe Foaming Facial Cleanser ($11.99 for Full Size; Sample Value- $0.50): This is honestly the only product in the box I'm not excited to try because I'm not the biggest fan of gentle cleansers like CeraVe and Cetaphil. I don't geel like they do enough to really help the skin. This will probably be something I keep in my shower or gym bag for when I'm in a rush and don't want to grab my normal cleansers.
Egyptian Magic All Purpose Skin Cream ($24.00 for Full Size; Sample Value- $1.20): I love that this is all-natural and only contains 6 ingredients derived from living plants and organisms.

I will do a follow up post once I've tried all the products and let you know what I think! As far as value goes this box was worth $43.45! That's amazing considering that I only payed $10. Plus we can't forget the additional $3 coupon I got towards my next Target Beauty purchase. I'm not sure if I just hit the jackpot this box or if they are all this great but I will be sure to pick up the next one as long as I can snag it before it sells out!

Let me know if you've tried the Target Beauty Box or any of these products before and what your thoughts are!

Have a beautiful day,

Dre

Dre Does 2015 Beauty Favorites

After careful consideration my favorite products of the year are finally here! These are makeup, skin care and hair products that have been used on a regular basis throughout the year and even repurchased multiple times so you know that I have put them to the test and love them. I chose 15 products total and have separated them into categories...So let's get started!

Let's start with hair products. If you know anything about me, it's that I am not one to fuss a lot over my hair. I've never colored it and keep styling to a minimum so for me to stand behind a hair product means that it has to be easy! These three products have been my rocks for the year and I can't imagine life without them anymore.

1. Kenra Professional Platinum Dry Texture Spray ($22): This might be my favorite hair product of all time. It smells amazing and gives my hair the perfect amount of texture without weighing my hair down. It gives me volume and revitalizes flat and boring hair. I love to use it both on curly or straight days. Click here to read a post more about it in my June favorites!

2. Redken Hot Sets ($17): This product changed my life when it comes to curling my hair. My hair has never wanted to hold a curl for more than an hour so when someone recommended this to me I was floored at how well it makes my curls stay. It's essentially a hair spray that you apply before heat styling that not only holds the style, but protects your hair from any heat damage! Go out and get some NOW if your hair is hard to curl and I promise you will love it!

3. Enjoy Volumizing Dry Shampoo ($24): I have tried more dry shampoos than I can even count and this one is by far my favorite because there is no lingering scent and my hair doesn't feel instantly dirty. It also is one of the easiest dry shampoos to blend into your hair if you are a brunette so I love that I don't have to spend much time with it. It gives me volume and I always get compliments on my hair when I use it (aka trick people into thinking I have beautifully styled and clean hair!) If you're interested in purchasing it please shoot me an email and I'd be happy to talk to you more about it because we retail it at the Spa & Wellness center I work at!

Now for the skincare! I have been experimenting with so many new products in the last year, but I've found that I have a few that I have really been loving.

4. Tarte Maracuja Oil (Reg. $48 but only $28 right now!): I feel like most of you probably know by now how much I love this stuff. It should come as no surprise that I am obsessed with Maracuja (passion fruit) oil. With a burst of Vitamin C it helps hydrate and brighten my complexion every morning and night. When my foundation feels too drying or I want a lighter coverage, I simply add a drop in. I have gone through probably 5 big bottles over the last couple of years and I can't see myself stopping anytime soon. The limited edition holiday bottle that I'm currently using is on sale on Tarte's website so if you've been wanting to try it, now's your chance!

5. Lelexo Mandelic Acid Scrub ($33): This has quickly become my holy grail cleanser. I use it on so many of my clients at the spa because it is amazing for so many skin types. Mandelic Acid is an alpha-hydroxy acid derived from almonds that gently exfoliates the skin and helps with acne, hyperpigmentation, aging and so much more! It is anti-bacterial, anti-viral, and anti-fungal, so it helps keep your skin extremely clean. Not only that, it is anti-inflammatory so it helps the skin to calm and heal quicker! I have gone through multiple bottles myself and would be happy to talk to you more about it if you're interested in trying it out!

6. The Body Shop Camomile Silky Cleansing Oil ($19)/ Camomile Sumptuous Cleansing Butter ($16)/ Camomile Gentle Eye Makeup Remover ($17): You're looking at my makeup removing routine. I always use either the Cleansing Oil or Cleansing Butter and the Eye Makeup Remover. All are gentle and remove my makeup so well without causing any irritation to my skin and leave it feeling smooth and hydrated! I always use my cleanser after, but as a first step to my skincare routine, I LOVE THEM!

It's time for the main course friends! My 2015 favorite makeup products. If you're new to my blog, I hope you try some of my obsessions.

7. NARS All Day Luminous Weightless Foundation ($48): Guys this foundation changed my life. I know that sounds extreme but as my skin has been transitioning into being less oily all the time, I have needed a foundation that gives me a full coverage yet light feeling luminous look and I'm obsessed with it. I used to be a die hard Tarte Amazonian Clay Foundation fan but it's too drying for me these days and this one has saved the day! I can't say enough great things about it and here is my post from last year. If you've followed me at all throughout 2015 you are probably not surprised that this one came out on top! I highly recommend getting a sample from Sephora if you are normal to oily!

8. Anastasia Beverly Hills Original Contour Kit ($40): I have to admit that at first I wasn't too impressed with this one. It was getting so much hype that I didn't think it could possibly be as amazing as everyone was saying so I probably didn't give it a fair chance. Fast forward to a busy bridal season and doing my makeup hundreds of times in 2015 and it's now easy to say that this is my favorite contour kit. The shades work so well and blend so nicely that I will be refilling it as soon as I finish up these pans. I found myself bringing other contour products to jobs but always ending up using this one.

9. Benefit Dallas Bronzer/Blush ($29): Back when I worked for Benefit this was one of the products that I talked about with clients on a regular basis. Anytime some said "I need a good every day blush that will go with everything" Dallas was the first thing that came to mind. Yes it's technically a bronzer, but let's face it, who likes following all the rules?! It gives the cheeks a beautifully natural glow without looking fake. It works on so many skin tones and blends easy as well! You must pick up a box for yourself now! (I might already have two back ups...)

10. Too Faced Original Chocolate Bar Palette ($49) & Too Faced Natural Matte Eye Palette ($36): These two palettes have been my go to palettes of the year. I've used them far more than any Naked palette and they were even picked up more than my beloved Anastasia palettes. I love warm shades and I feel like they both give me a great range of shades to do any intensity of neutral looks! If you don't have either you need to get them both ASAP!

11. Benefit They're Real Mascara ($24): SURPRISE! This made the cut another year...haha! I don't think another mascara will ever compete for me. It's a cult favorite for a reason and stays on like no other mascara for me. The wand, the formula, the intensity...it does it all!

12. Glo Minerals Brow Collection ($45.50): I'm obsessed with this brow kit. If you've ever been a client of mine regarding brows you know how much I love brow waxes instead of pencils. I think they are more customizable and you get more for your money. When I started using Glo Minerals at my job I fell in love with this kit because it is such a good value! You get two brow powder shades, a brow wax, cream highlighter, spooly brush, angled brow brush, tweezers, and stencils all in a zip up kit for only $45.50! Such a deal and the product is really great quality! If you have questions about it let me know! You can buy it through me at Remedi!

13. NYC Liquid Eyeliner ($2.99): Yes you read that right... it's onlyl $2.99 and it's amazing! If you haven't heard of how amazing this inexpensive liner is you either aren't that interested in makeup or are living under a rock. So here I am recommending it to you as well because it is Dre Does approved! You can get it at your grocery store or Target and it's extremely black, easy to use, and lasts all day!

14. Glo Minerals Suede Matte Crayon ($16): I love lip products, it's no secret. At any one time my purse can have upwards of 15 lipsticks in it so let's say I've tried quite a few. These crayons are my ideal lip product for a few reasons. First, they are matte which is my favorite lip finish because they last all day and make my lips look the best. Second, they are really pigmented. It doesn't take much product but they are easy to apply. Third, they are very smooth and don't dry out the lips. Sometimes I have to take a break between matte lipsticks because they dry my lips out too much but these never do! Lastly, they come with a built in sharpener so you can take them on the go and never have to worry about it not being ready to use!

15. Dr. Bronner's Pure-Castille Bar Soap ($4.69): If you missed THIS post, you might be wondering why bar soap is in my 2015 favorites. Read the post and you'll find out that it has become my favorite way to clean my makeup brushes. Not only is it extremely good at getting every last bit of makeup out of them quickly, but it also softens and conditions my brushes for future use! Go read the post on it and you'll learn more!


There they are friends! All 15(ish) products that I LOVED throughout the year. Let me know what your favorite products were and if you have questions about anything, as usual, let me know and I will be happy to answer them!

I hope your 2016 is off to a fabulous start! Remember to stay kind and grateful to everyone!

Have a beautiful day,

Dre
Dre Does an Adele Inspired Tutorial

I shared the picture above asking if you guys would like to see my Adele inspired makeup look and the response was overwhelming! Thank you always for your support! I obviously bought Adele's album the day it came out and every time I listened to it on my phone, the photo above of her makeup was looking back and me and I knew I wanted to re-create it. I realize it's not a color photo but the defined and contoured eyelook was what I was after. The look is super easy and honestly a great look with or without the liquid liner, for those of you who are still working on the perfect wing! The thing I like most about this look is that it is about layering shadows from light to dark, so you're in complete control of how light or dark you want to make it. Every shadow I used was from the Too Faced Natural Matte Palette and while you certainly don't need this palette to get this look, I highly suggest investing in it or adding it to your christmas wishlist. I don't know what I would have done without this palette for my freelance kit because everything you need to start and blend a look is in it. Without this turning into a Too Faced review....let's begin!
(On my lips is the Maybelline Color Sensational 'The Mattes' Lipstick in Daringly Nude)


1. As usual I started with a primed eyelid and then applied Heaven from lashline to brow bone using a flat shader brush. 
2. Using a very fluffy blending brush I mixed Lace Teddy and Nude together and applied them throughout the crease. As you can see this doesn't appear too much darker than the Heaven shade, but thats what I want. This look is all about slowly building the color and blending A LOT! Adding the lighter/medium shades in the crease will make blending the darker colors much easier. 
3. Next, I mixed Cashmere Bunny and Risqué on a pencil brush and applied it in my crease. Using the same fluffy blending brush from step 2, I blend the crease color out. I want the edges to be more blended on the top as you can see but the area where my crease meets my lid, I keep pretty intense and not so faded. 
4. The last shadow step is to take some more of Heaven and apply it to the lid to create that contrast between the dark crease and light lid. This is what gives Adele's look that defined and contoured eye shape. 
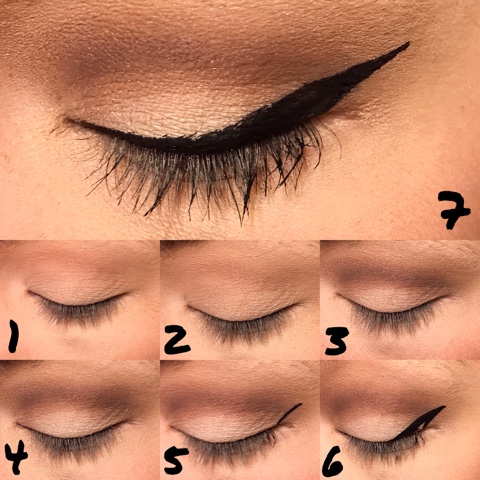
5. Next it's time for liquid eyeliner. In this look I used the NYC Liquid Eyeliner which is such an inexpensive and great product. It's only a couple dollars and is especially great for those who are practicing winged liner because you won't feel bad wasting expensive liner if you have to remove and re-apply. I always start my winged liner with a small line extending from the end of my lashline outwards. The angle I create is based on following my bottom lashline and extending that line out. 
6. Next, I draw from the end of the tail I've created back to my lashline, creating a little triangle. 
7. Lastly, I create the line along my lashline from the inside of my eye connecting to the tail I've just made. If this seems super confusing let me know and I can create a post completely devoted to how I do winged eyeliner!
(I unfortunately didn't get a picture after I finished my eyeliner, but I always perfect that line of liquid liner along my lid at the end to create a smooth line so please excuse any uneveness!)
8. The last step is lining your waterlines. I used Black on the top lashline and NYX's Wonder Pencil (a nude shade) on the bottom to get that bright open-eyed look like Adele has in the album cover. Two coats of your favorite mascara and you're done!

And that's it! You can get Adele inspired makeup that easily! Let me know if you have any questions or requests of makeup looks to recreate. I really enjoy recreating celebrity looks for you guys!

I hope you all had a wonderful Thanksgiving and please know that I am so thankful for you!

Have a beautiful day,

Dre


Dre Does Brows for Beginners

I had a good friend reach out to me lately asking for some pro tips regarding brows and it got me thinking that I've never really covered the basics regarding filling in brows, here on Dre Does. So I decided to share some of the basics with you incase you have never filled them in before and don't quite know where to start. 

1. Start small: If you've never colored your brows in before ANYTHING is going to look more dramatic than what you're used to. Just because you notice a huge difference doesn't mean they look bad. I would recommend starting with a tinted brow gel first, working your way up to a pencil, and then moving on to a tinted wax or pomade if you're really feeling confident. Filling your brows in for the first time should be subtle and minimal to avoid going too dramatic. 

2. Small Strokes: If you are using a product to fill them in always use small hair-like strokes because after all you are trying to make your brows look like they are full of more hairs. No one has perfectl straight and opaque brows naturally, so don't make long and intense lines with your product. 

3. Get a spooly: You'd be surprised how different and much easier filling your brows in is when you have a spooly for blending. A spooly is simply a disposable mascara wand and you can find a pack of them for only a few bucks at your local beauty supply store. If you don't want to go out and buy one, simply wait to use up your current tube of mascara (if it's one with a traditional bristle brush wand) and sanitize it for use in place of a spooly! Simply apply your brow product like you normally would and then use your spooly to slowly brush through the brow hairs and blend the product. This will ensure that your filled in brows don't look so fake.

4. Start in the middle: Whenever you are filling in your brows, I recommend starting to fill the middle of the brow first for a few reasons. If you're using a product that has a wand or brush (so a tinted gel or pomade for example) you will have the most product on it initially. You don't want to put all that product right in the front of the brow because naturally we aren't the fullest right where the brows start. It's also hard to master how to start your brow, so slowly building the front with only a little bit of product will help you acheive a much more natural look. This will help you avoid the obvious, too squared off brows. 

5. Shade is key: Don't use too dark or too light of a product. Brows should always stay a little darker than your hair if you're blonde, or a little lighter than your hair if it's darker. Also unless you are a red head, your brows should stay ashy and cool-toned. No one really has warm brows except for red heads, so picking the right tone of product will help you avoid your brows looking fake!

6. Get them shaped by a professional: I tell all of my clients that they beauty of getting their brows shaped is that I give them the blueprint to fill in their brows. Simply follow the shape I've waxed them to and in no time you'll get the hang of what you should be filling in. I take the guesswork out of adding product and will even show you how to do it if you need help. If you're in the Lansing area I would love to help you in person, but if not, find someone you trust to help shape your brows and get rid of unnecessary hairs!

7. Get them tinted: If all of this seems way too difficult and intimidating, look into tinting. This is a service I personally perform at the spa and it allows me to tint the hairs and underlying skin, to look like the brows are fuller than they are and to help emphasize the shape I give by waxing. The tint lasts up to 3 weeks so it's a great option for those who don't want to fill them in with product every morning. 

If this post stirred up any questions you might have regarding brows, please feel free to leave a comment below or on my Facebook page! I hope this helps!

Have a beautiful day,

Dre
Dre Does a Beauty Secret

If there's one thing us makeup artists and makeup enthusiasts can agree upon, it's that cleaning brushes is the bane of our existence. It's the thing that we know we have to do but always dread. Well I'm here to share a tip I discovered about a year ago but didn't actually try out until very recently. I'm happy to say I'm never going back to my old ways!

So what it is? A solid brush cleanser. You may have heard of the most famous one from Beauty Blender that retails for $16 for 1 ounce of soap. The idea is that you wet your brush or sponge and swirl it around on soap, pick some up and then use that to clean the brush in your palm or whatever you normally use to clean your brushes. I have always used baby shampoo for deep cleansing my brushes because it's just how I was taught and what has always worked. Mind you this always takes forever when you have a lot of brushes and I feel like I'm always wasting shampoo because I'm pouring it into my palm.

Well I heard another makeup artist suggest trying Dr. Bronner's Pure-Castille Bar Soap as a solid cleanser and seeing as it costs a shocking $4.69 for 5 oz, I figured it wouldn't hurt to try. OMG! Ladies go out and buy this completely organic soap ASAP and try it. Not only is it ridiculously cheaper than the Beauty Blender's alternative, but it's organic, conditioning for your brushes with coconut and tons of other oils, and it comes in so many different scents. Since it doesn't come with a container to store it in like the Beauty Blender one, just make a trip down the travel sized beauty section like I did and snag yourself a clear 97 cent container to store your bar of soap in.

I love how quickly I can wash everything too because I'm not picking up a shampoo bottle and pouring out and wasting extra product with every brush. It also cleans the brushes quicker than I've ever seen! I've linked the Citrus scent above which is the one I am currently using.

If you try this out and love it, let me know! Also please feel free to share any other beauty secrets you might have!


Have a beautiful week,

Dre

Dre Does Friday Favorites

It's been too long since I've shared some Friday Favorites so I thought I'd give you a taste of what I've been really enjoying lately.

First up we have a fall themed favorite that I discovered when looking for something else! I'm a huge fan of greek yogurt and it's the only dairy I consumer besides the occasional addition of cheese when I'm cooking. I heard that Chobani had Pumpkin Spice Yogurt and even though I didn't think I would like it I set out to find some. Luckily I came across the last one while grocery shopping last week and right next to it was an abundance of the Cinnamon Pear flavor. I grabbed a few and it turns out I ended up hating the pumpkin spice one and being OBSESSED with the Cinnamon Pear flavor. It's so delicious. While they are higher in sugar than I like (15g of sugar and 12g of protein), if you're looking for a healthier option to having dessert at night, I highly recommend trying the Cinnamon Pear flavor as an evening snack!

 Even though I'm already more than halfway through the 20's I really enjoyed reading this article from Emily, one of my favorite fashion and lifestyle blogger's from Cupcakes and Cashmere. It's filled with some great reminders so take a look when you have a second.

I have been obsessed with the Becca Shimmering Skin Perfector Spotlight in Opal (the liquid version of the Shimmering Skin Perfector family). It came in a kit of four mini's from Becca that I purchased about 6 months ago. While I fell in love with two of the four really quickly, this one kind of got thrown into a drawer and for some reason I decided to pull it out last week and start using it. Not sure what compelled me to do so but thanks to whatever intuition I should thank for my now glowing skin! It has a nice, flat applicator that makes it really easy to dab one side on one cheek, flip it over and dab the other side on the other cheek! Then I use my beauty blender to blend the product well into my skin so I have no harsh edges (I should note that I always apply it after my under eye concealer as my last liquid product. I then set my under eye concealer with powder and finish my face with my other powder products). I love how dewy and healthy it makes my skin look. The nice thing about the full size version of this product is that it comes with a pump so you can mix it in with foundation or moisturizer to give you an all over dewy illumination. It will definitely be added to my beauty wishlist.

While I haven't mentioned it for awhile here on Dre Does I reach for my Aveda Beautifying Composition often especially as the weather starts to get chillier. Recently I've been noticing some random dry patches around my nose and eye area so I pulled out my trusted friend and have been adding a drop here and there to combat these random flaky spots. I love the aroma and the versitility of this product and will never be without it. Click here to see a post I did on it more than a year and a half ago showing 11 uses for this magical product!

Cycling or spinning (depending on what you call it...haha) used to be a huge part of my life. When I was a senior in high school my mom dragged me into a class with her and I was hooked! I am super competitive by nature and loved being able to push myself every class. I started going multiple times a week and it became a huge part of my workout routine. I slowly got out of it as college and life got busier and it had been years since I have done it. A few months ago though, the gym at my apartment complex got a spin bike and I couldn't have been more excited. I dusted off my spin shoes and have been spinning at least 4 times a week since! I forgot how much I truly love the workouts. You can find great spinning workout ideas on Pinterest if you need some inspiration. If you're not the biggest fan of running and you've never tried it I highly recommend giving it a shot! I think it's really important to find a class in your area to get started so that you can learn proper form and technique from professionals before you try it on your own.


Dre Does a 5 Minute Fall Transformation

I wanted to create a really simple look that only required a few extra minutes added onto your normal face routine to be fall ready. The focus of any quick look for me will always be my lips because it is the quickest way to add drama and let's be real...fall is all about the drama on the lips. 

When I think of fall makeup I think of warm earth tones; oranges, reds, plums, berries. All of these shades work really well with trying to extend your summer bronze and still look ready for the fall season. Below you'll see that I did my normal face routine (let me know if you want to see exactly what that looks like recently), and then used ONE eyeshadow and ONE lip product to transform my look.


For my eyes I simply applied my normal primer (Benefit's Stay Don't Stray in Light/Medium) and then packed MAC Cosmetics' Amber Lights onto the lid. It's a beautiful metallic orangey bronze color that compliments the warmth of fall so well. The thing that I love about metallic colors like this is that if you just buff out the edges with a blending brush, you look like you have a complete look because the metallic sheen giving so much dimension on your lid. Apply your mascara and you're done!

For the lips I used one of my favorite products ever; the Lorac Pro Matte Lip Color in Merlot. These lipsticks are amazing because they go on so smoothly, are so pigmented, don't require a liner to stay put, and they last forever. I love how this deep shade screams fall. 

There you have it! I took a really basic look from natural to dramatic with the use of only two products. I highly suggest you go through your collection and find duos like this that work well together and take note of them. This way when you're running late in the morning or at night, you can quickly amp up your look in no time at all. You could even wear just the shadow for work and add the lips just in time for happy hour with your friends!

Let me know if you find any great combos! 

Have a beautiful day,

Dre